Pages

Tuesday, June 30, 2015

Welcome Baby Party: The Invitations (2015)

I have been working lately to host a welcome baby party for my sister and newest niece who are staying in town for a couple of weeks. Since my sister lives a few hours away (and she's all newborn exhausted) we thought it would be better to wait until she got here to set the date for her party.  That way we could make sure to plan it when my sister was (hopefully) a bit more rested.

I took a few photos of my niece on a Monday, made the invitations that night and planned the party for the following Saturday.  It was a whirlwind, but well worth it!

Usually I like to construct paper invitations, but there was no time for that (or the time it would take to mail them).  I knew I needed to send the invites out electronically but still wanted them to be cute, so I turned to MyScrapNook to quickly create adorable invitations.


 Pretty in Pink

The theme of the party included daisies and lots of pink.  when creating this invite, I first chose a pink polka-dot background, then layered the white 'sheet' on top.  This gave me a nice clean space to add the text and a photo of Baby D (not included here).  I added a a few pink daisies at the corners, then popped in the text.  ....Not too bad for 12:30 on a Monday night, huh?  :D

 In case you can't see it clearly, here is the text:

We are tickled pink & excited to say
That baby ____ has made our day!

Join us for a 'meet & eat'
(Cake & punch to be served)

***Don't forget to add the date, time, ect!


Free Printable

I included this blank template in case anyone wanted to use the same theme.  Just right click on the image and save to your computer.  You can print out the image as it is here, add text, use it electronically...the possibilities are endless!

I hope you enjoyed, thanks for stopping by!

-Jennifer

© Jennifer Adams Flowers 2015

Thursday, June 25, 2015

Father's Day 2015 - How We Celebrated


We had a very nice Sunday celebrating our Daddy of the house this past weekend.
Take a look at a few of our photos from the day!


 Granny's Crepe Recipe

We started the day with crepes from scratch.  This is the recipe that I followed, it's actually my Granny's.  She used to make these for us all the time and called them 'German Pancakes'.

Fun Fact:  I think Husby was about 16 the first time he ever had some of Granny's German Pancakes!


 Sugar Cookies


Husby also requested sugar cookies as a Father's Day treat.
Baby Girl chose blue icing with colorful sprinkles, some in the shape of fish....because Daddy likes to go fishing ;)

We also spent time before the weekend baking double chocolate chip cookies for Papaw, and banana bread for Papa.  Baby Girl did most of the mixing while the Little Man and I supervised :)


Cookie Close-Up

I loved how these turned out, very colorful and aquatic!

After the crepes and cookies, Husby spent the afternoon napping followed by a seafood dinner.  (It turned out that the fishy sprinkles went with the dinner theme perfectly!)

I don't know a whole lot about preparing shrimp and crab so he had to do the cooking, but he didn't mind. He wanted the dinner to be edible, after all.  (Ha ha!)

 After dinner we had a quiet evening:  I took the kids on a short walk to give my Dad a couple of Father's Day hugs and Husby squeezed in another nap before bedtime. :D :D :D

 We had a nice holiday weekend, hope you did too!
Thanks for stopping by!

-Jennifer

© Jennifer Adams Flowers 2015

Wednesday, June 24, 2015

Summer Photography - June 2015

Guess what?  I went and got busy again.  

So busy that I missed my usual Tuesday blog post!  But that's ok, I had a really good reason.  I've been spending all my time snuggling my brand new baby niece!

I'll be updating soon with posts all about her welcome party.  But for now, here are some of the summer photos I have been taking.

(I left off my watermark, use and enjoy as you wish!)


Blooming Sage


 Chives

Who knew onions could be so pretty?


 Magenta Lilies


 Orange Lilies


 Hydrangea


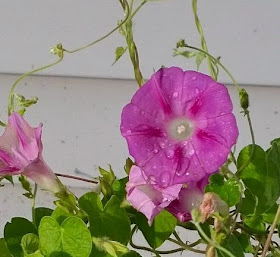
 Morning Glory


The Sky

I am in love with the sky, especially at night.  There is nothing more peaceful to me than sitting out on my porch looking at the stars.

Those are the pics from my summer so far, hope you are all having a nice one too!

Thanks for stopping by!

-Jennifer

© Jennifer Adams Flowers 2015

Thursday, June 18, 2015

Rainbow Party - Table Decor! (2015)


I'm back today with the rainbow pizza party/ graduation celebration wrap-up!

In case you missed it:

Click here to view the invitations.
Click here for behind the scenes baking fun.
Click here to see the streamer and balloon decor.

Otherwise, keep reading to see our rainbow tables :)


Kindergarten Diploma

Each student received a diploma from their teacher during the school ceremony.

The colorful certificate featured Baby Girl's name and the name of her teacher as well.  I thought it would make a great addition to our party decor and decided to (temporarily) put it into a frame.

I used the framed diploma as part of the back drop for the dessert station. This was an easy way to personalize the party decor using things I already had.  The diploma came home with Baby Girl and the frame was from my stash.

(Now that the party is over, I will be putting this into Baby Girl's scrapbook.)


Table Tops

This colorful graduation table covering and confetti were both found at Dollar Tree for $1.

I was very please with the graduation selection found at Dollar Tree!


Bubble Favors

You may remember these (Dollar Tree) bubble favors from this post.  I wanted to display them in my milk glass pedestal bowl but all of the white on white looked a little boring.  I ended up creating a nest with a few streamer scraps and liked the look much better!  By adding a rainbow of color, the centerpiece tied into the overall decor perfectly.

Baby Girl added the confetti to the table top herself ;)


Bubble Close-Up

There was no rhyme or reason here, just crunch up some paper streamers and tuck in the bubbles!


Recycled Streamers

Remember when I showed you how we re-purposed the ceremony balloons for the actual party?  When I left off you saw the photo of this weight surrounded with a handful of streamer scraps.  The colorful scraps helped to brighten up the table top, but looked a little like...well...garbage!  Hahaha! 

 Not to worry though, the addition of confetti took the look from messy to intentional.  Now the streamers look as though they are supposed to be there, instead of like someone forgot to pick up a mess!


Funfetti Cake

Complete with rainbow sprinkles and a decorative tassel, this cake was a big hit!


Chocolate Cupcakes

These were my favorite.  I can pass up most sweets, but I have a special love for chocolate!

Right:  I wasn't able to create a hanging tag for these cupcakes so I made a flat one in instead.  I cut the photo and label from the box, taped them together and then tucked the tag in among the cupcakes.

***Did you notice that my three tiered cupcake stand is now a two tiered cupcake stand?!?!?!  I'm not sure exactly what happened, but I know that the Little Man was involved ;)

One day he couldn't reach that high, the next day I was down to two cupcake stands!  I was just glad that he didn't get hurt and used a clear glass platter to make up the loss :)


Dessert Station

Here you can see the cake, cupcakes and framed diploma together.  I didn't purchase plates or napkins for this party, but instead 'shopped' my cabinet for leftover birthday supplies.  By pulling out an assortment of colorful party ware, I was easily able to convey the rainbow theme.

The addition of confetti pulled everything together.  That is what I love about table confetti; it  helps to visually connect the various items together.

I hope you enjoyed our party, thanks for stopping by!
-Jennifer

© Jennifer Adams Flowers 2015

Tuesday, June 16, 2015

Rainbow Party - Streamers & Balloons! (2015)


Baby Girl's (rainbow themed) party for her Kindergarten graduation was a lot of fun to plan and host.  It rained and rained and rained the day of the party, but we still had a great time!

I was going to share all of the decor today, but sat down and realized that there are way too many photos for just one post!  So new plan:  Streamers & Balloons today, Table Decor in the next post :)

Keep reading to see how I used streamers and balloons to create a rainbow theme.
Click here to see the party invitation.


Simple Supplies

Streamers, confetti and a couple of table coverings were almost all that it took to pull this rainbow party together.  Everything pictured here was surprise purchased  by Mamaw at Dollar Tree.

The table covering and graduation cap confetti are $1 each
while the streamers are packaged at 2 for $1.
Total cost:  $8

(Thanks Mamaw, Baby Girl loved her decorations!)


Welcome!

I used streamers at the front door to create a rainbow stripe.  If you haven't hung streamers in this way before, it's really simple.  Just tape one end down, twist the streamer until you like the way it looks and then tape down the remaining end.

The art piece in the center of the door was made by Baby Girl herself.  Her class made them at school and used them to decorate the gym for the graduation ceremony.  I thought it made the perfect party decoration as well!

FYI:  Humidity causes the streamers to stretch and lose shape.  As you know by now, I like to do the bulk of my decorating the day before the event.  With all the rain in the area the humidity was pretty high and my streamers did not look like this by the morning of the party.  They had stretched out of shape and were hanging loosely on the door.  To fix them I un-taped the bottom end of each streamer, re-twisted and then cut off the excess before taping it back into place.  This photo was taken after I fixed them, so you can see that it turned out alright!


Dining Room Window

I taped and twisted these streamers in the same way as above, but instead layered two different colors each time.  That way the streamers appeared to change color as they twisted and I was able to represent all the colors of the rainbow without having to twist six separate strands ;)

I continued this technique (not pictured) at the archways to our kitchen and living rooms as well.


Graduation Cap

This graduation cap belongs to Husby.  He wore it for his Kindergarten graduation wayyyy back in 1986.  The cap now lives in the kid's dress-up box, but I thought it would be a nice touch to pull out for the party.


Hanging Balloons

In the corner of the dining room I strung six balloons (one for each rainbow color) and hung them from the ceiling with a grouping of streamers.  This would have looked really awesome with a lot more balloons and had it gone all the way to the floor, but you know, toddlers...hee hee hee!

Next to the balloons is a cardboard graduation cap with golden streamers that I found at Dollar Tree.
Cardboard cap and balloons:  $2


In the mirror.

I took this photo for no reason other than I love the mirrors in my home.
Click here to see what I'm talking about!

Click here or here to see what I'm talking about at Christmas time!


Extra Scraps

Baby Girl went around behind me collecting the extra streamer scraps as I was decorating.  She asked if she could create her own decoration by taping some to the wall and I agreed.  I love this little rainbow design that she came up with!


Celebration Balloons

Baby Girl wanted to bring out and use the balloons that she received the day of her school ceremony.  They were slightly beginning to deflate, but it was important to her so I conceded :)

Usually I would have set this extra table up on the back patio, but remember all that rain?  :D

Click here to see how we celebrated the day of the ceremony.


More Scraps

We used another collection of streamer scraps to create a splash of color at the base of the table balloons.  It doesn't look like much now, but once Baby Girl sprinkled her confetti it looked great!

...you will have to come back in a couple of days to see the confetti and the rest of the table decor....

Thanks for stopping by!
-Jennifer

© Jennifer Adams Flowers 2015

Friday, June 12, 2015

Behind the Scenes: Rainbow Party Baking! (2015)


You didn't think we had enough cake yet, did you?  Of course not!

Read on today to see the baking I did for Baby Girl's rainbow graduation party!


Materials

Cake:  Funfetti cake mix and Funfetti icing.

Cupcakes:  Chocolate cake mix and more Funfetti icing.  I purchased Funfetti icing for these cupcakes too because I wanted a white icing that would be easy to color.  The fact that Funfetti icing comes with free sprinkles meant that I would have a lot more to use for the Funfetti cake!  (We must always be savvy with our purchases, my friends, we must always be savvy!)

Tip:  Packages of sprinkles make wonderful distractions for curious toddlers ;)

Tip:  Get that crock pot out now!  You are going to be in the kitchen for a long time baking and decorating...who wants to cook dinner?  I don't, so I almost always plan a crock pot meal for my baking days (this time we had ranch pork chops).  You'll thank me later! ;)

Ranch Pork Chops:  For every 4 pork chops, add 1 can of cream of chicken soup and 1 packet of ranch seasoning  (Husby likes things to be extra saucy, so I double the cream of chicken soup).  Since I was starting this late morning I put the setting on low and they were perfect by 5:00 pm.


Double Layer Funfetti

I always ice in between my layer cakes, but this time I decided to add sprinkles in the middle as well.  Why not put those extra sprinkles to good use, right?

*See the little orange tassel?  That will come into play in a bit....


The icing on the cake!

After icing the middle, I layered on the top cake and iced again.  This time I added a lot of sprinkles to the top.  I wanted the cake to be very rainbow-y!

.....word of the day:  'Rainbow-y' ;)


Finished Cake

I love this cake!  Clean, simple and perfect for the rainbow party theme.


Tag and Tassel

Now here is where I incorporated the tassel.  After adding the Funfetti tag (made from the cake mix box) I also added this little orange tassel.  This was a Dollar Tree find that I thought would be adorable as a cake stand topper for the party.

Eventually I will add it to Baby Girl's scrapbook.  For that reason I liked that it has a little 2015 charm.

(You can click here to see an example of how I make my tags)


Coloring Cupcakes

I wanted the chocolate cupcakes to be iced in red, yellow, green and blue with coordinating sprinkles on top.


Mix it up!

I mixed up each of the icing colors before starting to decorate.  That way I could made sure that each color was of the same hue.  In other words, I didn't end up with lighter shades of some colors and darker shades of others (dark red but pale blue, etc).


Add Sprinkles

Tip:  While it would be faster to ice all of the cupcakes at once and then go back and add sprinkles, I recommend adding the sprinkles each time a cupcake is iced.  That way the icing is still soft and the sprinkles stick better.


The Finished Cupcakes!

These rainbow cupcakes turned out really nicely, and looked great next to the Funfetti cake.

 Come back next week and I will post with the rest of the party details.

Thanks for stopping by!
-Jennifer

© Jennifer Adams Flowers 2015

Tuesday, June 9, 2015

Decorating a Watermelon Cake


Watermelon Cake

You may remember from last week that I made a watermelon cake to celebrate Baby Girl's graduation ceremony.  Today I'm going to tell you all about how I pulled the cake together!

(You can click here to read more about how we celebrated that day)


Cake Mix

For this cake I purchased a Betty Crocker seasonal mix and (green) icing in watermelon.  I loved the picture of the pink cupcake on the box, especially the little black watermelon 'seeds'.  I was pretty sure it would be a hit with my Baby Girl as well ;)


Mixing Up

So I opened up the box to find a white mix and was disappointed...but as soon as the liquid was added the mix turned a lovely shade of pink :)

If you look closely you can see very tiny flecks of cookie that came with the mix to serve as watermelon seeds.  I wanted my seeds to be a bit more obvious, so I added in a few chocolate sprinkles.

Fun Fact:  As you can tell by the photo, I mix up my cakes by hand.

Yes, we have an electric mixer.  Nope, I have never, ever used it.  I think the only time it gets used is when Husby creates sauces or whip cream from scratch. (Yeah, I don't do much of that whole 'from scratch' thing either...Hahaha!)

My Granny gave me this wire whisk a long time ago, and it's the only thing I ever use.  I don't know why really, I guess it's just out of habit.  ....I also have only one knife that I will use for cutting everything from pizza to vegetables...even though we have a ton of knives and I think two pizza cutters.  I guess I'm just simple like that :D :D :D


Icing Decor

The watermelon flavored icing came in a lovely shade of bright green, but I wanted to add a bit more dimension to the cake.  (You know I can't leave things plain!)  I pulled out some Wilton sparkle gel from the cabinet (thanks Mom!) and decided to color it a deeper shade of green.  A few drops of green food coloring and it was ready to go.

(To read more about how I use sandwich bags to guide my icing, click here)


Watermelon Swirls

Left:  I decided to use the green sparkle gel to create sort of a vine look to the top of the cake.  It's important to remember that you don't have to always make things look exactly as they would in nature.  Sometimes the general idea is just as lovely ;)

Right:  After placing the swirls, I sprinkled a bit of green and chocolate sprinkles.  These added a bit of texture and a lot more fun to the cake.


My Signature Tag

As always, I cut the cute little cupcake photo from the front of the package and turned it into a hanging tag.  It's a simple step that adds so much to the overall look of the dessert!

Fun Fact:  Speaking of Granny, she also gave me this hole punch when I was in elementary school.  I have always loved art and design and creativity.  She knew this so one year for Christmas she made up 'Art Boxes' for me and my siblings.  Each box consisted of a big Rubbermaid tub filled with paper, paints, glitter, tools, you name it!  I still have (and use) my hole punch and stapler :)


The Finished Cake

Into the extra fridge this went to wait until celebration day!


Pink & Green

The best part of the cake was when it was cut open and the pink was visible, that's when it really had that watermelon look!  ....at least that was my opinion.  Husby and the kids thought the best part was when they got to eat the cake!

The cake tasted like candy, so they loved it.  I however tried a bite and decided to pass.  I would much rather prefer to wait for the chocolate cupcakes that we had for the family party ;)

 ***Come back in a few days and I'll share the details from the rainbow graduation party***

I hope you enjoyed this yummy post, thanks for stopping by!
-Jennifer

© Jennifer Adams Flowers 2015