Pages

Thursday, December 31, 2015

Kids Room Fun - Christmas 2015

I know this is almost a week late, but I promised an update that included our newest Christmas tree.
(We had four different Christmases to celebrate, I've been busy!)

  Soooo.... here are a few photos from the kids room this year:


Little Tree

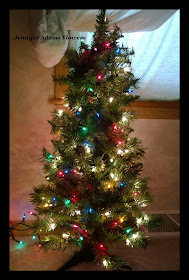
We decided on a smaller (three foot) tree for this room.  I mean let's face it, the tree was not going to stay upright with a toddler in the area :)

Baby Girl really wanted this tree to have colored lights.  (It came pre-lit with white lights - $20 from Wal-Mart).  I added a bit of garland to fill it out and then a strand of colored lights.  Eventually we would also like to add ornaments and a star on top, but it's better to wait until the Little Man is a bit older ;)

**********

In addition to the tree, I also added a few colored lights to Baby Girl's doll houses.  I did this while she was at school one day so that she could come home to a nice surprise :D

(The doll houses and furniture are Little Tikes and were made in the 90's.  Baby Girl uses them for her Lalaloopsy dolls)

Scroll on to see the pictures:


I loved how it turned out, it made the room so magical!  Baby Girl enjoyed playing dolls in the glow of the lights, she had a lot of fun.

I hope everyone is enjoying their holiday celebrations as much as we have been!  I'll be back soon with pics from how we celebrated.

Thanks for stopping by!

-Jennifer

© Jennifer Adams Flowers 2015

Friday, December 25, 2015

Dining Room Christmas Decor Update 2015


Ok, ok it might be late evening on Christmas day but.....
.....welcome back to my holiday dining room!
Read on to this year's decor updates:

(You can click here to see the rest of my dining room decor)


Large Ornaments

If you remember from last year, I already had a couple of really large gold ornaments that I use for this tree.  They looked great, but I really wanted to add a few more.  I found the large golden ornaments (pictured above) at Dollar Tree and purchased 10 in varying finishes; shiny, glittery, matte and multi tonal.


Mini Battery Lights


My Grandma purchased a set of these lights for me last month while we were shopping together. Found at Wal-Mart, I believe they were around $3.

These lights area really cool!  Each light is very tiny and attached to a wire like string.  Because they are on a battery pack you can use them in wreaths, bouquets, filler bowls, etc.  I decided to use my set in our holiday village.


The Tree is Lit!

Here you can see the mini led lights in use.  I thought the set that I had got was clear, but ended up being red in color.  That's ok, I am pleased with the way it turned out!  

Another really cool thing about these lights is the fact that the battery pack comes with a timer.  Simply turn them on at the time of day you want them to operate, and they will run a few hours before automatically shutting off.  The next day the lights turn right back on by themselves (at the same time as before).  I really like this feature because it means one less thing that I have to remember!  In addition to the timer you have the choice of steady or blinking lights -ours our set to slowly blink.


Village 'Snow'

I also decided to add a snowy effect to our village this year.  I had a couple of tulle wrapped light strands (left over from the Little Man's welcome baby party) that I thought would work perfectly.  I plugged them in and arranged the lights into 'piles' around the buildings.  The results were exactly what I wanted with whimsical drifts of snow now filling our display.

(You can click here to see these lights in use during the Welcome Baby Party)

Happy decorating and thanks for stopping by!
-Jennifer

© Jennifer Adams Flowers 2015

Tuesday, December 22, 2015

Christmas Hand & Foot Print Art (2015)

Let's give a big thank you to Pinterest for the inspiration needed to create these cute holiday paintings.
Check them out:


Reindeer Feet

A couple of eyes, a red nose and a pair of antlers transforms a footprint into and adorable reindeer.


Fingerprint Lights

For this one is was easiest to: sketch out the curvy line first, then place the colorful fingerprints and follow up with a  little more black ink for the bulb detailing.

Tip:  Make sure your colored paint is dry before adding any detailing!


"Mistletoes"!

A few red dots of paint to serve as berries and these cute prints are transformed into mistletoe.

I hope you enjoyed this crafty post, thanks for stopping by!

-Jennifer

© Jennifer Adams Flowers 2015

Monday, December 21, 2015

A Skirt For Elfie

Every good elf needs a holiday outfit, right?  Baby Girl felt that her elf friend (Elfie) needed something to wear other than her red felt pajamas.  We decided that a holiday skirt was in order and whipped one up with materials pulled from the supply bin.

Read on to see how easy it was to create a skirt for our holiday friend:

(You can click here if you didn't get a chance to meet Elfie)


Materials

Ribbon and cotton lace trim were all I needed to pull together this 'outfit'

Side Note:  Thank you to my Grandma who gave me a box of her old ribbons, laces and trims!


Step 1

After cutting the cotton lace to the size that I wanted, I hand stitched a couple of lengths of ribbon to serve as ties.  I didn't get very technical here (do I ever?) and just eyeballed my measurements.

Side Note:  I was out of red thread so we'll just pretend that we wanted the white stitches to show ;)


Detailing

Because Elfie is a fancy elf, Baby Girl thought we should add glitter to her skirt.

We used a bit of glitter glue from the kids craft bin, you can find this at Dollar Tree.


Step 2

Add a layer of glitter and let dry.

We were ok with the sort of opaque look, but if you want a darker embellishment simply add more layers of glitter glue.


Ready for the Runway

And here is our Elfie, ready to rock the holiday in her new skirt!

I hope you enjoyed this how-to post, thanks for stopping by!

-Jennifer

© Jennifer Adams Flowers 2015

Friday, December 18, 2015

Elf on the Shelf (2015)


A few Christmases ago, Baby Girl received the plush version of Elf on the Shelf from her Aunt Mary and Uncle Jim.  Baby Girl decided that this elf is a girl and named her 'Elfie'.

Elfie lives a relaxed life with us; we don't restrict her to her shelf, and she is allowed to be cuddled and played with as often as Baby Girl likes.  In fact, she spends the entire Christmas season sleeping on Baby Girl's pillow......

.....It's really strange though, even though Baby Girl carefully places her on her bed each morning, Elfie somehow manages to roam the house.  Elfie gets herself into all sorts of situations, take a look!


 Hanging from the ceiling fan & hiding in the tree.


 Upside down from the kid's shower curtain & hiding out in Baby Girl's stocking.


 Parade of trucks.


A meeting with the zoo animals & a soak in the Barbie tub.


Under the bed & in a wreath.


This isn't all of the fun we have had with Elfie, we also decided to make her a festive skirt to wear.  Stay tuned to read all about the latest in elf fashion!

I hope you enjoyed this holiday post, thanks for stopping by!

-Jennifer

© Jennifer Adams Flowers 2015

Tuesday, December 15, 2015

Kitchen Christmas Decor - Update 2015


Welcome back to my holiday kitchen!  Read on to see what's new this year....


New Ornaments

This year's additions to the candy tree included a couple of pink and white candies and a few snowflakes.

The candies were found at Wal-Mart for $1 - Baby Girl and I each got one of these.

The snowflakes came as a surprise in my package of decorative cookies that I received from the Oodlekadoodle store (on eBay).  I already had two little gingy figures and an artificial peppermint that I decided to glue into the center of the snowflakes.  The small additions really helped the snowflakes blend in to my candy tree.

Like these snowflakes?  I saw them in packs of six at Dollar Tree.  Leave them plain or upgrade as you wish.

(You can click here to read more about my decorative cookies and find the link to the Oodlekadoodle store)


Peppermints

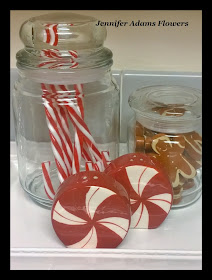
These peppermint salt and pepper shakers look adorable displayed with jars of faux candy canes and gingerbread men.  The shakers were a treasure hunting find at .50 for the set.

(You can click here to read that treasure hunting post)


Gingy Towel

I received this towel as a gift from my parents last Christmas.  Since it contains a recipe in the design, I made sure to lay it out flat next to one of my gingy boxes.


Gingy Rug

This rug was a birthday gift this year, also from my parents.  I think it looks absolutely perfect in front of the stove!


Gingy Table Cloth

Another birthday gift, this table covering is absolutely adorable!  I loved the way it looked on the kitchen table...until I realized that if I left it there it would be completely stained up by the end of the day.  The Little Man does his best, but those not-quite-two-year-old hands tend to spill and drop quite a bit ;)

I decided to be really clever and use it as a Christmas tree skirt instead.  That way it could still be out and enjoyed in the kitchen, but stay much cleaner.  

Or at least I thought so anyway....The Little Man finished his snack....climbed down from his chair....walked over to the tree skirt....picked up a  corner of it....and proceeded to use it as a giant napkin and wipe his entire face!  Sigh....:D


Gingy Cloth Tree Skirt

Here is the table cloth turned tree skirt complete with our stuffed gingy family.  Once the face wiping fiasco was over, the cloth has stayed nice and tidy :)

(You can click here to see the rest of my kitchen Christmas decor)

Hope you enjoyed the post, thanks for stopping by!

-Jennifer

© Jennifer Adams Flowers 2015

Wednesday, December 9, 2015

Tips For Lighting Your Tree


Here is a 're-blogged' lighting post from last year's Christmas:

Once I got my trees up and filled out with evergreen garland, it was time to light 'em up!  Read on to see the lights I use and how I give each and every branch attention...

(Click here if you missed the post about using garland to improve the look of an artificial tree)

 ~~~~~~~~~~
First up:  Kitchen Tree

Kitchen Tree Lights

For this tree I used three strands of basic led holiday lights in white.  I really like white lights, and use them for all of my trees.  Because I use so much color on my trees within the ornaments, I feel that colored lights would get a bit too busy.

And as you can see, I like a lot of lights!  I want my trees to glow with 'Christmas magic', so I put on about twice the amount of lights actually needed to cover the tree.  I also wrap each branch individually with the light strands.  I start at the bottom of the tree and run my light strand all the way to the trunk.  Whichever branch is closest will be my starting point and I run the lights all the way down the top of the branch to the end. I then run the lights back toward the trunk again, this time along the underside of the branch.  Once back at the trunk, I hop over to the next branch and continue on the same way until each and every branch has been individually lighted.

I learned to light the tree this way from watching Martha Stewart several years ago.  Martha took it a step further and actually ran an extension cord with several outlets up the trunk of her tree so she could plug the lights right into the trunk.....I haven't gone that crazy.....yet.....:D

It only takes the first two strands of lights to cover this tree in the kitchen, then I use the third one just to add extra light.  I love the fact that during the night at Christmas time, we don't need any lamps.  Just turn on the trees and the house is bright enough all right.  I also like to have the trees on all day if we are home.  It makes the atmosphere so much more 'Christmassy'!

Tip:  If you are able to swing it, have each branch of the tree perfectly covered with your light strand (and it's extender outlet plug) ending exactly at the top.  This makes plugging in the star at the top of the tree so much easier.  Somehow, this always works out on my trees!

Kitchen Tree

All lighted and ready to go, this tree is ready for a whole bunch of sweet treats!

~~~~~~~~~~
On to the Dining Room....


Dining Room Tree Lights

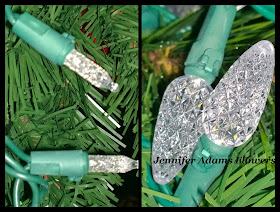
In the dining room I first used two strands of strands of simple LED holiday lights in white.  After covering the entire tree in these lights, I then followed up with another set of LED holiday lights (also in white).  The second set of lights features a much larger bulb with decorative notching.

I love layering lights, I think the different sizes and textures give the tree a much bigger personality!

The Dining Room Tree

I took a picture of this tree first with just the simple led lights (left) and then again after layering on the larger fancy lights (right).  The layering of the lights gives the overall look a greater depth and richness.

You can sort of see the difference in lighting ---- I had major issues in getting my camera to properly take a photo of the big led lights.  For some reason it kept blurring the larger lights, no matter what setting I used.  I think I have the settings better figured out now, so the upcoming post with ornament pictures should be a lot better ;)

~~~~~~~~~~
And on to the Living Room....


Living Room Tree Lights

The living room tree is my big guy, so it gets a total of five strands of lights.  First I strung three strands of the large led lights (the same way I described earlier) and then followed it with two strands of smaller led lights.  For this tree, both sets of lights feature the pretty notching on the bulbs.


The Living Room Tree

This guy is now ready for ornaments and presents!


Kitchen * Dining Room * Living Room

Now that the trees have been filled out with garland and properly lighted, we can move on to decorating.  Come back soon, I'm working overtime to get all of these holiday posts written and published in time for the season :)

Hope you enjoyed the post, thanks for stopping by!

-Jennifer

© Jennifer Adams Flowers 2014


Tuesday, December 8, 2015

Ornaments 2015


Hello!

I'm back today with this year's ornament update, check out the latest to our collection:


Seashells and a Mermaid


The seashells came from Husby's Mom.  She was cleaning out some of her storage and we were lucky to gain a few ornaments!  Baby Girl, Little Man and I each claimed one for our own.

The mermaid was mine...until Baby Girl saw her.  I found her while treasure hunting this summer, you can read about that by clicking  here.


Starburst & Antlers

Baby Girl and I each got one of these starbursts for .75 while treasure hunting (post  located here).

The antler wreath is from Wal-Mart, Baby Girl picked it out for Husby.


Glittery Ducks!

These ducks are also from Wal-Mart and retail for just under $1.  When I saw ducks, we each had to have one!  Baby Girl and I have a pink one, Husby is yellow and the Little Man has a blue one.


'Choo Choos' & 'Melmo'

The Little Man also got these from Wal-Mart; a couple of 'choo choos' and his buddy 'Melmo'.  The trains were $1 each and I think the Elmo was around $8.


The Big Ornament Tree

And here is a shot of our tree this year.....yes, the ornaments go all the way around to the back :D


Night Shot

I couldn't resist adding a night shot as well, it's just so pretty!

You can click here to see the rest of our sentimental ornaments and living room decor.

I'll be back tomorrow with a re-blog of last year's lighting tips.
I hope you enjoyed the post, thanks for stopping by!

-Jennifer

© Jennifer Adams Flowers 2015

Saturday, December 5, 2015

Using Garland to Improve an Artificial Christmas Tree

Hey everybody!  
As promised, here is a re-blogged holiday post from last year.  Read on to learn how garland makes any artificial tree look a million times better!


I have three artificial trees for my home (yes, three!) that I love for several reasons:

*I don't have to go out and buy a tree every year, or worry about disposing of one.

*Artificial trees don't need water or maintenance, so they are easier to care for.

*Since they are not going to age, I can put my artificial trees up as soon as Thanksgiving is over and enjoy them much longer.

*Because the branches are wired, I can pose them as I wish, which means greater design flexibility!

For me, the benefits of artificial trees are endless.  But there are a couple of drawbacks.  For one thing, there is no wonderful fresh-cut pine tree scent filling your home.  I love that smell, so I buy evergreen scented wax cubes for my Scentsy warmers.  Problem solved ;)

Another problem with artificial trees is the fact that most times they look....well...artificial!  There is no getting around the fact that those branches have a lot of wire and plastic hardware in place to keep them attached to their 'trunk'.  When I look at my trees I want to see lush pine boughs, lots of lights and beautiful ornaments, not weird sticks, color coded tabs or - and this is the worst- the wall behind the tree.  Nooooo Sir!

 (Just look at the picture below!)


The wire branches, color coded tabs and plastic rings all clearly visible.  I took this photo of my living room tree after I spread out all the branches.  In order to fix this problem I started using evergreen garland to camouflage the hardware of my trees.

Today I will share with you how I go about doing this, but first let me introduce you to my trees;


Tree 1:  This is my kitchen tree.

This tree is a small 6-foot tree available at Wal-Mart.  I think they are economically priced at around $20 for this size, but I found mine while treasure hunting and only spent $5.  This is a good tree for smaller homes or apartments, as it is relatively skinny.  The tree is not pre-lit and comes completely disassembled. Each and every branch must be put into place.  The branches are basic faux greenery, all of one type.


Tree 2:  This is my dining room tree.

This tree is a super gorgeous, super fancy tree from Prairie Gardens, and stands at 8 feet tall/ 3 feet wide (at the base).  This tree used to be a pre-lit tree, and easily pops together in just three sections.  The branches are composed of two different types of high quality faux greenery and have real pine cones as well.

I was treasure hunting one day when I walked  up to a sale and saw this tree with a sign on it that said 'FREE'....huh?!?!?!  Of course I asked right away why such a nice tree was being given away. The lady explained to me that this was a really nice, really expensive tree from Prairie Gardens.  She paid almost $300 for it, but the lights didn't work anymore and she didn't feel right selling it to anyone that way.

Well let me tell you, I snapped that free tree right up!  It did take me nearly 45 minutes to remove all of the lights.  The lighting was so well done that I had to use wire cutters and individually clip each branch away from the lights, but it was worth the effort.  Now with the addition of new lights, the tree is good as new!


Tree 3:  This is my living room tree.

Measuring in at 8 feet tall/ 5 feet wide (at the base), this is my largest tree.  The tree comes completely disassembled and the branches are composed of two different types of artificial evergreen.  This tree is big!  We needed a really big tree to house all of our 'yearly' ornaments, but I'll get to that in an upcoming post.  I purchased this tree 5 years ago from Wal-Mart for $80.

Now that you know my trees, lets get started!


 The tools you will need:
A decent pair of work gloves and your vacuum cleaner.

Tip:  Faux trees are created with lots of heavy duty wire.  While the wire gives the trees their shape and allows positioning of the branches, all of those ends are sharp.  In addition, the foliage itself is also very scratchy.  I highly recommend wearing long sleeves and a pair of gloves if you are going to work extensively with your tree.  Because the garland needs to be tucked inside the branches near the trunk, you will be reaching far into the tree.  Any bare skin will be scratched like crazy!

Tip:  I heard someone say one time that they wanted an artificial Christmas tree to avoid having to clean up all of the needles that a real tree drops on the floor.....Haha, good luck with that!  Faux evergreen trees (and garland) drop tons of little plastic 'needles' all over the place.  And the more you work with them, the more they drop.  I can't stand a messy floor, and I don't want the needles tracked through the house, so I run the vacuum after each step of the set up process...and again after lighting...and again after decorating....I can't believe my trees aren't bald at this point!


 Artificial Evergreen Garland

When it comes to choosing a garland, there are all kinds of lengths, thicknesses, colors, textures, etc.  In fact, each of my three trees has a completely different type of garland in use.

I took the photos here because I wanted to show you how long and skinny the garland that I use for my dining room tree is.  Left in it's original state, this garland would take forever to mask the hardware of the tree, so I make it shorter and thicker.

I do this by taking each length of garland, folding it in half and twisting it into place.  Now I have lengths of garland that are half the size and twice as thick, and I repeat the process.  What I end up with is very short but full lengths of garland (pictured on the right).  These smaller and fuller sections are much easier to tuck into the tree and cover more flaws at once.

I suppose you could cut your garland apart before twisting, but then you could never revert back to the original long sections.  I never know what I'm going to want to try next, so I like to keep my options open.  By not cutting my greenery apart it can always still be used for other things.  Versatility is important to me ;)


 This is my kitchen tree.

Left:  The tree as is comes out of it's box.  When you remove your branches from the box, they are going to be very skinny and all smashed together.  This is good because all of the smashing allowed the tree to fit inside of the box, but it isn't all that pretty.  Look at that poor thing!

Middle:  This is the tree after I individually fluffed out every single branch.  You can see that it's starting to look a whole lot better, but is still very weak and spindly.  And if you look near the 'trunk' you can see the wires of the branches.  I don't know about you, but I never saw a tree in the woods that looked like that!

Right:  This is the tree after I have added five sections of garland.  Not only is the tree now lush and full, but all of the mechanics have been hidden :)

How To Garland:  The branches of an artificial tree radiate out from the base in several tiers, one on top of the other.  I consider each tier of branches to be a 'shelf', and tuck the garland around the trunk on top of this shelf.  Just play with the garland and continue adjusting until you can no longer see any hardware.  I like to take a step back and view my tree from a few angles in order to check for any missed spots.

....Can you see the amount of needles on the floor? Sigh....


Here is another pic of the same kitchen tree.

What in the world is the deal with artificial trees always having this super long branch sticking straight up at the top?  I suspect it's to 'add height' without adding more tree.  As in, "Look! The box says that this tree is 6 feet tall"...then you get it home and it's a five foot tree with a foot of green stick at the top!  :D

Anyway, I'm not really into the whole Dr. Seuss look, so I always take the stick at the top and fold it in half.

So.  Much.  Better!
:D :D :D


Dining Room Tree

Even the expensive trees can use a little help, look at all those holes!

(Although I will say that this tree doesn't require that the branches be individually spread out and shaped.  This tree easily pops into place without a lot of fussing)


 Dining Room Tree

If you viewed this tree from the kitchen before the garland was added, you could almost see out of the window through the poor thing!


 Dining Room Tree

In this set of photos you can really see the extensive 'holes'.  I did not take the framed photograph off of the wall behind the tree, I just added garland ;)


The Living Room Tree

Even the big guys need a little help sometimes ;)

When I worked in the floral shop, we called techniques like this, "hiding our secrets".  Any time something looks perfect, you can bet there is a lot of wire, glue or plastic involved, but you don't want all these mechanics to be seen. Using visual tricks, like garland inside of your tree, helps to cover up unsightly hardware.
 Don't the trees look so much nicer all filled out?  I love how much more prominent they become, more respectable!  

I'll be posting soon with my lighting and decorating tips, but in the meantime I would love to hear from you.  What tricks do you use to create a beautiful looking tree?  Pictures are always welcome :)
I hope you enjoyed the post, thanks for stopping by!

-Jennifer

© Jennifer Adams Flowers 2014