Pages

Saturday, January 30, 2016

Construction Party: Birthday Decor

Welcome to the Little Man's construction themed birthday party!

You can click here if you missed your invitation, otherwise
come in and see how we decorated:


Balloons

The orange, yellow and black balloons really helped to set the tone of the party.

(Want to read all my balloon tips?  Click here)


Blueprints & Hard Hat

This shot is of the coffee table, which I like to use as the gift table.
Once the gifts are piled on top you can't really see the decorations anymore, but it looks great in the meantime ;)


Table Decor (Dining Room)

Each table first had a black table covering in place followed by a large blueprint sheet.  I then used orange napkins to add color before arranging the tool containers.  Lastly, I followed up by scattering washers and nuts as confetti.

You can click here to read more about the materials that I gathered for this look.


Table Decor (Living Room)


Table Decor (Kitchen)


Wall Art

I had a few extra blueprints left over from the table decorating and decided to turn them into wall-art.

A couple of sheets of colorful scrapbook paper layered on top made the perfect backdrop for these print-outs:

Left:  CAUTION 2-YEAR-OLD AHEAD

Right:  DANGER HARD HATS REQUIRED

(Inspiration found on Pinterest)


Pipe Plans & Husby

I framed one of Husby's pipe plan sheets and propped it up at the dining room window.
Next to that I added a framed photo of Husby from one of his job sites.  He's to cute not to be part of the decor ;)


Desserts

***I'll be back next week with the dessert details***

But for now, check out the saw!  Who needs a cake server when you can cut the cake with a saw?!?!?  Baby Girl really enjoyed cutting the Little Man's cake for him using this construction tool - she even wore safety goggles ;)


Cake & Cupcake Close-Up

You can see in these photos that I carried the blueprint theme here as well.  I cut the sheets into smaller sizes (so they would fit onto my counter tops) and used napkins to add layers of color.   A sprinkling of washer/ nut confetti and a welding caution sign completed the look.

And that was our construction themed decor.
I hope you enjoyed our party, thanks for stopping by!

-Jennifer

© Jennifer Adams Flowers 2016

Tuesday, January 26, 2016

Design Materials for a Construction Themed Birthday

The Little Man is turning two and we celebrated with a construction themed birthday party.

After looking at ideas on Pinterest, most of what is available (for decor) seemed to either be Bob the Builder or strictly roadwork themed.

Now, there is nothing wrong with Bob or road construction, for that matter.  But the Little Man's Daddy is a welder (shout out to the United Association Local 149!) and his Papaw is a drywall finisher (shout out to the Painters Local 363!).

I wanted the decor to be reflective of these family trades and construction work in general....so that meant I had to get creative!

Check out the items I gathered to pull it off:


Paper Goods & Balloons

I think the easiest place to start when theme designing is with color choice.  Choosing 2-3 colors that relate to your theme helps to set the foundation for the overall look.  

For this party I went with orange, yellow and black.


Blueprints!

After starting with a black table covering, I wanted a large statement piece to set the tone.  I thought blueprints would be an excellent choice.

A big thank you to my Dad and Husby!  Dad brought me blueprints from one of his job sites and Husby provided me with some awesome piping plans from one of his old apprenticeship books.


Centerpieces

I decided to use tools as my table centerpieces.  Going left to right we have:  bolts, welding rods, pliers, a screwdriver, bolts, a level, a small pipe wrench and more bolts.

These were really easy to find, all I had to do was borrow from Husby and my Dad again ;)


Trucks

We can't leave the road crews out though, right?!?!?!  I bought four of these little plactic CAT trucks from Dollar Tree and put a couple into vases as well.  

The other two were used for the cake/cupcakes, but we'll get to that in an upcoming post ;)

These trucks were packaged in twos, so the total cost was $2.


Tools

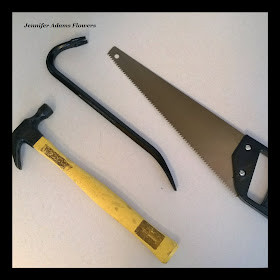
I had a few tools (also from the garage) that I stuck here and there among the food/ dessert tables.  

The saw had a very important function, but again, you will have to wait for an upcoming post ;)


Candle Holders

Husby made these candle holders for me a very, very long time ago when he first started welding.

I pulled them down from my shelf to use for the party.  They are just the right size to hold a cup full of utensils.


Washers & Nuts

Another bag of goodies that I 'collected' from my Dad.
I used these washers and nuts as table scatter.


Danger

This sign from Husby's work bench made a great addition to the dessert table.

Side Note:  It's true, watching a welder at work can cause blindness!


Candle

Remember those stickers from the party invitations?  I had a few leftover and applied them to a jar candle.  Cute, huh?  :D

(You can click here if you want to read more about the party invitations)

So that's what I had to work with, come back later this week and I'll show you how it all came together!

********************

I hope you enjoyed this party decor post, thanks for stopping by!

-Jennifer

© Jennifer Adams Flowers 2016

Thursday, January 21, 2016

Pink Lemonade Birthday Cake


If you happened to read yesterday's bakery post featuring a strawberry cake, then you know that I have another yummy cake to share with you today.

You can click here to get caught up with the strawberry cake, or keep scrolling to read about the pink lemonade cake pictured above.


Supplies

I used Pilsbury cake mix and icing in pink lemonade flavor.


Pretty in Pink

After applying the icing, I topped the cake with multicolored heart-shaped sprinkles.  

I also added a variety of pink candles; some hot pink, some light pink, some pink and white striped and a special re-lighting pink candle in the middle ;)


Dressed & Ready

I cut out the cupcake photo along with the pink lemonade tag and attached them to my cake carrier with yellow ribbon.  And that was that, a pretty cake all ready to go!

I hope you enjoyed this how-to post, thanks for stopping by!

-Jennifer

© Jennifer Adams Flowers 2016

Wednesday, January 20, 2016

Strawberry Birthday Cake


My Sister-In-Law (Leslie) had a birthday celebration this past weekend.  She wanted a strawberry cake this year so I made one for her to take home.

Last year she had a pink lemonade cake....which I just found the photos for hidden in my blogger dashboard...oops!...so I'll share those this week too.

But for now, check out this strawberry goodness:


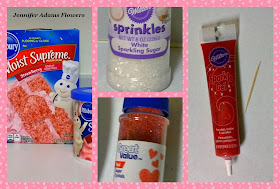
Supplies

I used Pilsbury mix and icing in strawberry flavor for the cake.  

For the decor I used a combination of red and white sprinkles paired with red sparkle gel icing.


Toothpick Trick

The easiest way for me to write anything on a cake is by sketching it on with a toothpick first.  That way if I mess up or the design isn't perfect, all I have to do is smooth out the icing and try again.


Sparkle Gel

Next I used the red decorator gel to add in Leslie's name - this was super easy since I had already put the lettering in place!

The cake needed a bit more detail, so I free-handed a few circular designs.


Sprinkles

A few white sprinkles helped to dress up the cake.


Candles

I added a few candles here and there.  

Unless they are for children, I don't bother with a specific number (age representation) of candles when I make cakes.  Instead I add them based on aesthetics.  If it's cute, it works!


More Sprinkles

I felt that the cake needed something more, so I ended up adding in a few red sprinkles as well.  This helped to tie the red and pink colors together, for a more cohesive look.

And that was Leslie's strawberry cake...pink lemonade coming soon! :D :D :D

I hope you enjoyed this bakery design post, thanks for stopping by!

-Jennifer

© Jennifer Adams Flowers 2016

Friday, January 15, 2016

Roses, Ribbons & Lace

Valentine's Day will be here soon and I have the perfect love themed wedding set ready to go!

Check it out:


This package features a romantic combination of red and white roses, white lace, satin ribbon and beaded detailing.


Bridal Bouquet


Maid of Honor


Bridesmaid's Bouquets


'Toss' Bouquet


Corsages & Boutonnieres

This 17 piece package will be available in my eBay store soon!

Want to see what is currently available?  Check out my eBay store here

Thanks for stopping by!

-Jennifer

© Jennifer Adams Flowers 2016

Wednesday, January 13, 2016

Winter Decor (2016)


The day after Christmas I took everything down.  Ok, the night after Christmas.  I stayed up until 2am in the quiet, sleepy house and cleaned everything up.  The weather was warm and rainy and I even heard some thunder while I organized.  It was fantastic!

(I know it's not most people's idea of fun, but I seriously enjoy cleaning and organizing!)

Once that was done - and I slept - I pulled out the winter decor.  This will stay out for a few weeks until it's time to get ready for the Little Man's 2nd birthday party, and then I'll move on to Valentine's Day.

Side Note:  I completely and totally suggest having a child about a month after Christmas.  As soon as you get through the holiday it's time to prep for a party, and once you get that done it's pretty much almost spring!  No time for the winter blues around here ;)

Anyway, read on to check out a few of the new additions to my winter decor:


Gift Bag Art

One of us received a Christmas gift last year that came in a large snowman bag.  I cut out the snowman and LET IT SNOW lettering and popped them into a couple of gold frames.


Handprints

Baby Girl brought this painting project home from Kindergarten last year.  With a snowflake painted on the backside (not shown), it fits right in with my wintery decor.


A Mug of Cocoa

Who doesn't want a hot mug of cocoa when it's this cold outside?  This cute craft is another one of Baby Girl's Kindergarten assignments.

Side Note:  I managed to get the cotton balls in the frame by carefully applying pressure.  You don't want to break any glass, so go slowly.


Friendly Birds

These cute little birds were a Christmas gift from my Aunt.  I thought they looked quite nice in front of a frosty window :)


And that's it for this year's winter decor.
(You can click here to see the rest of my winter decor)


I hope you enjoyed this chilly decor update, thanks for stopping by!

-Jennifer

© Jennifer Adams Flowers 2016

Thursday, January 7, 2016

Construction Birthday Party - The Invitations


The Little Man's 2nd birthday will be here very soon!

This year his party will have a construction work theme, check out the invitations:


Materials

I used orange and yellow scrapbook paper to create the invitation background and printed out the information on standard printing paper.

Invitation Wording (created with inspiration from Pinterest):

CAUTION
BRING YOUR HARD HATS
(Child's Name)'s BIRTHDAY IS UNDER CONSTRUCTION
WORK BEGINS
(Date & Time)
LUNCH & DESSERT TO BE SERVED


Layers of Paper

After cutting out the wording, I layered it onto the yellow paper.  I trimmed that up and then layered it onto larger orange squares.  Pretty good, but a few more details were needed...


Stickers

....so I added a few stickers.

I figured that I could find a couple of packs of stickers for about $4 at one of our local craft sores. Butttttt, I would have had to pack up the kids and drive across town.  I seriously hate random errands!  I much prefer to do everything in one morning and in as few places as possible.

I ended up looking around on eBay just to see what was available.  Not only did I find these stickers that were perfect, but my total cost was $3 with free shipping!  Didn't have to leave the house and spent less than I had planned, yay!

In case you are interested, I purchased these here at the Grambears Crafts & Bargains store on eBay.


Stickers!

Because the two sheets of stickers contained a variety of tools, each invitation turned out a little bit differently.  I am really happy with them - it was hard to choose which one to keep for the scrapbook!

I hope you enjoyed this how-to post, thanks for stopping by!

-Jennifer

© Jennifer Adams Flowers 2016

Tuesday, January 5, 2016

Candy Cane Cake

My Mom's birthday is in late December, right before Christmas.  So what does that mean?  That means there is a whole lot of once-a-year holiday candy to choose from when baking!

Check out this candy cane cake:


Supplies


For this cake I used Pilsbury Devil's Food mix, Pilsbury chocolate icing and Hershey's Candy Cane Kisses.


Candy Cane Kisses

These holiday edition kissed come in festive silver wrappers with a cute little candy cane design.  I'm not usually a fan of peppermint, but these are subtle enough that even I enjoy them ;)


Unwrapped

The candies are just as pretty unwrapped!  


Chop Them Up

I used my favorite knife to cut the candies into small, sprinkle like pieces.


Adding Candy

I sprinkled the chopped up candy bits into the batter before baking.  Because this was a double layer cake, that meant that there was candy evenly dispersed throughout the cake.


Topping

Once the cake was iced, I used another handful of the chopped up kisses to top off the cake.  A few white candles and that was that; a pretty cake ready to eat!

I hope you enjoyed this yummy post, thanks for stopping by!

-Jennifer

© Jennifer Adams Flowers 2016