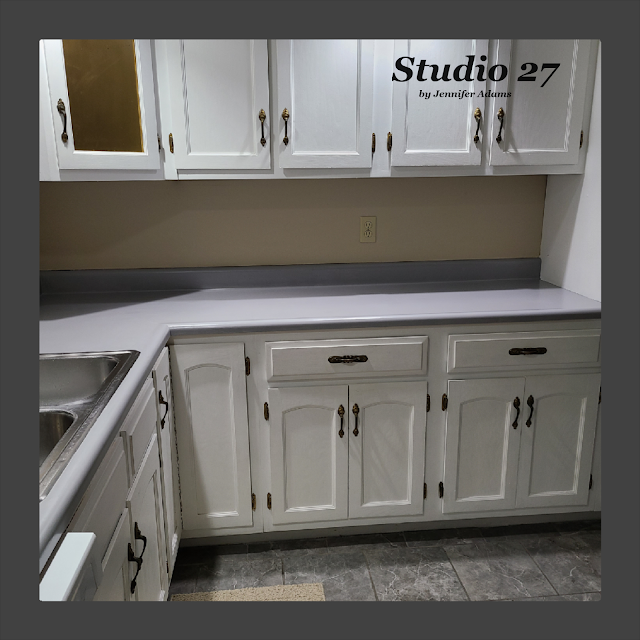
Have you ever wanted to change your countertops without having to actually install new ones? Read on to see how you can easily resurface them using ready made products:
**********
Disclosure - This post may contain affiliate links. If a purchase is made through an affiliate link then (at no additional cost to you) I will receive a commission. You can read more about affiliate links here
**********
This photo (from our home's sales listing) shows you the walls, floors, cabinets and countertops as they were at move in. I repainted the walls beige, the cabinets white and my husband replaced the linoleum with stone gray ceramic tiles - you can see those changes in this post.
Here is how the countertops looked up close - a beigy marbled laminate. I didn't think they were all that bad by themselves, but with the new tile floor it was just too much contrasting pattern.
We wanted to calm them down with something neutral and decided to use Rust-oleum's Countertop Coating. The product is available to be tinted in several different colors, and must be done so by a sales associate at the time of purchase.
The cans are a bit small so we got two just in case. If you do get multiple cans, make sure to open them up, combine them into a larger container and mix well. Because the coating is tinted at the time of purchase, it's possible to have variance between cans. Mixing them together prior to use will prevent you from painting half of your surface in one color, then opening a second can and painting the remaining in a slightly different shade.
Prep your surface by cleaning well, lightly sanding, cleaning again and then taping off the areas where the counters touch the walls. We used a small brush to cut in around the sink and then rolled on the rest. The most important tip is to make sure that your space is well ventilated! This stuff is noxious and you will definitely get light headed and headachy if you don't have enough fresh air.
The instructions on the can say that the product should cure for 72 hours before use. We managed this by painting the perimeter counters first, using the island for 3 days and then swapping. That caused the project to take almost a full week to complete, but it was better than not being able to use the kitchen at all for three days. Luckily our island has a power outlet so we plugged the microwave in there, but you could always move your small appliances to another room if you needed to.
The flat gray color really toned things down and made a calmer environment.
And that's how we resurfaced our kitchen countertops!
**********
I hope you enjoyed this how-to post, thanks for stopping by!
-Jennifer
© Studio 27 by Jennifer Adams 2025
**********
This post was added to the following link parties:
**********
Do you like the convenience of crafting or organizing with instantly available digital downloads?
Check out this week's features from my Etsy shop:
**********
**********
**********
Are you thinking of starting a blog or a seasoned author who wants to get organized? This 115 page printable bundle is for you! I created these pages for my own use and found them so helpful I thought I should make them available for other bloggers as well. Click the link below the image to read the full item description.
**********
This post was featured at:
**********


Wow, that looks so much better! You've done a fab job and saved a fair bit of money too!
ReplyDeleteHope you've had a lovely weekend. :)
Thanks so much, have a great day!
DeleteThis makeover is totally amazing, Jennifer. Well-done! Visiting from the Wednesdays in the Studio link party.
ReplyDeleteThank you!
DeleteGreat job! Something like this really transformed your kitchen! We decorated our kitchen a couple of years ago going from dark wood to white and it really brightened it up.
ReplyDeleteI love refreshing my furniture with white paint!
DeleteThanks for the useful tips, I am thinking of tackling this project this year but I am nervous about the end result. Your end result was great so it's given me hope.
ReplyDeleteSo far the counters have held up really well with minimal touch up. If I were doing it again, I would sand a little more before applying the paint. You also have to be careful about placing hot pans, the resurface paint won't hold up to temperature like stone counters would.
Delete