Saturday, March 31, 2018

Coloring Eggs - 2018


With one of my nieces in town this week I knew we had to begin our Easter fun a little early.  Together the three kids and I baked an Easter surprise cake, played with glowy eggs and I supervised while three dozen hard boiled eggs were artfully designed 😍

(You can click here if you want to read about glowy eggs)

  I'll have a new post coming soon featuring our Easter surprise cake, but for now check out these photos from our afternoon coloring eggs:


We used standard egg dying kits to create the base colors before adding additional details with markers and stickers.  Bubby preferred  a simple solid layer of color for his eggs, but the girls created layers of color by dipping the eggs in more than one hue.

The eggs in the photo above were all decorated by my Bubby while
the photos below contain eggs designed by the girls. 


The kids did a great job and had a lot of fun....especially when my two started experimenting with different ways to waste, I mean crack and peel their eggs....It's the memories that count, right? 😊

**********

I hope you enjoyed this holiday post, thanks for stopping by!
-Jennifer

© Jennifer Adams Flowers 2018

Friday, March 23, 2018

17 Piece Wedding Package - Pearls & Pansies


It's time to think spring!  Take a look at this lovely wedding collection featuring seasonal florals:

 Multi hued pansies in yellow and shades of purple, as well as purple crocus flowers, are tucked into a base of white dahlias.  The mix is then accented with tiny pearls in shades of white and lavender. 


 Bride's Bouquet


 Bridal Party Bouquets


 'Toss' Bouquet


Corsages & Boutonnieres

**********

This 17 piece package is available in my eBay store now!
Want to see what else is currently available?  Check out my eBay store here

Thanks for stopping by!

-Jennifer

© Jennifer Adams Flowers 2018

Saturday, March 17, 2018

How to Make Southwest Easter Eggs


I was scrolling through Pinterest recently (looking for inspiration for this year's Easter eggs) when I stumbled upon an adorable set of cactus themed egg topiaries.  It didn't look like they would be too hard to recreate, so after a quick trip to Dollar Tree I was all set to get started! 
Read on to see how easy this project was to complete:

Disclosure- This post contains affiliate links.  If a purchase is made through an affiliate link then (at no additional cost to you) I will receive a commission.  Affiliate links are noted below.


Supplies

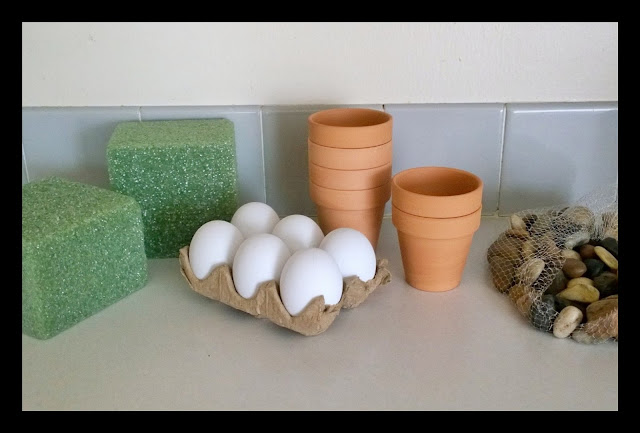
For this project I used foam eggs, miniature terra cotta pots, decorative stones and craft foam.  

The foam eggs I had left over from previous years, but you can find them at Wal-Mart for about $2 a dozen.  The remaining supplies were purchased at Dollar Tree.


Step 1

  
I chose three different shades of green paint to create interest in the finished grouping, but a single shade will do as well.  I already had this acrylic paint on hand, but it can be purchased at any craft store if needed.

Tip:  I recommend painting your eggs right away so that they can begin drying.  


Step 2

Cut the foam squares into smaller pieces to fit the pots that you are using.  I was able to cut one square of foam into enough pieces for all six of my pots, it doesn't take a whole lot.

Once cut, my foam pieces were a tight enough squeeze that no glue was needed, but feel free to add some if you notice any wiggle room.  Also, I made sure that the pieces were short enough that they sat a bit lower than the rim of the pots.  This bit of depth will give your stones a nice place to settle.


Step 3


After my foam was tucked in I began to fill in the space with the decorative stones using hot glue.

 You can leave a small hollow in the center as that is where the base of the egg will settled.  And d
on't get too worried about the gaps in between the stones, that will all be covered up in a moment.


Step 4

Using more glue, fill in those gaps with a bits and pieces of decorative moss.  
(The moss is another item that I had on hand but can be purchased at most craft stores)


Step 5

I used a Sharpie to free hand a few simple designs on the eggs.  These can be as realistic or as whimsical as you wish - I went in the whimsical direction 😊


Step 6

Once your 'cacti' are detailed, glue the bottom (the widest part) of the egg into the mossy nest.  


Step 7

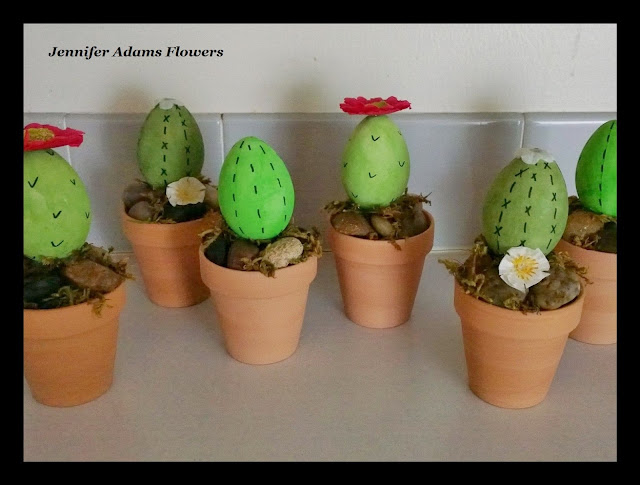
I decided to embellish a few of the cacti using some tiny artificial flowers that I had on hand.  And there you have it:  southwest Easter eggs!

**********

I love how these southwest Easter eggs turned out and was especially pleased that nearly all of the supplies were found at my local Dollar Tree.

Want to check out Dollar Tree's merchandise for yourself?

Click the affiliate link below and happy shopping!
Easter Crafts, Supplies, and More At Dollar Tree!

**********

I hope you enjoyed this how-to post, thanks for stopping by!
-Jennifer

© Jennifer Adams Flowers 2018

Saturday, March 3, 2018

Little French Table


Since the region that I live in experiences all four seasons, garage sales are commonly held only about 6-7 months of the year.  But spring is in the air my friends, and it won't be long before I'm treasure hunting my way through life once again!

Given that, and that fact that I'm starting to get super excited, I decided to share with you today one of my best finds from last summer:  This adorable little French table, take a look!


Little French Table

I noticed this pretty piece before I even hit the curb of the garage sale - we're talking all of the way across the street - and I zeroed right in!

Not only was it of French design, not only was it already painted gold, but it was a mere $5!
So yeah, I grabbed it up 😎


Decorative Top

I wasn't too sure about this 'marbled' mirror top at first and experimented with painting the reverse side in first white and then gold.  It turned out that I liked it best in it's original form though, so that's how it stayed 


Detailed Carving

Here are some close-ups of the carved detailed.  I say 'carved' because as far as anyone can tell this piece looks very much to be made from wood.  In truth though, it's actually a heavy duty plastic!  This might turn a lot of people off but I am by no means a purist when it comes to design.
As far as I'm concerned plastic means durable and lightweight 😉


Closet Room

I was going to place the table in our master bedroom under the large window, but it proved to be just to tempting as a window seat.  My Bubby was all set to climb on top when I caught him just in time 😅
We avoided breaking the glass top and I figured I better stash this piece in a more out of the way location.  Now the table lives in my closet room and looks quite at home next to an arm chair underneath my mirrored wall.  A perfect side table for a girly room!

**********

I hope you enjoyed this treasure hunting post, thanks for stopping by!

-Jennifer

© Jennifer Adams Flowers 2018