Friday, January 28, 2022

DIY Box Of Roses

Valentine Decor

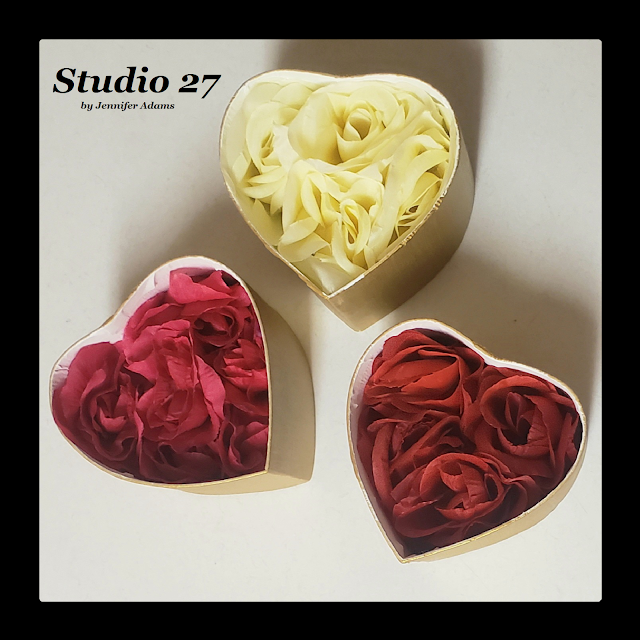
Valentine's Day will be here soon and whether you are looking for gift giving ideas or simply want to decorate, here is a great DIY box of roses:


**********


Disclosure - This post may contain affiliate links.  If a purchase is made through an affiliate link then (at no additional cost to you) I will receive a commission.  You can read more about affiliate links here


Valentine Decor

Using these heart shaped gift boxes from Dollar Tree and a bit of Wal Mart acrylic paint...


Valentine Decor

I painted the boxes and then detailed the lids with gold puffy paint.  
I also went back and painted the interiors with a bit of creamy white.

(You can click here to browse Dollar Tree's online selection of floral supplies)


Valentine Decor

After that it was a simple as tucking in a few fabric floral heads.  Just buy a faux floral bush and gently pull off the flowers from the stems.  A bit of hot glue at the bottom of each bloom will help it stay put in the box and hold up during storage.

And there you have it, Valentine gift boxes!

**********


I hope you enjoyed this how-to floral post, thanks for stopping by!
-Jennifer

© Studio 27 by Jennifer Adams 2022

**********

This post was added to the following link parties:

Wonderful Wednesday (Oh My Heartsie Girl)
Wonderful Wednesday (Penny's Passion)

**********

This post was featured at:


**********


**********


Friday, January 21, 2022

DIY Wedding Floral Series: Part 4 - Tulle

 Dollar Store Wedding

Ready for the final post in the DIY wedding floral series?  Read on to see how you can wrap those bouquet stems:

**********


Disclosure - This post may contain affiliate links.  If a purchase is made through an affiliate link then (at no additional cost to you) I will receive a commission.  You can read more about affiliate links here


Dollar Store Wedding

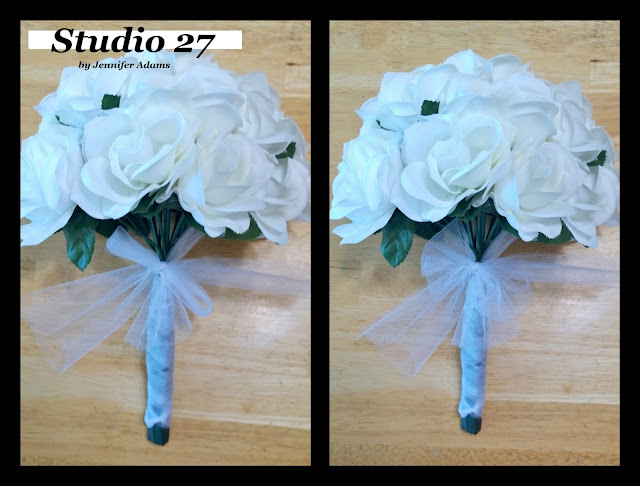
Once the bouquets are wrapped in tape and the stems fluffed out, I like to add tulle to the stems.  I do this for a couple of reasons; one- the tape is sticky and no one wants icky hands going down the aisle and two- it's just pretty!

The amount of tulle that you cut is going to depend on the thickness and length of your bouquet.  I like to go with about two feet, but you can adjust accordingly.  When the length is cut, lie it flat on your working surface and position the bouquet with the bottom of the stem in the center of the tulle.

(You can click  to here browse Dollar Tree online for their selection of floral stems and supplies)


Dollar Store Wedding

Bring the sides of the tulle up and tie a knot at the bottom to secure it in place.  Then begin wrapping from the bottom up, crisscrossing the tulle on top of itself.


Dollar Store Wedding

Keep going until you reach the top and tie another knot, then trim the ends.


Dollar Store Wedding

Using another length of tulle, I like to add a simple shoe-string bow.  
Just tie the bow, knot the tulle and then fluff out the loops before trimming the tails.


Dollar Store Wedding

And there you have it, a lovely hand-tied bouquet!

**********

Did you miss a post in this series?
Post 3:  Bouquets

**********

This series used all white fabric roses in the example photos, but here are some other ideas:


**********

I hope you enjoyed this how-to floral post, thanks for stopping by!
-Jennifer

Friday, January 14, 2022

DIY Wedding Floral Series: Part 3 - Bouquets

Dollar Tree Wedding

Welcome back for post 3 in the DIY wedding floral series, using Dollar Tree florals!
Today I'm sharing how I put together the bouquets for the wedding party, check it out:


**********


Disclosure - This post may contain affiliate links.  If a purchase is made through an affiliate link then (at no additional cost to you) I will receive a commission.  You can read more about affiliate links here


Dollar Tree Wedding

With my flowers sorted into their various bouquet piles (post 1), I like to prep them a bit further by shortening the stems.  Dollar Tree floral bushes tend to be a little on the longer side so I trim off about an inch or so using my wire cutters.

Don't worry about those short stems that were trimmed off to make the boutonnieres and corsages, they will be covered up 😉

(You can click here to browse Dollar Tree's selection of online floral supplies)


Dollar Tree Wedding

Gripping the stems together firmly, use more floral tape to wrap the bunch together.  I like to give the bouquet two or three layers of tape to that it's nice and strong.

Need tips on using floral tape?  Check back in to post 2.


Dollar Tree Wedding

While the length of the stems should look good at this point, there will still be some visible ends at the bottom of the bouquet.

Here is how you can cover those up:


Dollar Tree Wedding

Cut a couple of strips of floral tape and position them across the visible stems, then pull the ends down the length of the bouquet.


Dollar Tree Wedding

Next, begin wrapping your bouquet again, this time starting at the bottom.  Keep wrapping until all of the strips are covered and the bouquet is nice and secure.


Dollar Tree Wedding

Now that the bouquet is secure, fluff out the flowers so that the arrangement is nice and full.  You can do this by gently pulling each flower head down and away from the center.  You want to pull enough so that the bouquet increases in size and fullness, but without creating emptiness at the top.  It might take a few tries but luckily wired stems are quite forgiving 😎

This technique of gathering flowers and binding them together with their original stems is called a 'hand tied' arrangement.  While there are many other ways of creating wedding bouquets, a hand tied arrangement is usually going to be the most cost effective.  Depending on your budget, you can explore other options such as using bouquet holders.

Want to see more wedding bouquet types?  Brides.Com has a great article.


Dollar Tree Wedding

And there you have it, a pretty and inexpensive bridal bouquet!
Check back in next week to see how the stems can be wrapped in tulle for a more elegant look.


Did you miss a post in this series?
Post 4:  Tulle

**********


I hope you enjoyed this how-to floral post, thanks for stopping by!
-Jennifer

Friday, January 7, 2022

DIY Wedding Floral Series: Part 2 - Corsages & Boutonnieres


I this second edition of the DIY wedding floral series, I'm sharing how I made my corsages and boutonnieres.  Corsages are for the ladies and can be either pin-on or worn at the wrist (in my packages I always included pin-on corsages)  Boutonnieres are worn by the men and are also pin-on in style.

Read on to see how easy they are to make:

**********


Disclosure - This post may contain affiliate links.  If a purchase is made through an affiliate link then (at no additional cost to you) I will receive a commission.  You can read more about affiliate links here


Here we are after prepping the floral bunches (post 1)- this pile is made up of the longest stems (one per bush) that I cut off using wire cutters.

Remember, these flowers and many floral design supplies can be found at Dollar Tree where everything is priced at $1.25.


I like to remove the greenery right away as it makes working with the flowers easier.  Just slide the greens right down the stems to take off and then set to the side.  The greens can be used later for embellishing the corsages/ boutonnieres.


Next trim the stems, again using those wire cutters.  I like to leave about an inch/ inch and a half of stem left per flower.


Once the stem is cut to the desire length, it's time to wrap using floral tape.  Lie the tape sticky (inside) side down leaving about an inch of length overhanging to the left.  Bend that strip down and behind the stem, running it lengthwise.  This gives you a nice piece to grip while you tug and wrap with the remaining tape.


Holding that strip down with one thumb (I use my left) use your other thumb to pull the tape while wrapping it around.  Pulling the tape causes it to stretch a bit, which also makes it stick to itself better and then stay in place.  Keep wrapping until you reach the end of the stem.  If you like the look you can stop there,  or you can continue adding tape until the stem reaches desired thickness.

Want to see a video of how it's done?
I've found a great tutorial  here!

Note:  The florist in the video tutorial is adding a wire to her flower because it is a fresh flower.  Since most fake flowers are already wired, adding another wire isn't needed.


Here is how my stems look after a couple of layers of the floral tape.


Remember those greens that we saved?  
I like to use scissors to trim them apart into leaves that look more realistic.


After that it's a simple as hot gluing the leaf into place.  You can stop here or go as complex as you want, adding more flowers, greenery, ribbon or other embellishments.  

Boutonnieres I tended to leave plain, but for the ladies corsages I liked to add ribbon.  Because my goal was to keep my prices as conservative for my customers as possible I often kept things very simple, but you can certainly go as far as your budget allows.
Make sure to have a floral pin to include with the piece and you are ready to go.

And there you have it, easy to make corsages and boutonnieres!

Did you miss a post in this series?
Post 3:  Bouquets
Post 4:  Tulle


**********


I hope you enjoyed this how-to floral post, thanks for stopping by!
-Jennifer

© Studio 27 by Jennifer Adams 2022

**********

This post was added to the following link parties:

Wonderful Wednesday (Oh My Heartsie Girl)
Wonderful Wednesday (Penny's Passion)


Saturday, January 1, 2022

DIY Wedding Floral Series: Part 1 - Purchasing and Prepping the Flowers

Early on in my adventure in online creative sales, I used to make and sell faux floral wedding sets on Ebay.  I no longer sell physical goods (my Etsy shop is full of digital downloads only 😎), but I have always wanted to share how I would put my floral packages together.  I decided to put together this 4 part series of posts to show exactly how I made my wedding sets using Dollar Tree flowers.

Note:  My wedding sets were intended to be priced as economically as possibly for my customers, which is why they were simple and made with fewer flowers.  With your own budget in mind you can go as large as you wish, adding in more flowers, embellishments or whatever you wish.  Whether you use a smaller amount of Dollar Tree florals as I did, buy twice as many or choose to invest in higher end florals, the techniques shared here will be the same 😉

Read on to see how I used to do it:

**********


Disclosure - This post may contain affiliate links.  If a purchase is made through an affiliate link then (at no additional cost to you) I will receive a commission.  You can read more about affiliate links here


Here you can see how the Dollar Tree rose floral bushes look upon purchase, with usually around 6 flower heads per bush.  

When I was creating wedding sets I would make 1 bridal bouquet, 1 maid of honor bouquet, 4 bridesmaid bouquets, 1 toss bouquet, 1 groom boutonniere, 1 best man boutonniere. 4 groomsmen boutonnieres, 2 father boutonnieres and 2 mother boutonnieres.  This was all done with 20-25 floral bushes, depending upon the size of the flowers in the bush.  Bushes with larger flowers are going to give you more bang for your buck as each flower takes up more space.  Bushes with smaller flowers take up less space, and require you to purchase more.  It all depends upon the look you are going for and what kind of flowers you choose to use.

Tip:  Try to purchase all of your flowers at once so that you can ensure that the colors of each bush match.  For Example, sometimes Dollar Tree will have multiple types of red rose bushes.  Each bush contains red artificial roses, but they might be of different fabric types, petal cut lengths or dye lots.  If you buy multiple types that blend together and make sure to blend them within each bouquet, then it looks great.  If you make a few bouquets that are composed of identical flowers and then one or two bouquets have some off colored/ styled blooms, then it doesn't look so good.  You can always buy some extra stems to have on hand.  I've had lots of brides who end up adding in extra attendants and wish to add bouquets later on.

Note:  When purchasing from Dollar Tree online, you will be required to buy bulk amounts.  Some flower bushes come in cases of just one kind, while others come in mixed cases.  If you can't find what you want in the store and the online selection provides a mixed case only, then you may end up spending more than planned to get enough of your desired type.

(You can click here to browse Dollar Tree's selection of online florals)


After removing the tags, the first thing that I like to do is push all of the foliage to the tops of the stems.  Since I'm creating a rounded bouquet, having all of the flowers and leaves at the top will give a fuller look.


A lot of times with Dollar Tree floral bushes, there will be one stem longer than the rest.  I trim this one off for a couple of reasons; one- it makes the resulting bush nice and even.  And two- now I have plenty of cut stems to use for corsage and boutonniere work later...without having to purchase extra bushes 😉


Here is my pile of cut stems, they really do add up!  Not only are there enough for single flower corsages and boutonnieres, but I would often put together my toss bouquets from these stems as well.


With all of my bushes prepped, I would then divide them into the bouquets that I intended to make.  You can see in the photo that with this set I had four bushes for the bride and then three bushes for each bridesmaid.  Once organized I would set those aside and knock out my corsage/ boutonniere work....which I will share with you next week!


Post 3:  Bouquets
Post 4:  Tulle

**********


I hope you enjoyed this how-to floral post, thanks for stopping by!
-Jennifer

© Studio 27 by Jennifer Adams 2022

**********

This post was added to the following link parties:

Wonderful Wednesday (Oh My Heartsie Girl)
Wonderful Wednesday (Penny's Passion)