Saturday, April 24, 2021

Make Your Own Faux Cupcakes


Fake Bake Cupcakes

Recently I made a birthday themed series of fake cupcakes!
Here's how easy it is to make your own using cupcake liners, spray foam and joint compound:

********


Disclosure - This post may contain affiliate links.  If a purchase is made through an affiliate link then (at no additional cost to you) I will receive a commission.  You can read more about affiliate links here


Fake Bake Cupcakes

Starting with cupcake liners in muffin tins, I added marbles to weigh down the cupcakes.  This is because  once decorated, the cupcakes can get top heavy and tip over without any weight at the bottom.  I also like to keep them in a tin while working with the spray foam.  Because it is meant to expand, the foam is going to balloon out in every direction possible.  If the cupcake liners are not inside of a tin then they loose their shape and the liners smooth out - no more crinkly edges!

You can click this link to see last week's DIY Artificial Spring Plants post where I used the same technique to make faux plants.

And of course be sure to check this video by Dawn Newell of The Pink Tree for her full cupcake tutorial.  It's the video I learned from myself 😍


Fake Bake Cupcakes

Here is the spray foam that I use.
You will want to make sure to shake it thoroughly per the directions of the can, and make sure to wear gloves and eye protection.  It's also a good idea to cover your work space with a drop cloth and make sure to use old cupcake tins.  When this stuff gets on your surfaces, it can be nearly impossible to clean off 😉


Fake Bake Cupcakes

This is a photo of the foam cupcakes after letting them dry overnight.  You can see that some of them round out perfectly, while others look lumpy and weird.  I generally don't worry too much about this as icing, or in this case joint compound, covers most sins!


Fake Bake Cupcakes

If there are any super ridiculous bumps, I go ahead and give them a trim with a foam cutting knife.  You can find this one here, but any serrated knife will do.


Fake Bake Cupcakes

Now on to the decorating-
Using light weight joint compound, mix a bit with acrylic paint to get the color of icing that you desire.  It's really important to use the light weight formula.  When joint compound dries, it tends to shrink up a bit and can even crack.  The heavier the compound, the more likely it is to crack so avoid the regular or standard weight!

I have found that matte finish acrylic paint works the best for coloring.  I've tried gloss, but it made the compound less firm.  Depending on how much paint that you add, even matte finish can thin down the compound.  I've read that some crafters add flour to their mixture to toughen it back up, but I've never tried it myself.


Fake Bake Cupcakes

Because this set of cupcakes was a birthday decor series, I used brightly colored foam cutout for sprinkles and party favors.  I made my foam cutouts by using my Cricut Maker cutting machine, but you could always use a paper punch, cut them by hand or even purchase faux sprinkles ready made.  I found these cute ones on Amazon.

*You can try experimenting with real (edible) sprinkles but I don't recommend it.  Over time the sugars tend to break down causing the sprinkles to fall apart or fade.  Once I tried coating chocolate chips in resin to seal them.  Well the exterior of the chips stayed nice and firm, but the insides of the chips melted causing the chocolates to collapse.  And it wasn't even really all that hot, just a sunbeam from a window and bye bye candy!

Live and learn...😎

In the bottom two photos you can see where I poked holes into my foam cakes (for the party favors) before adding the joint compound icing.  It is soooo much easier to add decor when holes are pre-made, let me tell you.  I used a metal chopstick, but any stick will do.

The party favors I picked up at Dollar Tree.
You can click here to browse their online selection of party supplies.

When it comes time to apply your icing, you can smear it on with a knife or go fancy and use a pastry tip and icing bag.  I like to do a mix of both whenever I'm creating to help add variety.


Fake Bake Cupcakes

These are two cupcakes that I applied the 'icing' to with a knife.  I like to stick with one color at a time and add the toppings before moving on.  This way the still-wet joint compound will hold the toppings in place.  Sometimes when drying, toppings might loosen and come off.  For some reason this seems to happen every time I use faux cherries!  It's no big deal though, just add a bit of glue and your toppings can go right back home.

**********

Now for the pictures of the completed birthday series:

Fake Bake Cupcakes

Fake Bake Cupcakes

Fake Bake Cupcakes

Fake Bake Cupcakes

Fake Bake Cupcakes

Fake Bake Cupcakes

And there you have it, easy to make faux cupcakes!

Want more faux food fun?
Here are some links to other projects that I have completed:


**********

I hope you enjoyed this fake bake how-to decor post, thanks for stopping by!

-Jennifer


Saturday, April 17, 2021

DIY Artificial Plants - Floral Decor


Fake Flowers

After spending the majority of my winter crafting time creating fake display foods, I started to wonder if I could do up some flower pots as well.  It turns out that I can, and so can you!
Read on to see how easy it is:

********


Disclosure - This post may contain affiliate links.  If a purchase is made through an affiliate link then (at no additional cost to you) I will receive a commission.  You can read more about affiliate links here


Fake Flowers
Supplies

Here is what I started with; paper cups and cauldrons from Dollar Tree, Great Stuff spray foam and some marbles.  

I had planned on getting more of the terracotta looking plastic pots from Dollar Tree, but they were all out.  Looking around I decided why not try some of their party cups?  You can get 12 of the regular size or 6 of the large size for just a dollar and I figured that I could paint them.  The cauldrons (also Dollar Tree) seem to only be available around St Patrick's day.  I went ahead and picked them up now even though I intend to use them for Halloween 😉

Before filling the containers with the Great Stuff spray foam, I like to weigh them down with marbles that I pick up either at the thrift store or Dollar Tree.  This combination of weight and foam is the same process that I use when making faux cupcakes, I'll do a post soon!

Following the directions on the Great Stuff can, you will want to shake well and wear gloves/eye protection.  It can take some getting used to, but you want to aim to fill your container just a little over halfway full.  Because the spray foam is intended to use as a method of insulation, it will expand as it dries.

Here is a tutorial video from The Pink Tree where Dawn Newell demonstrates use of the spray foam.

You can click here to browse Dollar Tree's online selection of party supplies 
or here to find the Great Stuff spray foam on Amazon.


Fake Flowers

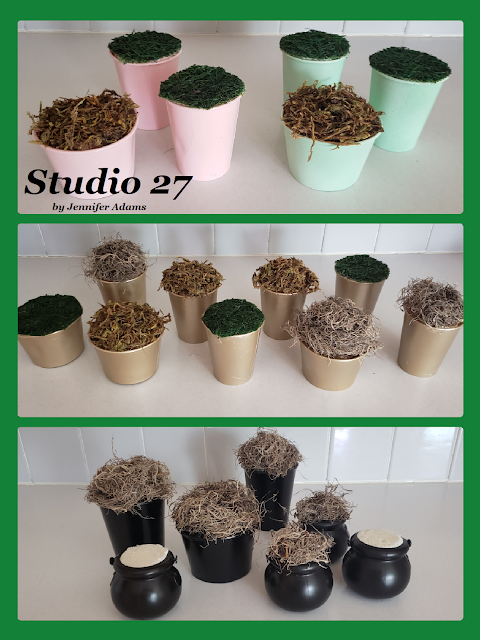
You can see in the top photo that the spray foam tends to dry kind of lumpy.  This is no big deal when making cupcakes, but since I wanted my flower pots to have a nice and even surface, I used a serrated knife to trim them down.  Once trimmed I sprayed my containers with a few different paint colors.  I figured gold would work well for everyday while the pink and aqua would be great for spring.  The black of course if for my Halloween ideas.


Fake Flowers

In this photo you can see my pots after hot gluing a variety of mosses; Spanish, reindeer and sheet moss, to cover the foam.  All of these mosses can be found at Dollar Tree, either in store or online.

*A couple of my cauldrons I left un-mossed.  This is because I'll probably make them look as though they have some sort of potion filling using spackle.  You can click here to see what I mean 😊


Fake Flowers

With my containers full of foam, mossed and painted, it was time to choose florals!
Some of these I already had in my bin while Others I picked up from Dollar Tree.


Fake Flowers

To begin you will simply cut one floral stem away from it's larger bush using wire cutters...


Fake Flowers

...and pop it right into your foam container!  
For extra stability you can always add a bit of glue at the base of the stem.


Fake Flowers

Continue adding leaves and floral stems until you are happy with your arrangement.

And that's how easy it is to make decorative floral pots!

Here are the rest of what I put together:


Fake Flowers

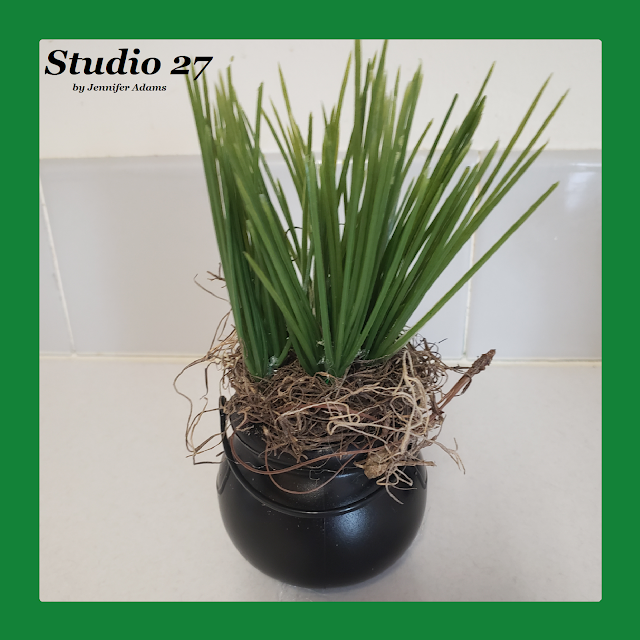
In my cauldrons I wanted to look like I was growing herbs for potions.  To achieve this look I simply skipped the flowers and stuck with greens only.

I plan to use these alongside my Halloween potion bottles.
You can check those out here.


Fake Flowers

What if the artificial flowers that your are using are all plastic with no sturdy wire stem?
That was the case with my faux grass, but no problem, just use a paper clip or other small wire to create your own stem 😉


Fake Flowers
Fake Flowers

There might be a bit of the wire that shows, but once you get the bulk of your plant created you can fix that.  Just hot glue some more of your stems to cover up the mechanics and you are good to go!


Fake Flowers

Now back to my pots!

I did have one of the Dollar Tree plastic pots (leftover from this project) in my stash so I went ahead and used it too.

Here are the rest: 


Fake Flowers

Spring Aqua


Fake Flowers

Spring Pink


Fake Flowers

And summer gold.


**********

I hope you enjoyed this floral decor post, thanks for stopping by!

-Jennifer


Saturday, April 10, 2021

Desk Chair Makeovers


Home Decor

Today I'm sharing my adventures in desk chair makeovers.
Because the pandemic has us spending so much time at home in front of our computers for school and work, I thought a couple of nice desk chairs for my daughter and I were in order.
Check out how easy it is to take a couple of used chairs and make them over into something beautiful:


********


Disclosure - This post may contain affiliate links.  If a purchase is made through an affiliate link then (at no additional cost to you) I will receive a commission.  You can read more about affiliate links here


Home Decor

First up, my chair!

I found this one for only $5 at a local thrift store and I must disclose that it did not look so horrible until I ruined it myself 😕.  You see, my son had really been wanting a cool looking gaming chair that he had seen on YouTube annnnnnd I thought that maybe I could re-create the look with heat applied vinyl....I could not 😄😄😄

The heat from the transfer process melted the already existing vinyl and the whole thing just came apart.  But for $5 it was a 'learning experience'.

He did get a nice chair as well, but it's just plain black with a plain black cover on top.  Not really worthy of this makeover post...

-Anyway-

Not one to give up or to waste, I thought I could still salvage the chair somehow.  I grabbed a can of spray paint and gave the whole thing a once over.  Because the arms and legs of the chair would remain visible, I made sure that they were completely covered.  The body of the chair I only lightly coated.  This was because I didn't want the patches of black showing through the cream colored slip cover.

*I'm going to pretend that I had that figured out beforehand, but nope.  Originally I painted only the arms and legs of the chair and when I put on the slip cover it looked terrible, so I took it off, painted the chair body and then put the slip cover back....'learning experience'...😂

You can find a similar chair cover for $14.99 at Walmart


Home Decor

Home Decor

And here is my chair all pretty after going through so many experiments!


Home Decor

My daughter's chair was of higher quality and came in at a higher (same thrift store) price of $25.  Still quite the deal and with so much experience from the first chair, I knew right away to paint the whole thing 😉

Because the shape of this chair is a bit different I went with a two-piece slipcover.
You can find it here for $7.80 at Walmart

*Note - The use of spray paint leaves quite a smell afterward.  Since we were having good weather I was able to leave my chairs outdoors for a few days until the fresh air took away the odor.


Home Decor

And here is my daughter's chair.
I like the way that the cream on cream color scheme turned out.


Home Decor

But what about those accessories?
The throw pillows I already had, the throw blankets were made:

Wanting a couple of coordinating throws for the chairs, I purchased the plush twin sized blanket pictured above.  It was an easy project to cut the blanket in half and run a couple of new seams along the raw edges, leaving me with two throw sized blankets!

Mainstays plush blanket, $10.46 at Walmart


Home Decor

And there you have it, two pretty and comfortable desk chairs for under $60!
For comparison the chair on the left retails for around $60 alone while the one on the right is about $100 😎


**********

I hope you enjoyed this DIY furniture upgrade post, thanks for stopping by!

-Jennifer

© Studio 27 by Jennifer Adams 2021

**********

This post was added to the following link parties:

Wonderful Wednesday (Oh My Heartsie Girl)
Wonderful Wednesday (Penny's Passion)

**********

This post was featured at:

All About Home

**********

Your Whims Wednesday


Saturday, April 3, 2021

Decorative Carrot Soup


Easter

I've been wanting to try my hand at faux drinks for awhile now and finally ordered what I thought was the right kind of acrylic water product.  But oops, instead of getting something that could fill a pitcher, I bought a product intended for shallow displays only!  Not wanting to waste the supply I started brainstorming about what other crafts I could use it for and it finally hit me - faux carrot soup to go with my Easter Decor!

Here is how easy it was to put together, check it out:

********


Disclosure - This post may contain affiliate links.  If a purchase is made through an affiliate link then (at no additional cost to you) I will receive a commission.  You can read more about affiliate links here


Easter
Supplies

For this project I used a glass bowl that I picked up at the thrift store, Realistic Water, acrylic paint, clay carrot slices, faux leaves and Spanish moss.

You can find the Realistic Water here on Amazon.  
Because his particular form of acrylic water is intended for shallow displays (think river or lake scene dioramas) it is recommended at a maximum depth of 1/8".  If you are wanting to create faux drinks or floral vases with a greater depth, I recommend this epoxy resin kit.  I have used this one to fill a pitcher and glasses with faux lemonade, and it worked really well 😊

The carrot slices were made with  Crayola air dry clay.  I simply rolled a few little balls, flattened them into slices and then painted them with acrylic paint.


Easter
Mixing the Soup

After pouring in a small amount of the Realistic Water, I added a few drops of the orange acrylic paint and mixed it well.

The Realistic water is very cloudy when first poured, but does dry nicely clear.  
It also mixed well with the paint.


Easter
Ingredient Prep

With my clay carrot slices ready to go, I cut some artificial leaves and Spanish moss into tiny bits.  I wanted to get the effect of seasoning 😉


Easter
Garnish

I then added in my carrot slices and 'seasoning' before setting the bowl aside to set up.  After a couple of days the liquid should be dry, but I like to give it a week to fully cure.

Tip:  If you want to make it a little deeper, you can add another layer of the Realistic Water once the first layer is fully cured.

And there you have it - a yummy bowl of carrot soup for your Easter table!

**********

Want more Easter fun?  Check out these links:

**********

I hope you enjoyed this Easter decor post, thanks for stopping by!

-Jennifer