Showing posts with label At Home. Show all posts

Saturday, April 10, 2021

Desk Chair Makeovers


Home Decor

Today I'm sharing my adventures in desk chair makeovers.
Because the pandemic has us spending so much time at home in front of our computers for school and work, I thought a couple of nice desk chairs for my daughter and I were in order.
Check out how easy it is to take a couple of used chairs and make them over into something beautiful:


********


Disclosure - This post may contain affiliate links.  If a purchase is made through an affiliate link then (at no additional cost to you) I will receive a commission.  You can read more about affiliate links here


Home Decor

First up, my chair!

I found this one for only $5 at a local thrift store and I must disclose that it did not look so horrible until I ruined it myself 😕.  You see, my son had really been wanting a cool looking gaming chair that he had seen on YouTube annnnnnd I thought that maybe I could re-create the look with heat applied vinyl....I could not 😄😄😄

The heat from the transfer process melted the already existing vinyl and the whole thing just came apart.  But for $5 it was a 'learning experience'.

He did get a nice chair as well, but it's just plain black with a plain black cover on top.  Not really worthy of this makeover post...

-Anyway-

Not one to give up or to waste, I thought I could still salvage the chair somehow.  I grabbed a can of spray paint and gave the whole thing a once over.  Because the arms and legs of the chair would remain visible, I made sure that they were completely covered.  The body of the chair I only lightly coated.  This was because I didn't want the patches of black showing through the cream colored slip cover.

*I'm going to pretend that I had that figured out beforehand, but nope.  Originally I painted only the arms and legs of the chair and when I put on the slip cover it looked terrible, so I took it off, painted the chair body and then put the slip cover back....'learning experience'...😂

You can find a similar chair cover for $14.99 at Walmart


Home Decor

Home Decor

And here is my chair all pretty after going through so many experiments!


Home Decor

My daughter's chair was of higher quality and came in at a higher (same thrift store) price of $25.  Still quite the deal and with so much experience from the first chair, I knew right away to paint the whole thing 😉

Because the shape of this chair is a bit different I went with a two-piece slipcover.
You can find it here for $7.80 at Walmart

*Note - The use of spray paint leaves quite a smell afterward.  Since we were having good weather I was able to leave my chairs outdoors for a few days until the fresh air took away the odor.


Home Decor

And here is my daughter's chair.
I like the way that the cream on cream color scheme turned out.


Home Decor

But what about those accessories?
The throw pillows I already had, the throw blankets were made:

Wanting a couple of coordinating throws for the chairs, I purchased the plush twin sized blanket pictured above.  It was an easy project to cut the blanket in half and run a couple of new seams along the raw edges, leaving me with two throw sized blankets!

Mainstays plush blanket, $10.46 at Walmart


Home Decor

And there you have it, two pretty and comfortable desk chairs for under $60!
For comparison the chair on the left retails for around $60 alone while the one on the right is about $100 😎


**********

I hope you enjoyed this DIY furniture upgrade post, thanks for stopping by!

-Jennifer

© Studio 27 by Jennifer Adams 2021

**********

This post was added to the following link parties:

Wonderful Wednesday (Oh My Heartsie Girl)
Wonderful Wednesday (Penny's Passion)

**********

This post was featured at:

All About Home

**********

Your Whims Wednesday


Saturday, February 13, 2021

Thrift Store Finds: Tiered Tray & Cake Stand Makeover


Thrift Store Finds

Since beginning my new 'fake bake' hobby, I've been looking for more ways to display my decorative treats.  I thought that cake stands and tiered trays would be an excellent way to go.  Check out how I made over these that I found while thrifting:


********


Disclosure - This post may contain affiliate links.  If a purchase is made through an affiliate link then (at no additional cost to you) I will receive a commission.  You can read more about affiliate links here.


Thrift Store Finds

Here are the cake stand and tray as I found them, $3.99 and $6.99 respectively at my local thrift store.


Thrift Store Finds

And here they are after sprucing them up with a bit of paint!

I used Krylon brand spray paint in a champagne gold and plain white.  The most important thing is to make sure that the paint you use is intended for multiple surfaces, including glass.  While it went on easily and held well I can't say for sure that the surfaces are still food safe.  For that reason I plan on using them for decorative purposes only.  

And decorate I did, filling them up with Valentine themed faux treats!

*I'm also careful to clean them gently with a damp cloth instead of putting them in a dishwasher*


Thrift Store Finds

You can click here to read about my faux drinks (the dessert cup was made in the same way).


Thrift Store Finds

You can click here to read about salt dough decorative cookies.

Want more fake bake fun?

In case you missed it, I also have this valentine village post.

**********

I hope you enjoyed this Valentine's Day decor post, thanks for stopping by!


-Jennifer


Saturday, August 8, 2020

File Cabinet Turned Bedside Table - A Thrifted Furniture Makeover

Furniture Makeover


You may remember me mentioning that we had planned on buying a home, and moving out of our rental this summer.  But first came Covid, then my Husband's furlough during our state's lock down and then some changes about how earnings are calculated for mortgage approval.  Essentially, the current guidelines take into consideration earnings for 2020 only, and if you were out of work because of a pandemic, then that's not so much to go off of....sigh.

But I'm not going to waste time while I'm waiting!  I have been actively completing every project that I can think of including coming up with a 'new home need list' for my treasure hunting excursions.  I've thought carefully about every single room that we will eventually have and written out a massive shopping list.  Once I find the item, then I take it home, clean it up and get it ready for it's intended space.  My dining room is now full of storage, my time is busy and I am having a blast

This week I scoped out the thrift store and found a $7.99 file cabinet that with a little love, would make a great bedside storage table for my son's bedroom, check it out:

********

Disclosure - This post may contain affiliate links.  If a purchase is made through an affiliate link then (at no additional cost to you) I will receive a commission.  You can read more about affiliate links here.


Furniture Makeover
Here is the file cabinet as I found it at the thrift store, a little beat up and in a natural wood color.
My son wants his room to be mostly black and chrome, so I decided to repaint this piece accordingly.


Furniture Makeover

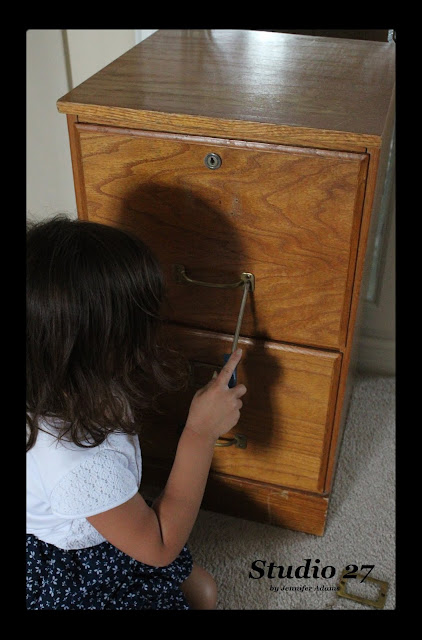
After cleaning, sanding and cleaning again, I removed the hardware with help from one of my nieces 😍


Furniture Makeover
 I used spray paint in black for the body of the cabinet and silver for the hardware.  When it was time to put everything back together I added a small rectangle of scrapbook paper in bright blue to add a pop of color.

I spent around $10 for the cans of paint, but also used them on a coordinating lamp and bulletin board, and still have lots left over.

Furniture Makeover

And there you have it - what was once a boring file cabinet is now the perfect bedside table with a great amount of storage!

I may not be able to move any time soon, but I sure am having fun planning and preparing 😎

**********

I hope you liked this how-to post, thanks for stopping by!
-Jennifer

© Studio 27 by Jennifer Adams 2020


Saturday, July 25, 2020

Little Mermaids - A Printable Watercolor Giveaway!

I've been working a lot on my Etsy shop  this week; creating and adding new items, reworking my layout, and making decisions about what I would like to keep and what I'll be discontinuing.  One of the products that I'll be removing are my printable mermaid watercolors.  But before I do, I thought I would offer the chance for you to score the set for free!

Read on to see my pretty little mermaids and discover how you can enter to win:

(These printables are scans of some watercolors that I did and print best as an 8X10)

********

Disclosure - This post may contain affiliate links.  If a purchase is made through an affiliate link then (at no additional cost to you) I will receive a commission.  You can read more about affiliate links here.


Blond Mermaid With Pink Tail
Blond With Pink Tail


Brunette Mermaid With Purple Tail
Brunette With Purple Tail


Redhead Mermaid With Green Tail
Redhead With Green Tail


Brunette Mermaid With Pink Tail
Brunette With Pink Tail

********

I'll send the files for the printable watercolors pictured here for FREE to five separate winners!

Just email me at Studio27byJenniferAdams@Gmail.com 
and put 'Mermaid Watercolor' in the subject line.
*Winners will be chosen at random*

Hurry, this offer ends Saturday, August 1, 2020!

You can click here if you would like to see what else is offered in my Etsy shop, I've been working on SVG files lately 😉

**********

I hope you liked this giveaway post, thanks for stopping by!
-Jennifer

© Studio 27 by Jennifer Adams 2020

Saturday, June 13, 2020

Buffet Turned TV Cabinet - Furniture Upcycle


Entertainment Center

I am so happy to be out thrifting and garage sailing again.  Not only is it great to get out of the house, but I've been finding some great deals.  For instance, the buffet that I turned into an entertainment center in the photo above 😄  Read on to see the before and after:


********

Disclosure - This post may contain affiliate links.  If a purchase is made through an affiliate link then (at no additional cost to you) I will receive a commission.  You can read more about affiliate links here.


Entertainment Center
Old TV Stand

Here is what we had before: a laminate covered particle board unit that was starting to sag and fall apart.
It did the job but I've been wanting to replace it forever.  It was so damaged on the top that I had to leave a covering there at all times and one of the doors would only close half of the time.


Entertainment Center
Thrift Store Buffet

I was thrilled to find this wooden buffet at Salt & Light for only $60!  It was the perfect size, In great condition, had plenty of drawers and cabinets and even a spot to house our cable box, Wii and DVD player.  What looked like two drawers at the top in the middle was actually a hinged door.  I was able to remove that completely to create an open shelf for the equipment.


Entertainment Center
Gold Details

After cleaning, sanding and painting the piece in white, I sprayed all of the hardware in gold.
It did take four coats of paint to complete, as the dark stain kept coming through, but it was worth the time and effort!


Entertainment Center
New TV Stand

And here it is in place.  We are really enjoying the taller height compared to the old stand.  Not only is it easier to see, but the glare from the living room windows no longer hits the screen the same way that it used to 😎


**********

I hope you enjoyed this upgrade post, thanks for stopping by!

-Jennifer

© Studio 27 by Jennifer Adams 2020


Saturday, May 30, 2020

File Cabinet Makeover


During my recent (and never ending) quest to complete all projects, I decided to tackle an old, ugly file cabinet as well.  Read on to see how easy it is to refresh a metal cabinet:

********

Disclosure - This post may contain affiliate links.  If a purchase is made through an affiliate link then (at no additional cost to you) I will receive a commission.  You can read more about affiliate links here.


Up Close & Personal

Here you can see some of the damage to the file cabinet - scratches everywhere!  Even if it wasn't damaged, it was just plain boring looking.  Definitely time for an upgrade!


Supplies

For this project I used an old file cabinet, Dollar Tree 8X10 frames, super glue and Krylon Fusion white spray paint.  I chose the Krylon Fusion because I wanted to make sure that the paint adhered well to the metal surface.  It did, though I also had trouble with the nozzle clogging.

You can click here to browse Dollar Tree's online selection of photo frames.
(I get my super glue there too, my favorite is the gel form 😉)


Picture Frame Prep

After removing the backing and glass, I flipped the frames over and used pliers to pull out the metal tabs.


Prepping the Back

Because the backs of the frames were dark in color, I went ahead and sprayed them in white before attaching them to the drawers.  This way if there is ever any gap between the frames and the cabinet, there won't be any distracting colors showing through and the piece will continue to look seamless.


Glue into Place

I attached the picture frames with super glue and let dry, then sprayed the cabinet and frames in white.

The Krylon Fusion spray paint worked well for a bit, but ended up clogging in the nozzle before I was finished.  I had enough of the spray on the cabinet to create a nice primer though, and ended up finishing with a roller brush and standard paint.


Stencil

While the cabinet was drying I used my Cricut cutting machine and some cardboard to create a fleur de lis stencil, planning on adding a gold detail to the drawers.  If I were doing this again I would have positioned the stencil more in the center of the cardboard to help avoid overspray of the gold paint onto the white file cabinet.  The cardboard worked ok, but if I had used removable vinlyl the finished look would have been crisper.


Here is an excellent tutorial from Daily Dose of DIY all about making stencils with the Cricut.


Fleur De Lis

If you look closely you can see that the detailing isn't as crisp as it could be and I also had to touch up some of the gold overspray.  Overall I'm happy with how it turned out though!


Finished Result

And here is my updated file cabinet all fresh and pretty.  This project was definitely worth it- only an afternoon of time and less than $10 and it's like having an entirely new piece!

**********

I hope you enjoyed this how-to post, thanks for stopping by!

-Jennifer

© Studio 27 by Jennifer Adams 2020


**********

This post was added to the following link parties:

Tuesdays With A Twist
Wonderful Wednesday (Oh My Heartsie Girl)
Wonderful Wednesday (Penny's Passion)


Saturday, March 7, 2020

Thrifted Shams as Couch Throw Pillows


When I found a set of four white quilted pillow shams at a church sale, I took them home, washed them and tucked them away in a closet.  I bought them because they were in perfect condition, pretty, thick and cozy and only .25 each, that's a dollar for the entire set!

After storing them away for awhile I finally decided; why not use them as couch throw pillows?
It turned out nicely, take a look:

********

Disclosure - This post may contain affiliate links.  If a purchase is made through an affiliate link then (at no additional cost to you) I will receive a commission.  You can read more about affiliate links here.


Pillows Before

Here are the pillows as they were before.  The large velvet in the back are down-filled but stiff because of the fabric.  They are nice to look at, but not so cuddly.  The other two are just plain old.  I bought them when we got married and that was 18 years ago, so it was definitely time to do something different!


Pillows After

Here is the couch with the new shams in place.
These larger, bed-sized pillows function much better for relaxing, napping or watching TV.

Interested in finding your own?
Better Homes and Gardens makes a similar set that you can find here

**********

I hope you enjoyed this treasure hunting post, thanks for stopping by!
-Jennifer

© Studio 27 by Jennifer Adams 2020

**********

This post was added to the following link parties:

Inspire me Tuesday
Tuesdays With a Twist
Tuesdays at Our Home
All About Home
Wonderful Wednesday (Oh my Heartsie Girl)
Wonderful Wednesday (Penny's Passion)
Your Whims Wednesday


Friday, January 17, 2020

Artist Spotlight: Dezi Cakes


Artificial Decorative Baked Goods


You all know by now that I have a special fondness for artificial baked goods (totally normal 😆) and I love adding to my collection.  Well last summer, I stumbled upon an artist known as Dezi Cakes while browsing through Ebay.  I quickly became obsessed with the variety of products and decided that the smartest way to add to my decorative collection would be to use them for business mock-up photos first.  Very clever, right? 😎

So after buying a few myself, and receiving others for my birthday/ anniversary/ Christmas, I've managed to pull together quite a collection.  I even got a cake and milkshake (thanks Mom!💗).

Having the artificial cupcakes has made my graphic design work more manageable, but I also just plain love them.  So much in fact that I decided to write this post, and tell everyone about
Dezi Cakes:

DeziCakes on Amazon

********

Disclosure - This post may contain affiliate links.  If a purchase is made through an affiliate link then (at no additional cost to you) I will receive a commission.  You can read more about affiliate links here.

*This is not a sponsored post. All opinions are my own, I did not receive compensation for this post*

********

If you keep scrolling you will see pictures of my cupcake collection but first a little Q & A:


Using Mock-ups
What's a mock-up???

In the digital sales/ graphic design world, a mock-up is a photo of any item that you would personalize with your product.  So if I'm selling cupcake topper printables, a mock-up for me would be a shot of two or three cupcakes with a nice, clean background.  Once my printables have been created, I can take the mock-up photo and combine it with images of my printables to show potential customers exactly how the printables would look in use.

But why?

Because using a mock-up is soooooo much easier!  I used to actually bake or buy cupcakes, drag out all of my photography lights and equipment, print, cut and assemble all of my toppers, add them to the cupcakes and take the photos.  Then of course there was the clean up followed by the photo editing.  The whole process would take about a day's worth of time too.

I used to think about how if I had a set of mock-up cupcake photos, the job would be a lot less work. But I didn't want to purchase someone else's mock-ups and have my shop look like it belonged to another designer.  Finally it hit me - I could be making my own mock-ups while adding to my collection of artificial baked goods at the same time 😎


(Like those cupcake toppers in the photo above? You can visit my Etsy shop here)

Now let's take a look at some of those cupcakes:


Artificial Decorative Cupcakes
Pinks


Artificial Decorative Cupcakes
Chocolates


Artificial Decorative Cupcakes
Holiday


Artificial Decorative Cupcakes
Black & White


Artificial Decorative Cupcakes
Red & White


Artificial Decorative Cupcakes
Summery

Aren't they gorgeous?  And this is just a small sample of the products available.  I've got my eye on a few more cupcakes, cakes, milkshakes and the chocolate dipped strawberries too!

As pretty as they are, it doesn't stop there- The items are light weight, come packaged well, are composed of quality materials and ship quickly.  I would be careful to keep them out of direct sunlight and away from water though, just to be safe.

And in case you need those links again:

DeziCakes on Amazon

********

I hope you enjoyed this Artist Spotlight, thanks for stopping by!
-Jennifer

© Studio 27 by Jennifer Adams 2020

**********

This post was added to the following link parties:

You're the Star
Wonderful Wednesday (Oh my Heartsie Girl)
Wonderful Wednesday (Penny's Passion)
Your Whims Wednesday