Friday, October 30, 2015

Fall Wreath Upgrade: Scarecrow Fun!


Fall Floral Wreath

You might remember this wreath from previous fall decor posts.  I made it a couple of years ago and it hangs on our front door.

(You can click here to read more about this wreath and the rest of my fall decor)

Recently I found some scarecrows at a yard sale that I thought would be fun to add to this wreath.  I chose them to represent our family of four and bought them for a total of $5.

I'm going to show you how easy it was to add the scarecrows to my fall wreath, but first......


.......Let me just share with you the 'upgrade' that Baby Girl created! 

See here is the thing; whenever I get out my supplies to work on any sort of project, I have one or two kiddos that want to take part in the fun.  Sometimes we can work side by side, and other times I let them play for awhile until they get bored.  

Today Baby Girl and I made a deal; she could design whatever kind of scarecrow/ pipe cleaner wreath that she wanted and I would put a photograph of it on the blog.  So here you go folks!

**********

And now back to the wreath.....


Scarecrows!

(You can click here to read the treasure hunting post that features these scarecrows)


Step 1

The first thing I did was to remove the wooden sticks from the scarecrows.  They were easy to cut off with a pair of clippers.


Step 2

Since the 'Husby' scarecrow was the biggest, I added him first.  
A little hot glue was all I needed to attach the scarecrows.


Step 3

I added my scarecrow next.


Step 4

Then followed up with two tiny 'kid' scarecrows and that was that!


Front Door

I'm happy with the way the wreath turned out, and just in time to get ready for Thanksgiving.
But for now, I'm off to celebrate the Halloween weekend with the kids!

I hope you enjoyed this how-to post, thanks for stopping by!

-Jennifer

© Jennifer Adams Flowers 2015

Tuesday, October 27, 2015

Treasure Hunting Update

Every time I think that garage sales are over for the season, we have a great weather weekend....with more sales!

Here are a few more fabulous finds:


Glass Bowls  .25 each

Four pretty bowls for a dollar, can't beat that!


Sparkly Tree Ornaments .75 each

Baby Girl immediately claimed one of these as her own and then asked if she could paint it gold (swoon)!  I'm going to try and convince her to keep it clear and sparkly but still, proud designer Mommy right here!


Miniature Packages .25 (for the bag)

Baby Girl was with me when I found these.  I thought they should be used with our miniature Christmas village, she thought they should be used with her Lalaloopsy Mini dolls.  (She was quick to correctly point out that they are way too big for the village anyway.)

We compromised and split them in half (half meaning she got two thirds and I kept one third, haha!).  I stashed mine away to use for the holiday while Baby Girl has been having Christmas with the Lalaloopsies almost every day now :D


 Ceramic Plate $1

Just in time for Thanksgiving.


 Mirror $1

This huge mirror was only a dollar!  It's a really nice heavy one with awesome detail.  You can tell from the back (and a few missed spots) that the mirror used to be gold (love) but was sprayed over in white (also love).

While I really liked this mirror for possible use in my closet, I knew that Baby Girl would fall in love with it too.  She did, so now it will be hers ;)  I think it would be perfect above her bed....especially since the Disney princess castle decal is mysteriously missing several pieces.....

 **********

I hope you enjoyed this treasure hunting post, thanks for stopping by!

-Jennifer

© Jennifer Adams Flowers 2015

Wednesday, October 21, 2015

Painted Pumpkins (2015)

I had a great time this past weekend painting up a few pumpkins for my Etsy shop!
(So much fun in fact, that I'm posting this a day earlier than planned!)

  After spending some time scrolling through Pinterest I found tons of painted pumpkin ideas.
 I was bouncing the ideas around in my head for a couple of days when I remembered my number one crafting/ business rule:  Design from what is already in stock before running out and buying more supplies.

I did purchase the pumpkins that I needed to paint, but I didn't buy any additional supplies (...except for that one pack of glitter).  Instead I challenged myself to come up with designs using the paint and beads that I had in stock already.

 It was fun to get creative and my storage containers were glad to get a little more organized ;)
Check out what I came up with:


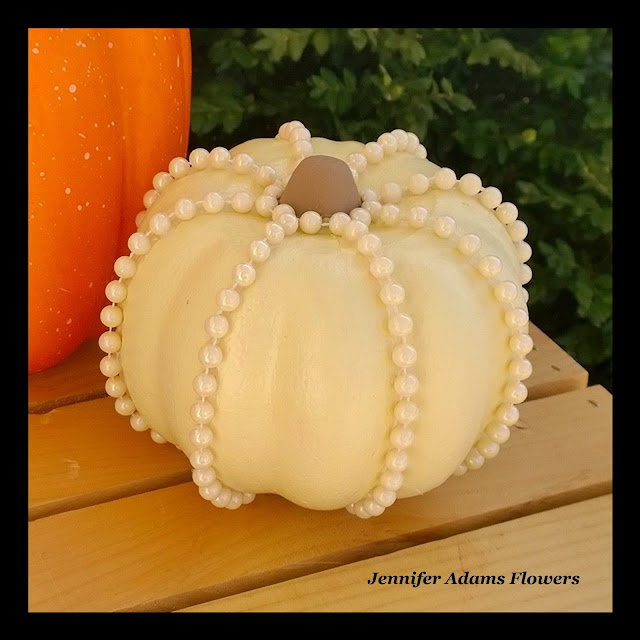
Ivory Beaded Pumpkin


Beige Beaded Pumpkin


Bronze Glitter Pumpkin


Gold Glitter Pumpkin

I decided to keep this one for my dining room ;)


Black & White Beaded Pumpkin


Ivory Beaded Pumpkin


Strawberry Cupcake Pumpkin


Chocolate Cupcake Pumpkin

You know this one was my absolute favorite!  I made two of these right off the top, because I knew there was no way that I could not keep a chocolate cupcake pumpkin for myself!

**********

You can visit the Jennifer Adams Etsy shop by clicking here
You can also find the Etsy link in the sidebar of this blog.

Enjoy your pumpkin decorating and thanks for stopping by!
-Jennifer
© Jennifer Adams Flowers 2015

Tuesday, October 20, 2015

Fall Haul!


A few weeks ago (early October) I found a garage sale with lots of cute, fall themed decor.  

I had already put out my Halloween at home, so I haven't gotten to see how these treasures will fit in to my Fall decor.  But I'm really excited to work them in the fisrt of November!  

I'm also really excited to share, so check out this 'Fall Haul' of goodies:


Leaf Placemats $1each.

I already have one brown and one burgundy leaf placemat, so these will fit in nicely.


Autumn Plate  $1

I'm thinking this little plate will end up in the kitchen.


Pumpkin Bowl  $1

I'll be honest here, I have no idea where this bowl will be used.....I just love pumpkins...I can't help it!


Scare Crows $5

I thought these little scare crows were adorable, and chose one to represent each member of our family.  I'm going to be using them to upgrade the fall wreath that is hanging on my front door - post coming soon!

In the meantime:

You can click here if you want to see the rest of my fall decor.
You can click here if you want to see my Thanksgiving deckor.
You can click here if you want to see my Thanksgiving printables.

I hope you enjoyed this treasure hunting post, thanks for stopping by!

-Jennifer

© Jennifer Adams Flowers 2015

Friday, October 16, 2015

Halloween Decor - Update (2015)

I've made a couple of additions to my Halloween decor this year, check it out!


Pirate Treasure!

I finally found some coins to mix into my treasure chests and I love the way it looks.  
*Little Man loves the way he can toss it all across the living room :D

My treasure boxes are looking pretty good, but I think they need a few jewels now.  Maybe even some costume jewelry....Hmmmm.

You can click here if you missed the treasure hunting post that mentions these coins
(A link to the page with the rest of my Halloween decor is at the end of this post)


Friendly Ghost

This little ghost was made by Baby Girl last year in Kindergarten.

I love the way it looks layered on top of one of my fall wreaths...And I can't believe that Kindergarten was last year!!!

**********
Want to see more Halloween fun?

Click here to see the rest of my Halloween decor.
Click here to read about an easy skeleton wreath upgrade.
Click here to view some cute Halloween inspired cupcakes.
Click here or here to find two collections of fun printables.
Click here for Halloween print art.
********

I'm going to head back to my craft room now, I've got a whole lot of pumpkins to paint!
-Update coming soon-

I hope you enjoyed this holiday decor post, thanks for stopping by!

-Jennifer

© Jennifer Adams Flowers 2015

Wednesday, October 14, 2015

A Hand-Painted Gift Bag


Recently Baby Girl attended a birthday party for one of her school friends and needed a gift.  We decided to put together a jewelry making kit inside of a hand-painted reusable tote.

Fun Fact:  Whenever I'm not sure what to give as a gift, I love to put together fun little kits.  Art supplies, jewelry making, bath and beauty, you name it!

Read on to see what went into this gift, as well as how easy it is to personalize your own gift bags.


Simple Supplies

Left:  A plain yellow reusable cloth tote.

Right:  Beads and elastic cording.  
*I really wanted to buy more beads, but Baby Girl insisted on adding a teddy bear instead :)


Step 1

I used a Sharpie to write Chloe's name on the bag.


Step 2

I added a couple of decorative flowers, again with the Sharpie.

Tip:  Keeping your design simple makes painting a whole lot easier.


Step 3

Prep your bag for painting by inserting a catalog, cardboard or pad of paper.  Not only does this help to smooth your painting surface, but it also prevents the paint from bleeding through the material.

(Thank you Cabela's!)


Step 4

I painted the leaves and petals in solid colors first, then added the contrasting details once the first layer of paint dried.


Step 5

After adding the tag and the bear the gift was done....or was it?  It seemed kind of plain looking....


....and when I hung it up safely in my closet (next to my hair clips) I realized why - It needed hair accessories!


So I got out a my glue gun and a couple of flowers and got (back) to work.


Doesn't that look so much better now?


The Finished Bag

I went ahead and took a proper photo of the bag, complete with hair accessories!
 Ahhhh, it looks soooooo much better!!!

I hope you enjoyed this how-to post, thanks for stopping by!

-Jennifer

© Jennifer Adams Flowers 2015

Thursday, October 8, 2015

Treasure Hunting (Early Fall 2015)

Here are a few of the treasures I picked up in August & September:


Large Milk Glass Plate $3

This plate is really big, a little over a foot in diameter!

Side Note:  I absolutely must keep collecting milk glass.  Why you ask?  Because Baby Girl has decided that she likes it too...which means that one of my vases -and the smaller version of this plate- have already been relocated to her bedroom :D

It's ok though, I don't mind sharing :)

(You can click here to see the smaller version of this plate)


Milk Glass Pedestal Bowl  $1

This bowl was only a $1 because it was in really bad shape.  (Well, I'm assuming that's why it was $1.  It was at the same garage sale as the other milk glass pieces featured in this post and they were each priced at $3).

Anyway, this bowl was covered in brown paint, but a little industrial strength Citrol made an easy fix.  I was very happy to rescue it because it matches a larger pedestal bowl that I already own.

(You can click here to see my larger pedestal bowl in a recent post)


Milk Glass Bowl  $3

Because you can never have too many large bowls...and there is still empty space on my shelf!


Flared Milk Glass Bowl  $3

Another pretty addition to my upper kitchen cabinets ;)


Circular Mold  $1

I don't know what kind of metal this is, but it's a really pretty blush pink!

According to the lady at the sale, this is a Jello mold.  I don't really make a whole lot of Jello, and I'm certainly not interested in molding any...but these molds are so pretty!  I suppose I could experiment with it as a cake pan, but for now I really like it as a decor piece.


Copper Mold  $1

So apparently I am in to copper now as well...we will see where this takes me...


Cake Pans!

Remember my baking collection from this post from a few weeks ago?  In it I mentioned that my Aunt gave me a few awesome cake pans, and here they are!

These cake pans are huge, I'm pretty sure it will take more than one boxed mix to properly fill them.

I'm not sure what is more amazing; these new pans?...Or the fact that I managed to squeeze them into my already bursting cabinet?....:D

I hope you enjoyed this treasure hunting update, thanks for stopping by!
-Jennifer

© Jennifer Adams Flowers 2015