Saturday, December 21, 2019

Kid Friendly -Graham Cracker- Gingerbread Houses


Kid Friendly Gingerbread Houses


Welcome to my last post of 2019!  I'm going to take a break from blogging and (work related 😉) social media for the holidays, but all be back in early January to kick off the new year.  Until then, lets talk about these cute little 'gingerbread' houses, perfect for the kids to make.

Made with graham crackers instead of actual gingerbread, these are so easy to put together, check it out:

**********

Disclosure - This post may contain affiliate links.  If a purchase is made through an affiliate link then (at no additional cost to you) I will receive a commision.  You can read more about affiliate links here.


Supplies Needed For Kid Friendly Gingerbread Houses
Supplies

For these houses you will want to gather graham crackers, premade icing, candies and sprinkles.  Bonus points if you pull out and use up the leftover Halloween candy like we did 😎


Step 1
Step 1

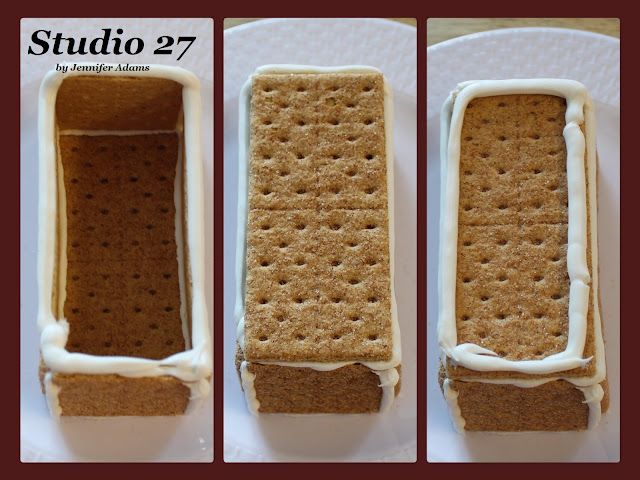
Spread a bit of icing on your surface (we used plastic plates) and press one full sized cracker on top.  The icing will act as a glue to hold it in place and keep it from shifting.  Next, pipe another bit of icing around the perimeter of the base cracker.

Note:  I like to put my icing into a freezer bag, cut off one corner and and use it as an icing bag. It makes the application of the icing soooo much neater and easier!


Step 2
Step 2

Using a couple more full length crackers, stick them to the sides of the base cracker to create the long walls.  Break another cracker in half to fill in the end gaps.


Icing Tip
Tip

I like to apply a bit more icing to the sides of my broken pieces before applying them.  
This helps them to stick to the long walls a bit better.


Step 3
Step 3

Pipe another round of icing on the top of your walls, then add a long cracker on top to serve as a roof support.  Apply yet another outline of icing to this and...


Step 4
Step 4

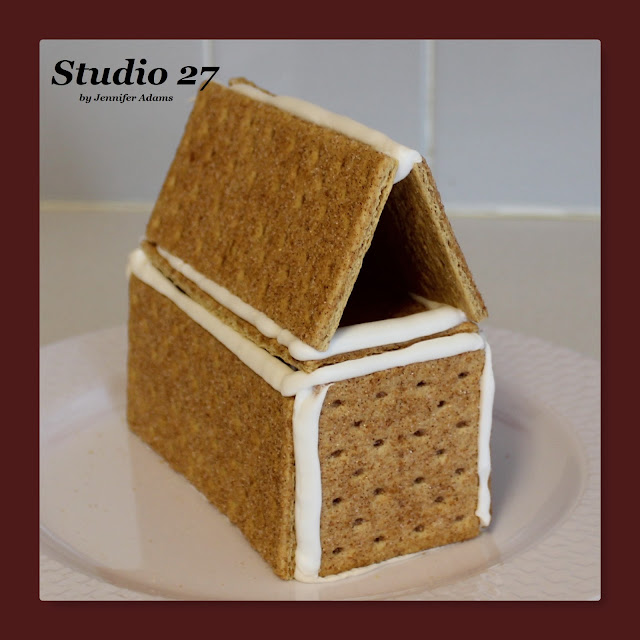
...use two more crackers resting diagonally on top to create the roof.  That extra layer of icing on the roof support will help hold them in place, but go ahead and add some to the peak of the roof as well.  It will hold better, looks better and provides a sticky place to add decorative candies.


Kid Friendly Graham Cracker Gingerbread Houses

Here is what the gingerbread house will look like before decorating.


Kid Friendly Graham Cracker Gingerbread Houses
House 1

For this one my daughter used gummy bears on the roof to look like Christmas lights, then fashioned a glob of icing to create an evergreen tree.  She used green sprinkles to color the branches and assorted sprinkles to add decorations.  A lollipop dipped in water, then sprinkles made for an adorable little lamp post 😍


Kid Friendly Graham Cracker Gingerbread Houses
House 2

My son made a lollipop lamp and christmas light bears as well, but look things a step further
with a Kit-Kat woodpile and snake in the front yard 😆

********

I hope you enjoyed this gingerbread house post.  Happy holidays and thanks for stopping by!
-Jennifer

© Studio 27 by Jennifer Adams 2019

Saturday, December 14, 2019

How to Make 3D Photo Ornaments

3D Snowy Picture Tree Ornaments

Hello everyone and happy holidays!  Today I'm sharing how you can make your own 3D photo ornaments just like the ones pictured here:

**********

Disclosure - This post may contain affiliate links.  If a purchase is made through an affiliate link then (at no additional cost to you) I will receive a commision.  You can read more about affiliate links here.


Adding Paint to Your Photo Ornaments
Step 1 - Paint

Remove the top of the ornament and add a bit of acrylic paint, then roll slightly to create the effect that you want.  For the snow ornaments I wanted an even snowdrift line, but for the swimming set I created uneven waves.  The look you achieve all depends on how quickly you roll the ornament and how far you turn it over, so you may want to have a few extra on hand to experiment with.

I like to stock up on these acrylic ornaments at Dollar Tree, where they come 2 for $1.
You can click here to browse their online selection


How to Dry Your Photo Ornaments
Step 2 - Dry

I found it best to let the paint completely dry before moving on and did so by resting the ornaments within a couple of cups so that they would stay upright.  How long it takes to dry depends on the amount of paint added- I've had some dry in a day while others took a full week!


Adding Embellishments to Your 3D Photo Ornaments
Step 3 - Embellish

For the snowy ornaments I added a bit of glittery faux snow.  For the swimming set I went with a sprinkling of blue sequins.  Just add a bit of your embellishment into the ornament once the paint is dry, unless you don't want it to move around-in that case add it while the paint is still a bit wet.  I wanted my ornaments to have movement so I waited until they were fully dry.


Preparing the Photos for Your 3D Picture Ornaments
Step 4 - Photos

Select the photographs that you want to use and have them printed out small enough to fit within your ornament.  I printed mine at home and used printer paper so that they would be easy to manipulate through the small ornament opening.  The size of your printing is going to depend on the size of your ornament but for most standard bulbs I'd say go for about a square inch or smaller.


Preparing the Photos for Your 3D Picture Ornaments
Step 5 - Put Together

Once printed, trim your picture around the subject as closely as possible and tape the photo to a toothpick that you have cut in half.  Use a bit of hot glue to secure the toothpick to the top of the ornament.

Carefully fold back the photo (without creating crease marks) and slip it into the ornament until the top clicks back into place.  You'll want to go slowly and carefully so as not to bend the photo, disturb the tape or knock the hot glue out of place.


3D Summer Swimming Photo Tree Ornaments
Swimming

Snowy Winter 3D Photo Tree Ornaments
Snowy

And that's all there is too it, now you have personalized ornaments for your tree or to give as gifts!

********

I hope you enjoyed this holiday ornament post, thanks for stopping by!
-Jennifer

Saturday, December 7, 2019

How to Make a Nintendo Controller Christmas Tree Ornament


How to Make a Nintendo Game Controller Christmas Tree Ornament

Hello everyone and welcome back after the Thanksgiving break!
Christmas is in full swing at our house including some new gamer inspired ornaments on our tree.
Read on to see how easy they are to make for yourself:

**********

Disclosure - This post may contain affiliate links.  If a purchase is made through an affiliate link then (at no additional cost to you) I will receive a commision.  You can read more about affiliate links here.


Supplies Needed
Supplies

For this project you will need a gaming remote, glue gun, scissors, ribbon and rhinestone embellishments.

Don't have any extra remotes hanging around?  Pick some up from Amazon for around $10 each.


Cutting the Cord
Step 1

Cut the cord of the remote leaving about 4 inches of cord remaining.  
Of course you will make sure that the remote is not plugged in to any power source first 😉


Making a Hanger
Making a Hanger
Making a Hanger
Step 2

Fold over the length of cord and push the end into the same hole that the cord comes out of.  Add a bit of glue to the hole opening to keep the folded cord in place.  
This will now be your ornament hanger 😊


Making the Bow
Step 3

Using the ribbon of your choice, cut a length about 6 inches or so.  I settled on a satin red because I thought it would look nice with the buttons and wording, but you could certainly customize here.


Making the Bow
Step 4

Begin making your bow by loopin the ribbon loosely in half and secure with a dot of glue.  
This will create the bow's tails.


Making the Bow
Step 5

With another spot of glue, bring the back piece of ribbon forward and attach to the tails that you just made.  Congratulations, now you've got a simple bow!


Making the Bow
Step 6

Glue the newly made bow to the remote just in front of where the cord loop was made.


Embellish the Ornament
Step 7

Last but not least, dress up your bow with a rhinestone embellishment.  I kept my ornaments simple by making them all the same but the creative possibilities are endless!


Perfect Gift For Holiday Gamers


Now that you've got a few made you can hang them on the tree to enjoy, or give away as gifts to your favorite gamers.  But why stop there?  I would love to see similar ornaments with Super Nintendo or Wii remotes - If you make some send me your pics to:

Studio27byJenniferAdams@Gmail.com

**********

I hope you enjoyed this how-to ornament post, thanks for stopping by!
-Jennifer