Tuesday, December 30, 2014

'Champagne Sparkle' Wedding (17 Pc Package) 2014

With the Christmas holiday season coming to a close, it will soon be time to ring in the new year.  What better way to do so than with a champagne inspired wedding package?!

 'Champagne Sparkle'

A mix of velvety white and satiny gold poinsettias, this 17 piece wedding set also features shimmery gold and glittery champagne bulb ornaments.  Perfect for a sparkly white winter wedding, or a wedding ceremony coinciding with the new year!

 Bridal Bouquet


 Maid of Honor Bouquet


 'Toss' Bouquet


 Bridesmaid Bouquets


 Velvety white boutonnieres for the men and shimmery gold pin-on corsages for the ladies.


The 17 Piece Package

This 17 piece package can be found in my eBay.

Want to see what else is currently available?  Check out my eBay store here


-Jennifer

© Jennifer Adams Flowers 2014

Wednesday, December 24, 2014

Christmas in the Kids Bath (2014)

 It's Christmas Eve and I need to go play Santa.....as soon as somebody's little eyes finally close;).....but I thought I would squeeze in one more blog post!


You know I couldn't decorate for a major holiday and skip the kids bathroom.
Of course I have Christmas ducks, take a look!


A couple of snowmen, a couple of trees and a little reindeer.


A couple of penguins, a reindeer and Santa himself.

I also have a small white snowman hand towel.  I thought it was cute to hang on the side of the tub, Little Man thinks it's cute to toss across the bathroom :D

That's it, short and sweet tonight!
Hope everyone has a wonderful holiday and thanks for stopping by!

-Jennifer

© Jennifer Adams Flowers 2014

Tuesday, December 23, 2014

Upgrading My Christmas Wreaths (2014)

 I really enjoy the look of Christmas greenery, so when I came upon a few evergreen wreaths, I decided to decorate them a bit and add them to my dining room decor (I made them to match the wreaths already hanging in my dining room and living rooms).  I like these wreaths, but they need a bit more 'oomph', so today's post will show you how I fixed them up.

(You can click here to read about my dining room Christmas decor)

Remember my posts about the evergreen garland I use to fix up my trees?  Well I found all of the garland for the kitchen and dining room trees, the three wreaths pictured here and all of my miniature pine trees in a great big box while treasure hunting.  Total price: $5!

Now let's get started!


The Wreaths

Pictured here are the three wreaths as I left them last year.  I used chocolate, gold and champagne ornaments from my dining room display to dress them up a bit.  When I ran out of ornaments, I stopped.  I was really pregnant at the time with Little Man and not in the mood for any outings, so I just made a note of what I needed and left it at that.

After Christmas day had passed I happened to be at Dollar Tree where they had all of there holiday items marked half-off.  (If you think buying everything for $1 is fun, .50 is even better!)  I remembered my notes and stocked up on packages of gold ornaments, then stashed them away with my holiday decor.

(If you want to read more about my holiday notes, click here )


Dollar Tree Clearance Ornaments


My secret weapon: Chenille Stems!

(Also know as pipe cleaners)


I like to cluster the ornaments into groups of three.  

Odd numbers always look best, and it's much easier to add three ornaments at once.
You don't have to worry about the color of the chenille stem, it will be hidden by the evergreen branches.


I simply string them onto the chenille stem, in no particular order.


Then I twist the chenille stem so the ornaments cluster together and stay in place.


I decide where I want the cluster to be positioned on top of the wreath and wrap the chenille stem around to the back.

Moving the little evergreen branches out of the way allows the cluster to be wrapped more tightly, and hides the color of the chenille stem.


I give the chenille stem a few twists on the back, then trim off the excess.

Then I flipped the wreath back over and repeated the process until I had the desired amount of ornaments in place.  Once all of the clusters had been added, I fluffed the evergreen branches so that the wreath looked full and balanced. This also helped to ensure that any visible chenille stems had been hidden.


And there you have it, a much happier looking wreath!

I feel so much better about these wreaths now, and the dining room feels less 'thrown together'.
And, I think the total cost for this project was around $3. Yay!

I hope you enjoyed this how-to post, thanks for stopping by!

-Jennifer

© Jennifer Adams Flowers 2014


Monday, December 22, 2014

Dining Room Decor: Christmas 2014

We're counting down the days until Christmas, but I'm still working away at these blog posts.  Who knew I had so much to say about this holiday?!?!  Haha!

Come on in for a tour of our dining room Christmas decor.......


Our Dining Room Tree

Left is a photo taken during the day, and the right was taken at night.
 I really enjoy having a chocolate and gold Christmas tree!


Christmas Village

Under the dining room tree is a ceramic Christmas village.  These little houses were cookie jars that I found on clearance for $2.50 each, about four years ago.  The figurines I found at Wal-Mart, and the trees I found treasure hunting.

I love having the village under the tree, it's so magical!  I also love having it where Baby Girl can easily play with all of the pieces.  Think of all the wonderful memories she is making makes me happy :)

The Little Man likes to play too.  He takes a figurine, chews it's head a bit, then throws it across the room somewhere.  It took us two days to locate the missing priest last week!


Village Close-Up


Village Close-Up

The way the little figurines are arranges changes as often as Baby Girl likes to play.  I love to see the stories she tells by the way everything is arranged :)


Stockings


Our stockings are chocolate and gold and hang in the dining room.  We do not have a mantle, so I use wreath hangers to suspend them from the curtain rod.  I really like the way it looks, but be careful if you decide to hang yours the same way.  Fill  your stockings heavily and you  might have your curtain rod come crashing down!

These stockings were plain when I purchases them, but a little puffy paint made for easy personalization.
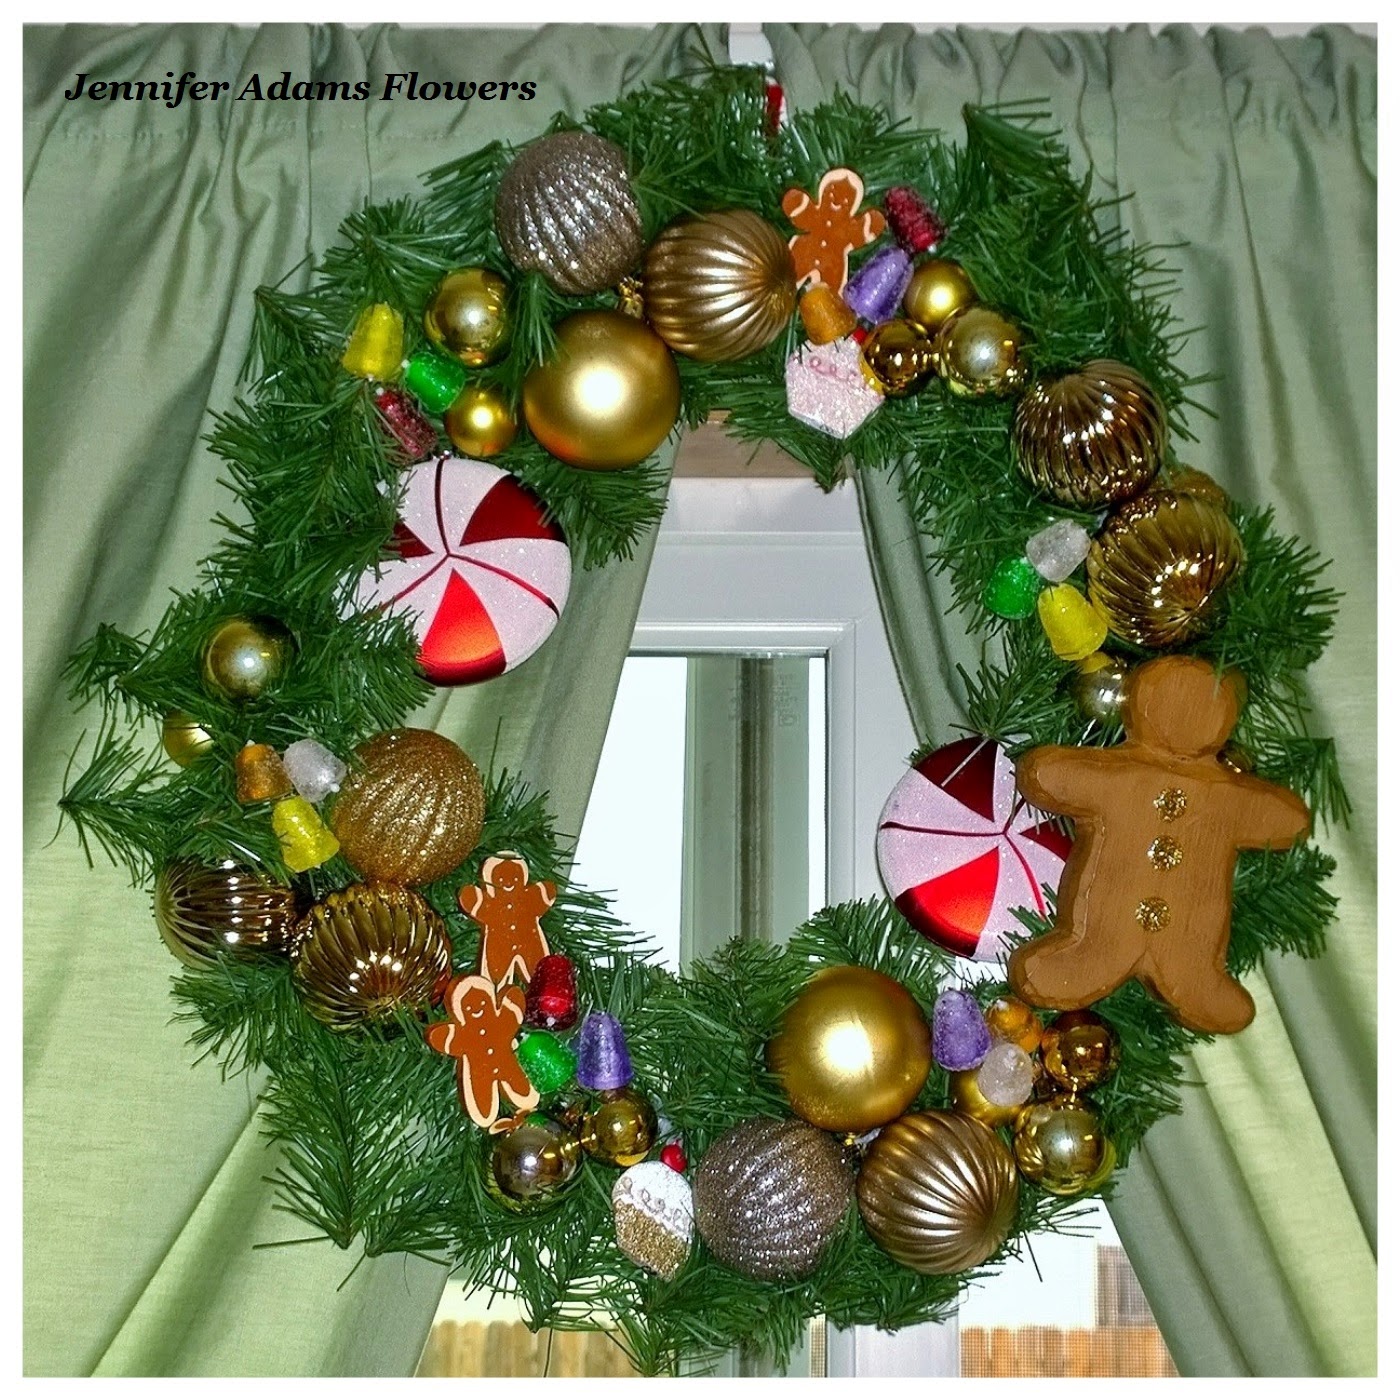


Dining Room Wreath

In the middle of the stockings I have this wreath.  I think I purchased the plain wreath from Wal-Mart, and decorated it with ornaments that match the tree in this room.

A wreath exactly like t his one is hanging at the living room window as well.


What's Crackin'?

Last year Baby Girl and I read The Berenstain Bear's and the Nutcracker several times during the holiday season.  So when I found these on clearance at Dollar Tree for .50 each, I snapped them up.  I didn't tell her I bought them, instead choosing to stash them away as soon as I got home.   This year when we were opening up and going through decoration bins, she was happily surprised!

At first I put them on the window ledge in the dining room, but that is the perfect reach for the now-walking Little Man.  In order to save them from certain destruction, I decided to tuck them into the tree.  I like how it turned out, a bit of unexpected whimsy :)


My trifle bowls are currently filled with large pieces of beaded fruit.  I can't remember how much these were, but they were a treasure hunting find.  I like the color and texture, Little Man likes to throw them across the room ;)

Behind the bowls you can see a couple of additional wreaths.  Not all of my wreaths are hanging, I actually have three of them tucked into my shelving.  Nothing says Christmas to me like evergreen boughs, so I like to have them all over the place.

(Look for an upcoming post where I detail how I put wreaths like these together)


These glass jars contain ornaments, bells, beaded fruit and star-shaped pieces of wood.  The star-shaped cuts of wood were from a package of potpourri.  I liked the look and texture of the wood, so I bought the potpourri on clearance for .99 and tossed out the other stuff.

In addition to the jars, I tucked in a few miniature evergreen trees and a ceramic snowman that belongs to Baby Girl.


My cake stands and large glass jar are filled with gold, chocolate and champagne ornaments.  Some of these are from Wal-Mart, others are from Dollar Tree.  I like the way they tie in with the decor of the dining room tree and stocking colors.


My one and only Christmas printable, and a house painted by Baby Girl.

While I have a whole lot of ideas pinned onto one of my Pinterest boards for Christmas printables, so far I have only made and framed one!  I positioned the frame inside one of the wreaths, where the metallic frame can compliment the nearby ornaments.

This printable reads:  It's beginning to look a lot like Christmas!

To Baby Girl's delight, Mamaw frequently allows her to paint ceramic pieces.  This one is a candy shop that Baby Girl covered in glittery silver paint.  This house is literally the product of a 4-year-old playing with paints, but look how well it turned out!  I love this house and the way it sparkles in the lights of the tree.  I also love the memories it brings ;)


A Few More Jars

The top photo shows my jars containing two different sizes of miniature holiday lights.  I love these!  I found both sets different years while treasure hunting, I think for .25 each.

  Baby Girl loves to play with these.  Sometimes she uses them to decorate the little trees of the Christmas village and sometimes her dollhouse.  Once we even knotted them together and wore them as necklaces.

The bottom photo pictures a jar of pine cones and a jar of wooden 'cranberries'.  The wooden cranberries came from the same garland that had the wooden candy canes and gingerbread people found in my kitchen post.  If you missed the Christmas kitchen decor post, you can read it here.


The little Santa was made by Husby in either pre-school or kindergarten I think ;)


A Christmas Photo Album

Now this isn't the Christmas photo album for our family (I have a scrapbook for every year as well), but instead a specialty album given to me by Husby's parents.  Each page has a space for one photo, journaling, and the book allows you to record an audio message.  I decided to use it for my 'under the tree' photo tradition.

Every year since Baby Girl was born, I have stuck her under the tree with the gifts after she fell asleep.  She has always stayed perfectly still and fast asleep, giving me the best photo opportunities!  I love these pictures and wanted to continue the tradition with the Little Man as well,  but he's a different little booger!

It does not matter what time of day or night, or how deeply asleep that child is, I stick him under the tree and he immediately grins.  It's like some sort of ornery-boy sixth sense!  Then he starts hitting and kicking the branches and gifts, before finally opening his eyes and giving me that 'ha ha!' look.
Once awake, he does give me some awfully cute smiles and poses though.  Needless to say, his addition to the book will be awake shots!  :D

I haven't decided what to record for the audio journal yet, I'm waiting until they can both participate.


I love the way the mirrors reflect the decor and sparkling lights.
It's like Christmas just keeps going and going!


 A little more reflection.

And now for me, a little bit of relaxation, but I'll be back tomorrow with a holiday wreath how-to.

In the meantime, happy Christmas count-down and thanks for stopping by!


-Jennifer

© Jennifer Adams Flowers 2014

Saturday, December 20, 2014

Ice Cream Party 2014

I'm back today with another gift basket post.

This one was for my nephew that turned 8 back in September.  Yes, September....As in 4 months ago....And now I'm finally getting this post up and published!

It seems like I always have at least 20 unpublished drafts hanging out in my blogger dashboard at any given time.  And in addition to that, my calendar notebook full of titles I want to post...for every week of the year.  Not to mention what's in my head...we won't even go there!  Ahhh, so much content, so little time!  Anyway.......

The theme for the basket was 'Ice Cream Party', take a look:


Supplies 

Left:  A colorful red basket, white paper filling, a shiny noise maker and party napkins.
Party napkins are a great way to add pops of color to your presentation in addition to serving as package filler.  You can't have a kids party without balloons, so these napkins were perfect.

Right:  I filled the basket with a glass sundae dish, chocolate sauce, sprinkles and various candy toppings.  The sprinkle container was cute so I left it as is, but the bags that the candy came in were not all that attractive.  I fixed this by purchasing a couple of clear plastic containers instead. 

I had ice cream too of course, but it had to stay in the freezer ;)


  I arranged the basket items on top of the shredded paper.  You can see that while the napkins serve to cushion the glass sundae dish, they also add a festive feel to the basket.


After wrapping the basket in cellophane I made a bow with yellow curling ribbon and the noise maker.  I thought a spoon would be a nice touch so I added that to the bow as well.

(For tips on taming your cellophane click here to read this earlier post)


Gift Tag

Instead of purchasing a card, I wrote and printed out this little poem.  A piece of green scrapbook paper as the background and a couple of ice cream stickers completed the tag nicely.  To attach the tag I used a hole punch and some yellow curling ribbon.


**Bonus**
  You can laugh at me too, let me set the scene:

  Husby walks in to the kitchen and tries to start talking to me when I exclaim, "Wait!!!  Stop!!!  I gotta write this poem down now!!!"

Husby says, "You gotta do what?!?!"

To which I responded, "This poem!  I just thought of the poem for Logan's birthday gift, I have to write it down now!"

Husby is used to me, so he just twinkled his eyes and shook his head.
The life of a 'creative'  :D :D :D

And now back to our basket......


The Finished Basket

From what I heard, the ice cream party basket was a success!

What kinds of gift baskets have you put together this holiday season?  Send me your pics and I just might feature you in an upcoming post.

Until then, happy holidays & thanks for stopping by!


-Jennifer

© Jennifer Adams Flowers 2014

Thursday, December 18, 2014

Easy Gift Wrap 2014

With the Christmas season in full swing, I thought I would share a couple of gift basket posts.

Have a last minute get together and you don't want to arrive empty handed?  Put together an quick and easy gift basket!

This first one is from a baby shower that Mom and I attended for a cousin.  Keep reading to see the gift that we took the mom-to-be, as well as tips for taming your cellophane.


Supplies

Left:  A colorful green basket, pink shredded paper and a raspberry bow.

Right:  A whole bunch of adorable outfits and a cute little stuffed elephant.  Can we take a moment to say 'awwwwww'?  :D


All Tucked In

The items for this basket fit together nicely without much hassle.  If you do find yourself struggling to keep your items in place, use clear adhesive tape.  

Tape is your best friend when making up baskets.  I have made baskets before where I had to tape almost every item!  Just make sure you aren't adding tape to anything that might be ruined by the adhesive. 


Taming the Cellophane

Step 1:  (Left Photo) Set your basket into the cellophane bag and straighten the sides as much as possible.  You will most likely have an excess amount of plastic on either side of the basket.

Step 2:  (Middle Photo) Hold the cellophane at the bottom of one side of the basket, pull it around to the back and tape into place.  Repeat this step for the other side of the basket.  Now you will have a basket snugly fitted into a cellophane bag, with excess plastic at the top.

Step 3:  (Right Photo)  Gather the remaining plastic in the middle and use tape to close it off.  There may be a great deal of plastic sticking up at the top (like in the picture here).  

Tip:  Make sure you wait until after adding your bow before trimming any excess plastic.  Adding a bow changes the visual dimensions of the gift.  Cutting the plastic before the bow is in place can leave you with a skimpy looking package.

Another Way:  You can always bypass the frustration of cellophane by purchasing shrink wrap.  Shrink wrap is a heat responsive plastic that shrinks into place with warm air from your blow dryer.  However it does come with it's own set of frustrations, get it too hot and you will make lovely holes in your plastic! Yay!  I'm not really a big fan of shrink wrap.....turns out I'm really good at making holes in the plastic :D

Anyway, back to our gift.......


A pretty Bow

In addition to the raspberry bow, I added in a couple of pacifiers.  I's a cute way to add to the look of the gift and I love the practicality.  No need to throw all of this packaging away ;)


The Finished Basket

And if you think that's cute, you should see the little baby it now belongs to!

I'll be back in the next couple of days with another gift basket post and then I'll get back to sharing my Christmas decor (yes, there is more, hee hee!)

Until then, thanks for stopping by and happy designing!


-Jennifer

© Jennifer Adams Flowers 2014

Tuesday, December 16, 2014

In the Kitchen - Christmas Decor 2014

I'm really excited because today I get to share with you the rest of my kitchen decor.......hope you like gingerbread.........:D


Gingy's on the Fridge

As you will see in this post, I love gingerbread people!  I affectionately call them my 'gingies' and collect them for my holiday kitchen.  Everybody needs a gingerbread army ;)

I keep a glass punch bowl on top of the fridge and thought it could use a little holiday cheer.  The dish towels were a gift from my Mom and the giant lollipops are from Dollar Tree.  

If you go down the toy aisle of Dollar Tree you will find these lollipops any time of the year.  The packaging suggests that they be used to fool people, but I thought they would be better as Christmas decor.  I also use them as props when taking photos of the kids.

The gingy in the bowl is a cardboard storage box.  I found three of these this summer while treasure hunting and they were only .10 each!


Window Sill & Stove Top

I have a couple of large copper cookie cutters that I hung from the curtains and battery candle sticks on the window ledge.  I can't remember where I purchased the cookie cutters, but the candles are from Dollar Tree.  

~~Scroll down for closer pictures of the stove area~~


Top Left:  The gingy spatula and rubber scraper were gifts from my Mom and I used a glass vase to display them.  The larger gingy plate was a Wal-Mart clearance purchase and the ceramic gingy shaped bowl was a treasure hunting find.  I used a gold colored plate stand to help the bowl sit upright.  Gingies are cuter when 'at attention' ;)

Top Right:  A couple of glass jars containing faux candy.  The wooden candy canes used to be a garland that also contained gingies and cranberries.  I found the garland treasure hunting and bought it so that I could cut it apart for my jars.  The gumdrops also used to be garland and are the same ones that I used to decorate the kitchen tree.

Bottom Left:  More of the wooden garland pieces and some larger plastic candy canes.  The plastic candy canes were also a treasure hunting find, and if I remember correctly they were intended to be tree ornaments.

Bottom Middle:  Every year on Christmas Eve we gather at my Grandparent's house for dinner, bingo and a gift exchange.  The red snowflake dish towel was a bingo prize that my Mom won and then gave to me for my kitchen.  She also gave me the two white gingy towels that I layered over the snowflakes.  Thanks Mom :)

Bottom Right:  This too was a gift from Mom; a gingerbread house wax warmer.  I love how the light shines from the little windows!


Kitchen Wreath

I wanted a wreath in the kitchen that had the candy theme, but also tied in with my overall household decor.  I started with a plain evergreen wreath to which I added gold, bronze and champagne colored ornaments.  Next followed the peppermints and a large wooden gingy that I found treasure hunting.  I finished it off by adding the small wooden gingies and a gumdrop pieces from the same garland that I mentioned cutting apart earlier.

Easy Fix:  When I found the large wooden gingy, it was very country looking with red buttons painted down the front.  Country isn't really my style, so I covered the buttons with gold glitter puffy paint.  I'm more of a sparkle and whimsy kind of girl, so this suits me much better now.

(You can read more about the kitchen tree by clicking here)

A few more details....

Top Left:  I needed something under the kitchen tree and decided that a gingy family was in order.  Originally I had a daddy, mommy and baby gingy...but tragically, the daddy gingy died in a laundry accident.  I was out treasure hunting the following summer when I found a replacement, but couldn't remember if it was the mommy or daddy that got eaten by the washing machine.  I guessed wrong and bought another lady gingy, but they are happy and I don't discriminate. We ended up with a two mommy gingy family and all is well ;)

Top Right:  These cute little ceramic cupcakes were another gift from Mom.  They came in a set of three with the third one being blue and white.  I use the red and green for Christmas and the blue will come out after the holidays when I decorate for winter.

Bottom Left:  I tucked the other two gingy storage boxes and my second gingy towel into the space on top of the pantry.  This cabinet is next to the tree and I love how the pop of color helps to draw your eye upward.  You will be able to see this in the very last photo of this post.

Bottom Right:  A couple of gingy pot holders that I hung from the drawer pull of the bakers cabinet.


Baby Girl's Gingy Ornament

Baby Girl and the Little Man each have their own box to keep their ornaments in, so I didn't see this ornament until we got ready to decorate our living room tree.  I had to take her picture, isn't she a cute little gingy?  :)

She hangs on the kitchen tree along with Baby Girl's very own assortment of candy and cupcake ornaments.


A close-up of the treat inspired ornaments I made last year.

I thought these looked pretty in the lights from the tree, so I took a few more photos!  In case you missed it, you can click here to read the how-to post for these ornaments.


The Finished Tree


And another shot, this time at night.

I think the kitchen might be my favorite room to decorate for Christmas.  It's absolutely full of things I love and I can't help but feel happy whenever I am in there.  I hope you enjoyed these photos as much as I did!

Do you have a themed tree that you would like to share?  I love seeing your pictures too, so send them my way!  And in the meantime....

Happy Holidays and thanks for stopping by!

-Jennifer

© Jennifer Adams Flowers 2014