Saturday, October 26, 2019

DIY Halloween Spooky House


Make Your own Halloween House From a Christmas Ceramic


I have always loved miniature villages at Christmas time and this year I thought, why not have a tiny Halloween scene as well?  Read on to see how I transformed a ceramic Christmas house into a spooky Halloween cottage:


**********
Disclosure - This post contains affiliate links.  If a purchase is made through an affiliate link then (at no additional cost to you) I will receive a commision.  Affiliate links are noted below.


Supplies for Painting Your own Spooky Halloween House
Supplies

Paints, brushes, palette trays and ice tea with lemon 😉

I know I've mentioned this before, but I always stock up on paint brushes at Dollar Tree.  At only $1 for an entire package, these are great for projects where you don't want to  mess up your good artist's brushes.  Even better, they have an entire selection of canvas now too!

You can click this Dollar Tree (affiliate) link to browse their stock of art supplies.

My acrylic paints I like to pick up at Walmart as they are usually priced at only .50 per bottle.


Ceramic Christmas House Turned Halloween Decor
Tiny Ceramic House

I found the house at a yard sale for .50 and thought it would lend itself beautifully to becoming a Halloween cottage instead.  There are a few evergreen bushes and some piles of 'snow' on the roof, but no problem - a little paint in strategic places can camouflage almost anything 😁


Acrylic Paint Halloween Decor
Custom Colors


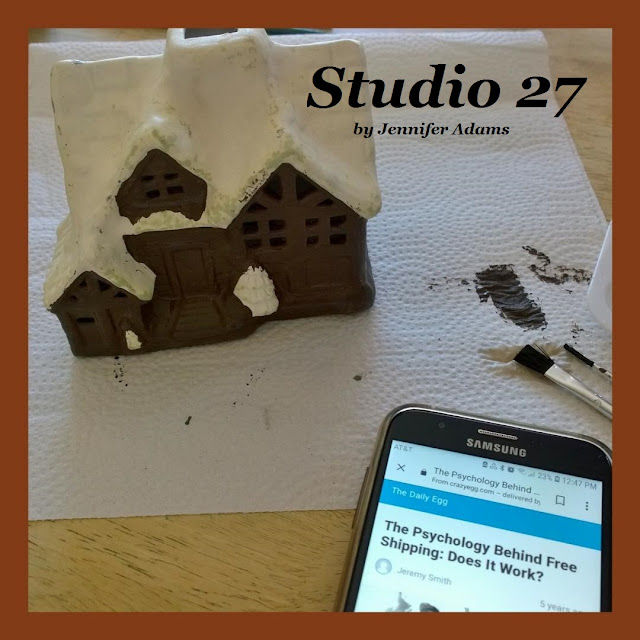
Wanting my house to be dark and shadowy, I mixed together Chocolate Sprinkle & Pewter Gray to paint the structure.


Jennifer Adams Study While Crafting
Study Time

What do you do while you wait for paint to dry?  I'm always trying to learn more about running my business so today's article was- The Psychology Behind Free Shipping:  Does it Work?

😁😁😁

Now moving on.....


Paint Your own Halloween Spooky House
Roof & Door

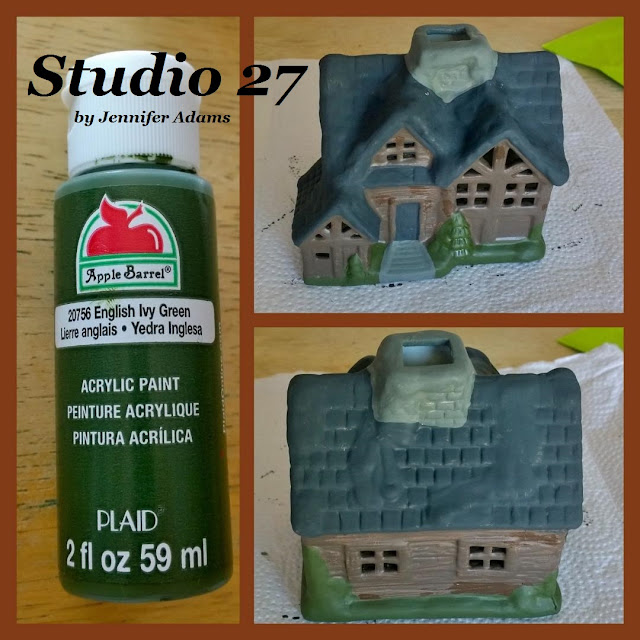
This time I combined Jet Black with the Pewter Gray to cover the roof and door.  Don't worry about those mounds of snow just yet, go ahead and cover them as regular roof tiles.


Painting a Halloween Woodland Cottage
Stonework & Greenery

I used more of the Pewter Gray for the chimney and front stairs, then chose English Ivy Green for the yard and landscaping.  I say 'yard' because that's how I painted the house to be, but it was intended to be snow.  Speaking of that snow, when looking at the back of the house in the bottom photo you can really see those drifts on the roof.

I have a solution.....


How to Paint Your Halloween House
Green it up!

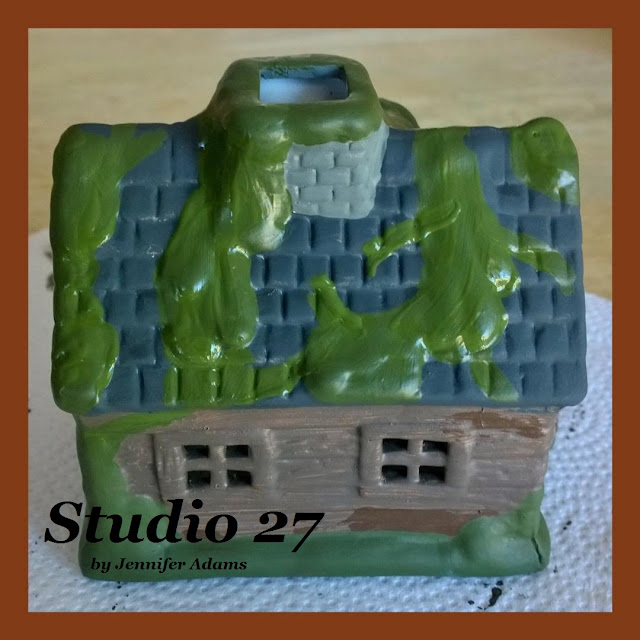
Using more of the English Ivy Green, I first painted the snowdrifts.  then I went back and added bits of green here and there to look like vines.  My goal was for the cottage to look as though it was nestled in the woods somewhere.


Acrylic Paint Halloween Decor
Fall Foliage

Harvest Orange, Jack-O-Lantern and Sunny Day were the shades of orange and yellow that I chose to use for the seasonal foliage.


Adding Fall Foliage to a Miniature Halloween House
Layers of Leaves

Starting from the top photo and working down, you can see that I first applied the Harvest Orange before layering on Jack-O-Lantern and then the Sunny Day.  By using a dry brush and sort of stamping the paint in place, I was able to create a less defined look to the leaves.


Adding Detail to a Halloween Woodland Cottage
Pumpkin

A circle of Jack-O-Lantern near the front door serves as the homeowner's pumpkin.


Adding Detail to a Miniature Halloween House
Adding Detail to a Halloween Village
Details

Lastly, using a Sharpie, I added detail to the fully dried paint.  A face for the Jack-O-Lantern, a doorknob, lines for the masonry and vining were the finishing touches.


Lighting up a Miniature Halloween Spooky House
Add a Candle

While you can certainly use an actual tealight, I prefer the battery candles whenever my kids are around.  These can be found at Dollar Tree as well  😎


Halloween Miniature House
Get Glowing

And there you have it, here is my little woodland cottage at night, all glowy and ready for trick-or-treaters 😉

**********

I hope you enjoyed this how-to post, thanks for stopping by!
-Jennifer

© Studio 27 by Jennifer Adams 2019

**********

This post was added to the following weekly link parties:

Silver Penny Sundays
Inspire Me Tuesday
Tuesday's With a Twist

Saturday, October 19, 2019

DIY - Halloween Skeleton Fairies


Make your own skeleton fairies for Halloween.

I have been seeing Halloween skeleton fairies like these all over Pinterest for a couple of years now and in so many different variations:

Leaf wings from Instructibles.com
Large wings on HalloweenForum.com
Pink and blue butterfly wings from CraftBits.com
Glitter wings on Patheos.com


I've been wanting to create some of my own and since I finally found the
perfect thrifted birdcage, here we go:


**********
Disclosure - This post contains affiliate links.  If a purchase is made through an affiliate link then (at no additional cost to you) I will receive a commision.  Affiliate links are noted below.


Thrifted Birdcage Turned Halloween Decor
Thrifted Birdcage

I found this cage at Salt & Light for $2.99 and knew it would be perfect for this project.

**********

Photo tip:  I left the cage sitting on top of this canvas to show an easy way to take well-lit, clean photos.  A sheet of canvas, poster board or even wrapping paper in front of an open door or window creates a bright and seamless background.  I use this technique often for both the blog and listings in my Esty/ Ebay shops.  The set up pictured here isn't big enough for the birdcage, but you get the idea 😉
All of the upcoming how-to photos were taken using this method.


Make your own Halloween skeleton fairies with Dollar Tree supplies

All you need to create your spooky fairies are a few plastic skeletons ($1 for a set of 4) and some artificial flowers ($1 per bush) from Dollar Tree.  I used roses for the full, rounded shape of the petals.

You can click this Dollar Tree (affiliate link) to browse their selection of holiday decor and artificial flowers.


Dollar Tree florals for Halloween Decor
Step 1

Deconstruct the flowers (they just pull apart) and then cut apart the petals.  Depending upon the type of wings you make, you'll need 2-4 petals per fairy.


Make your own Halloween skeleton fairy using Dollar Tree supplies.
Step 2

Using a bit of hot glue, attach the petals to the back of the skeleton to look like wings - and you are already done!


How to make skeleton fairies for Halloween with supplies from Dollar Tree
Variations

Using the purple rose I added four petals to create a larger and fuller set of wings.  I also used some of the foliage (right) to add a little variety to the set.


Thrifted birdcage turned Halloween decor/ Skeleton fairies.
Make your own skeleton fairies in time for Halloween.

Since my fairies were to be displayed in a cage I used a bit of clear thread to hang them from the top.  This way they look like they are flying around 😁


Skeleton Fairies, Skulls, Potions - Halloween Decor

Once complete, I put my cage of new friends on the dining table with all of our potions.
You can read more about those by clicking  here.
You can click here to see more of our Halloween decor.

And there you have it, a Halloween inspired cage of skeletal fairies 😎

**********

I hope you enjoyed this how-to post, thanks for stopping by!
-Jennifer

Wednesday, October 16, 2019

Giveaway Day! - Halloween Wall Art


Tricky Treats Bakery  Halloween Wall Art
It's time for another giveaway!

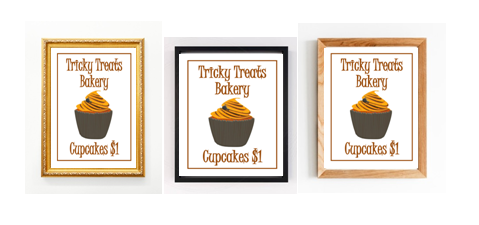
Today I'm sharing this cute little Halloween-Bakery inspired printable, perfect for dressing up your holiday kitchen.  Just download the file and print on standard printer paper or card stock.  Trim to fit an 8X10 frame and you are ready to go!

If you are interested in purchasing this printable wall art,
you can click here to visit the listing in my Etsy shop.
Otherwise read on for your chance to score the set for FREE!

Tricky Treats Bakery  Halloween Printable Wall Art
-Ready to pop in to your favorite style of frame-

I'll send the Tricky Treats printable wall art file for FREE to the first five people to contact me!

Just email me at Studio27byJenniferAdams@Gmail.com 
and put 'Tricky Treats' in the subject line.

Hurry, this offer ends Wednesday, October 23!

**********

I hope to hear from you soon and thanks for stopping by!
-Jennifer

© Studio 27 by Jennifer Adams 2019

**********

This post was added to the Best of the Weekend weekly link party.

Saturday, October 12, 2019

Halloween Decor - 2019


Welcome to our Halloween house!
Check out the decor:


In one corner a collection of cauldrons and candles sits beneath a couple of floating witches hats.

Can you see the seasonally inspired hand and footprint art?
You can click here to read more about it 😊


These witches hats were only .99 apiece at Goodwill.  They were easy to hang too, just a bit of curling ribbon attached to the tops then hand from the ceiling.

Tip:  If you want to make them look like they are really floating in mid air, use transparent thread or fishing line to hang them 😎


The cauldrons I found at Salt & Light for $2 and $3, while the skull was .50 at a garage sale.  The candles were a $5 Goodwill find, still packaged.  The box indicated that they were Christmas decorations, but I thought they looked much more Halloween-ish 😉


Nightly Glow

I prefer my decorations at night when everything is glowy and spooky 😉


The dining room table is my favorite because it features our homemade apothecary station, but before we get to that...


You can click here to read more about this skeleton wreath.


This little house was also intended to be a Christmas decoration, but I painted it with fall in mind.  I'll have a post coming soon with all the details.


You can click here to read more about my spooky owl.


In another corner I used an extra chair to hold a foliage wreath.  I just found this little house at Salt & Light for a dollar.  I'm not sure how I want to decorate it yet, but it's adorable all the same.  Especially at night with a battery tea light inside.

So that's twice now that I've mentioned Salt & Light, a local thrift store that I've recently discovered.
  
I. Am. Obsessed!

The store is clean, organized, well stocked and the daily sales are amazing.  I'll be talking about it a lot more, I'm sure!


Apothecary Station

The dining table holds my collection of potion ingredients that I put together last year.
(you can click here for the full post)

I love this area - the kids and I play a lot, whipping up different brews and spells 😎
In addition to the bottles are another .50 skull, a stack of faux books and an assortment of chalices.  The books were a $2 Salt & Light find and the chalices I found at Goodwill - I think they were $5.

I couldn't resist adding a few tealights to the chalices just so I could call them "Goblets of Fire" 😀

Can you see the birdcage?...


This cage full of skeletal fairies has been my favorite project this year.  
I'll post next week with a full tutorial!


Hidden Supplies


The stack of faux books is a actually a box.
Tucked inside are the rest of the chalices and a few faux toadstools.

**********

And that's our Halloween home.
I hope you enjoyed this holiday decor post, thanks for stopping by!

-Jennifer

© Studio 27 by Jennifer Adams 2019

**********

This post was added to the Finding Silver Pennies weekly link party and 

Thursday, October 10, 2019

Giveaway Day! - Halloween Cupcake Toppers

Purchase, download and print for your Halloween Decor!


Lately I've been producing a ton of new printable items for my Etsy shop and I've really been wanting to share them here.  But with my once per week posting schedule I felt that by having frequent available-for-purchase-item-posts, the blog would get too sales-y, if you know what I mean 😎

So I've held off until now because I've come up with a compromise!  I'm going to keep my Saturday posts reserved for standard blog content; home decor, crafting, treasure hunting and the like.  And if I have a shop item that I want to share then I'll make an additional post with as many FREE giveaways as possible.  Because sharing is caring, am I right? 😉

So without further ado, here are my Halloween Cupcake Toppers:

**********

If you are interested in purchasing this printable cupcake topper package,
you can click here to visit the listing in my Etsy shop.
Otherwise read on for your chance to score the set for FREE


Purchase, Download and Print Halloween Cupcake Toppers
Cupcakes.....

These cupcake toppers can be used - obviously - on cupcakes!  
Just cut out the design, tape to a toothpick and insert into your cupcake.


Downloadable Printables for Halloween Decor
.....And More

But don't stop at cupcakes - these cute little designs can be added to candle holders, applied as gift tags or even printed on adhesive backed paper to function as stickers.  The possibilities are endless!


Download and Print Halloween Cupcake Toppers


And now for that giveaway:

I'll send the cupcake topper files for FREE to the first five people to contact me!

Just email me at Studio27byJenniferAdams@Gmail.com 
and put 'Halloween Cupcake Toppers' in the subject line.

Hurry, this offer ends Thursday, October 17!

**********

I hope to hear from you soon and thanks for stopping by!
-Jennifer

© Studio 27 by Jennifer Adams 2019


Saturday, October 5, 2019

Fall Front Porch


Fall Florals & Pumpkins on the Front Porch

Welcome to fall!  
Today I'm sharing how I styled my front porch for the season using a mix of items I already owned plus a big batch of fall themed florals, check it out:


Treasure Hunting Haul:  Fall Florals for Outdoor Decor
The Haul

This entire pile of fall florals was picked up at a garage sale for FREE!  That's right, a box at the curb had all of this and more for no charge 😎

Since there was no cost involved I decided that I didn't mind if everything was ruined by wind, rain, sun and spiders (my god, the spiders) and I took it all outside.


Artificial Fall Florals and Pumpkins for Outdoor Decor
Bakers Rack & Strawberry Pots

I love the pops of orange mixed in with the green plants, milk glass and terra cotta.  I made sure to leave empty space here and there (including a couple of the containers) to keep things from being too cluttered.

You can click here if you want to see the porch when it was decorated for spring.


Artificial Fall Florals and Pumpkins for Outdoor Decor
Side Table

Here is a before and after of the side table empty and now filled for fall.  
The pumpkins are artificial as well and both ones that I already owned.


Artificial Fall Foliage for Outdoor Decor
Foliage Wreath

I pulled out one of my fall wreaths and layered it on top of this gold frame for the front door.  I enjoy the contrast of the formal look of the frame with the outdoorsy wreath.


Artificial Fall Flowers & Pumpkins for Outdoor Decor
Full View

Here's how neat and clean everything looked immediately after I finished.  As soon as the sun went down, those garden spiders came out and had a hay-day....but now it's ready for Halloween, right??? 😁


Artificial Fall Florals and Pumpkins for Outdoor Decor
Back Porch

I had enough of the artificial flowers left over that I decided to add some fall color to the back porch as well.  The addition of one of my ceramic pumpkins completed the look.

And that's my fall porch, both front and back!

**********

I hope you enjoyed this fall decor post, thanks for stopping by!
-Jennifer

© Studio 27 by Jennifer Adams 2019

**********

This post was added to the Finding Silver Pennies
and the Best of The Weekend weekly link parties.