Wednesday, September 28, 2016

'Gardening' Update


You may remember from this post that I decided not to plant any flowers this year, instead opting to go faux.  Why?  Because with two small children I had grown tired of having yet another chore to attend to every day.  

I thought that if I experimented with artificial flowers in my outdoor pots, it would give myself a nice little break and I'd be ready to plant again after awhile.  Well guess what?  I didn't miss the watering or maintenance.  Not. One. Bit.  Instead I found myself looking at the pots each day with happiness that they still looked picture perfect.  And when I remembered that I wouldn't have to water?  Giddy.  I felt giddy :D

So I don't really plan on planting any porch or indoor pots anytime soon.  Maybe not even ever.  Instead I've started imagining the possibilities that fake flowers could provide, and all of the seasonal changes I could make!  But first, I want to start with getting my greens a little more 'filled' out.  When I began this experiment I mostly used what I had available in my supply bins.  Now that I know the materials hold up outside, I want to implement a bit more planning.  

As far as flowers go, I'll work more on that next year.  But for now check out the amazing greenery I have found:


Florals & Greens

I found this large pile of artificial greens and flowers for $2 while treasure hunting.  I didn't care much for the faux iris, but even after tossing them out it was still a great deal.


Greens & Grapes

This huge bundle was another great deal at only $1.  I removed the grapes from the faux vines and used the wonderfully shaped faux grape leaves on their own.

**********

And now that you have seen the materials, take a look at how the pots are evolving:


Mr Gnome is more at home with this lush backdrop.


The kid's playhouse is much more home-y with better foliage.

(Can we just take a minute to appreciate the miniature toy grill?  It even has charcoal that lights up!)


The pansies look much better tucked into a bed of fuller greenery.


Some of my pots just have greens, or in this case, greens and a rock.  I'm ok with that though.  The mixture of several different greens gives a nice, clean look.

This pot did have red flowers in it when I started out the summer, but they faded pretty badly.  On the upside, I'm starting to be able to tell which kinds of colored artificials hold up to sunlight and which ones don't.


I did swap out the previous daisies for these higher quality sunflowers.  Since they came with the $2 box of greens, I thought why not?  I'm thinking in the future that I'll have sunflower-y and mum types for fall only.


The pink hydrangeas look better with a sprout of foliage as well.

**********

Remember, if you want to compare, you can click here to see the original faux gardening post.

**********

I hope you enjoyed my imaginary garden, thanks for stopping by!
-Jennifer


© Jennifer Adams Flowers 2016


Saturday, September 24, 2016

Treasure Hunting - August 2016

Here's a recap of my August treasure hunting finds:


Milk Glass Vases

After buying a couple of milk glass vases for my sister's welcome baby party last year (which I let her take home), I decided to start collecting my own.  I'm working up to a nice collection, these were only .25 each!

(You can click here to read more about that party)


Candle Holders

These heavy, resin candle holders were a steal at .50 each.  The problem?  I didn't like the color so much..........


Fresh Paint

..........So I re-painted them with a coat of bright, clean white.  Much better!


Marble Rolling Pin


Ok so, yeah I bake, but rarely do I ever make anything from scratch.  In fact, the only time I ever do is when Husby wants crepes.  I do use a rolling pin when when we roll out sugar cookies at Christmas time, but even those come from a mix ;)

So why buy a marble rolling pin?  Because my granny used to have the exact same one!  And since it was only a $1, I snapped it up.  It actually does get a lot of use, by the way, the kids love rolling it back and forth across the kitchen floor :D :D :D


Heart-Shaped Plates

These pink, sparkly dinner plates will be a lot of fun on Valentine's Day.  They were $1 each and I bought 4.


Spider Web Bowl

For .50 this bowl will be a fun addition to our Halloween table.


Another Vase

Also .25 and my collection is expanding :)


Faux Acorns

A box of fake acorns was something that I didn't already have, so yep, bought it!  I'll probably put them in a bowl with this years fall decor (the box was $1)

(Fall decor post coming soon)


Amber & Gold Tree Ornaments

These large ornaments were .50 each.  They will make a great addition to my dining room tree.

(You can click here to read more about this holiday tree)


 Milk Glass Plate

Super pretty, and only .50!


More Ornaments

Can you believe that each of these ornaments was only .10 apiece?!  The angel is for Baby Girl and the Train for my Little Man, the candies and gingys will go on my kitchen tree and the crystal/ gold- I'm not sure yet.  I might be using them to hang from the light in my closet.  Time will tell ;)

**********

There are still a few weeks of good treasure hunting left, so wish me luck!

I hope you enjoyed the post, thanks for stopping by!
-Jennifer


© Jennifer Adams Flowers 2016

Wednesday, September 14, 2016

Labor Day & an Easy T-Shirt Re-Style

For our family Labor Day is more than just a day off of work or a chance to hit up a few sales.  For us it's a chance to celebrate Husby's hard work as a member of the United Association, the social change that the organization stands for, and the history of worker's rights that organized labor has achieved.


 At the Parade


We call Labor Day 'Daddy's Holiday' and he gets to choose whatever meals he wants for the whole weekend.  In addition to all of that yummy (non heart healthy!) food, we also go to the Labor Day parade and picnic.

This year Husby planned to walk in the parade with his UA brothers and sisters.  The kids couldn't decide whether they wanted to walk with Daddy or 'watch' the parade (AKA collect candy).  So Husby suggested that we watch the parade not far from the picnic site, and then join the parade when he came by.  This was the perfect solution as it allowed the kids to both participate and watch.

Husby also thought it would be nice if we came wearing UA t-shirts.  I liked the idea, but I knew that the t-shirts available would all be really big and we would drown in them.  Then I got an idea, why not just re-style them into something that works?!


A Large T-Shirt

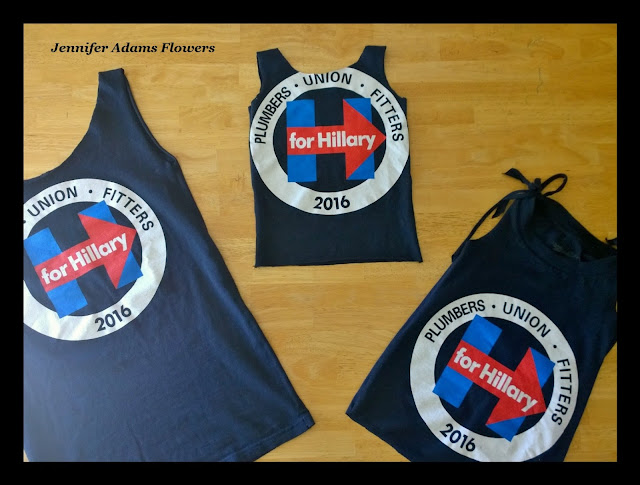
For the upcoming presidential election, the UA has endorsed Hillary Clinton, and the UA Political Task Force distributed these shirts to the locals.  The shirts feature the Hillary H on the front and the UA symbol on the back.

Keep reading to see how I re-fashioned this oversized t-shirt into an adorable tank top:


Supplies

To get started with my t-shirt, I grabbed  a pair of sewing sheers, a chalk pencil and a large platter from the kitchen.   What the what?! A platter?!  Yes!


Perfect Symmetry

I wanted my shirt to have a larger neckline, (almost a boat neck) so that when worn it would look very casual and layer over a tank nicely.  In order to do this I needed to remove the original collar and used one of my large kitchen platters to create a template.  In the past I have used dinner plates, bowls, you name it!  Just make your choice depending on the shape you are going for.

Tip:  Is there a design on the back of your shirt as well?  Make sure to take that into consideration before cutting!


Chalk Lines

Here you can see the line that I traced with the chalk pencil.


Cut-Out Collar

Carefully cut the fabric following your chalk line.  Make sure to keep the fabric flat and even, to avoid bunching.


Good-Bye Sleeves!

Since I was transforming this tee into a tank, off came the sleeves as well.  This was easy to do, I simply cut along the seams that were already in place.  After removing the sleeves, I also took in the side seams by about three inches on each side.


Fronts & Backs

Here you can see my finished tank (left) along with the shirts I re-styled for the Little Man and Baby Girl.

Middle:  For the Little Man I also went with a tank style.  His shirt was slightly more difficult to style because in order to take a man's XL down to a 4T I had to completely take apart the shirt.  Once the shirt was apart in two pieces (front and back) I used one of the Little Man's existing tank tops to trace the outline that I wanted.  I placed his tank on top of the design and traced a little larger in order to have plenty of room for a seam allowance and potential mistakes.  Then I sandwiched the pieces together (inside out so that the images were touching) and ran them through the sewing machine.  I had a little bit of trouble with the shoulders of his shirt and ended up stitching those by hand.

*Wouldn't it have been easier to make the Little Man's shirt from the large and use the XL for myself?  Uh, yeah, absolutely...but I didn't realize that they were different sizes until I was already almost finished!  :D :D :D 

Right:  For my Baby Girl I left the original collar and used a bowl to trace out the markings for new sleeves.  After cutting the sleeves, I took the seams in straight down from where the sleeves ended (I also used one of her currently fitting shirts as a guide).  With so much fabric removed, there was plenty left over to cut out a few 'ribbons'.  Each ribbon was about a foot in length and a quarter inch in width.  I used the ribbons to tie a bow at each shoulder, and another one to make a matching bow around her pony tail.

Side Note:  I didn't put in any new hems, but left the fabric unfinished instead.  I am by no means a seamstress, just a designer who likes to get creative!


All Done:  Front & Back

I was very pleased with how our shirts turned out, but also very nervous.  Luckily, everyone seemed to really like them.  One lady even left her post in the parade to come and ask where we got them!  Whew!

**********

I hope you enjoyed this how-to post, thanks for stopping by!

-Jennifer


© Jennifer Adams Flowers 2016

Thursday, September 8, 2016

Lalaloopsy Birthday - Cake Making


I'm back today to tell you all about our Lalaloopsy birthday party cakes and cupcakes!

But first, let's get you up to speed in case you have missed anything:

You can click here to read about the supplies gathered to decorate this party
You can click here to see the invitations
You can click here to learn how to make button party decor
You can click here to see the party decor

Now lets get started:


Supplies


For this party Baby Girl chose vanilla cake and strawberry cupcakes.  The cakes were to be white with pink candy sprinkles.  The party cake would feature a 'Birthday Girl' candle set and a couple of Lalaloopsy figures while the personal cake boasted a sparkly pink #7 candle.  The strawberry cupcakes were all covered in pink icing with some accented by pink sprinkle candies and others with chocolates.


Close-Up

Here you can better see the chocolates and 'Birthday Girl' candle sets, both of which were found at Dollar Tree.

Tip:  When purchasing edible items from Dollar Tree, flip over the package and make sure they have been made in the USA.  That way you can be sure that what you are eating has been prepared under government health standards.


Blossom & Petal Flowerpot

A cute sister pack was the perfect topping for the party cake - especially since that's what Baby Girl's instructions called for this year :D :D :D


Pans

I stuck with my usual sizes; three standard sized rounds, three mini rounds and two cupcake pans.

(You can click here to see more of my cake pan collection)


Food Coloring

Baby Girl also requested that her cake be a "pink gradient of color".  I figured the best way to accomplish this would be to create a three layer cake, with each layer consisting of a different shade of pink.

After mixing up the batter, I separated it into three bowls.  Into the first bowl I added 10 drops of pink food coloring, 30 drops into the second and 50 into the second.  (I'm out of pink food coloring now, by the way)


Mini Cakes

Once the cakes were finished baking, I trimmed them up and layered going from darkest to lightest with the darkest shade on the bottom.  Then I had no choice but to wait until the party to see how the layers of color looked.

*Don't forget to add a bit of icing in between each layer, it holds things in place and makes the cake prettier once cut and served.


Completed Cakes

Once the cakes were iced and covered in sprinkles, I stuck them out of the way in our extra fridge.  I waited until just before the party to add the candles and Lalaloopsy dolls on top.


Cupcakes

I was pleased with how adorable the cupcakes turned out!  Most had the chocolate candies on top, but the few that had the pink sprinkles also got a pink striped candle.  -You can see more photos of the desserts by following the link at the top of the post.


Stripes

In case you were wondering, the layers of food coloring worked!

**********

That was our Lalaloopsy birthday party, hope you enjoyed the post.  Thanks for stopping by!

-Jennifer


© Jennifer Adams Flowers 2016


Friday, September 2, 2016

Lalaloopsy Birthday Party!

Baby Girl's Lalaloopsy themed 7th birthday party was SEW cute!
Come in and see how I managed to pull it off:


The first thing that I did was to go through this pile of 12 million Lalaloopsy dolls and decide how to use them as party decor :D :D :D

I ended up using a combination of milk glass and clear glass to display them.  The larger dolls were easy to pose but the minis and tinies needed to be contained.  For those I used cylinder vases.

(What's a mini, what's a tiny?  You can click here to read more about these dolls)


**********
Let's take a look at where the dolls ended up:


Dining Table Display

Here we have Crumbs Sugar Cookie, Sprinkle Spice Cookie, a vase full of minis and a vase full of tinies.


Kitchen Table

This table featured Jewel Sparkles, Smile E. Wishes, Cloud E. Sky and a jar full of mini pets.


Living Room Table Centerpiece

Next to another jar of minis and the mini ferris wheel, sat Tiny Might.


Gift Table

Beauty Fairest, Marina Anchors and Cape Riding Hood were happy to keep an eye on the gifts :)


Babies in the Corner.....

(Crumbs Sugar Cookie, Scoops Waffle Cone and Mittens Fluff' n' Stuff)


.....and a whole bunch of the 18 inch ended up on the dining room window sil :)

Top:  Harmony B. Sharp, Peanut Big Top, Bea Spells-A-Lot, Frost I. C. Cone, Toasty Sweet Fluff and Jewel Sparkles.
Bottom:  Little Bah Peep, Bow Bah Peep, Pepper Pots 'N' Pans, Stumbles Bumps 'N' Bruises, Twirly Figure Eight, Crumbs Sugar Cookie, Trace E. Doodles and Fluffy Pouncy Paws.

*********

Now that you know what the dolls were doing, lets look at the rest of the decor:


Table Coverings

For the table tops I layered our pink and white party colors.  Each table started with a pink plastic table cloth that I topped with a length of pink and white polka-dot wrapping paper.  On top of that was a smaller length of white table cloth (cut from a standard sized plastic table covering).  After the doll centerpieces were in place I used pink buttons as table scatter.

(You can click here to read more about the supplies gathered for this party)


Balloons

For the balloons I combined white with two shades of pink.

(You can click here to read more about how I style my balloons)


Button Decor

The paper plate buttons were a cute addition to the front door and kitchen.

(You can click here to read all about how to make buttons like these yourself)


Vanilla Candle

I like to have a candle burning when guests arrive.  That in addition to my cupcake scented wax cubes, the house smells delicious!

After removing the label from the candle jar, I taped on a small strip of that polka-dot wrapping paper.  A little glue for the buttons and you have a custom candle that matches the rest of the party.


Pink & White

Cups, plates and napkins are such an easy way to carry out your party theme through simple color.  I always purchase more than one shade of napkin and layer them like in the picture.  This time (because I made paper plate buttons) I ended up with three different colors of paper plates as well.  I stacked them in a pattern (light pink, white, hot pink) so that as guests took them the different colors would be equally represented.  Good design is all in the details, people ;)

I also took the time to add a bit of wrapping paper to the cup that was holding the forks.  It's little touches like these that really complete a look.


Food Station

Tiny houses, 18 inch pets and paper plate buttons helped to make the food station a fun and whimsical place.


Drink Station

Coral Sea Shells helped to serve tea, water and soda to all of the guests.


Dessert Station

Out desserts were accompanied by a mini dollhouse, a large Blossom Flower Pot doll and more button decor.


Candies

I purchased these candies to help decorate the tops of the cupcakes.   I thought the leftovers would look cute in a milk glass bowl with the rest of the desserts.


Cake

The large guest cake and mini personal cake were triple layer vanilla with vanilla icing.


Cupcakes

This year's cupcakes were strawberry with pink strawberry icing.  Most were topped with chocolate candies but a few I decorated with pink sprinkle candies and striped candles.

I'll have more details to share about these cakes soon.
I hope you enjoyed the party so far, thanks for stopping by!

-Jennifer


© Jennifer Adams Flowers 2016