Saturday, November 24, 2018

Christmas in Progress 2018

I was all set to take today completely off from blogging as I had planned to spend the entire holiday weekend putting up the Christmas trees and decorations.  But it turned out that I have two very eager helpers on my hands!  The kids and I managed to get almost everything done in two days so I thought, why not share a few pics?  I also added links to previous holiday posts check it out:


Kitchen Candy Tree

Click here for candy tree details and ornament hanging tips.


Dining Room Tree

Click here to read about this chocolate and gold decorative tree.
Click here to see the miniature village beneath the tree.


Living Room Tree

As of now, this tree is up and lighted with my decorative ornaments in place.  This is our main tree where we hang all of our personal ornaments collected over the years.  Remember how I said that the kids and I got almost everything done?  Well, since hanging our personal ornaments is a family traditions, well get those up when we are all home at the same time tomorrow afternoon 😊

Since the living room and dining room trees can be seen at the same time, I like for them to match a little bit.  In order to accomplish this I have a base layer of ornamentation for the living room tree that includes gold beaded garland, golden snowflakes and clusters of chocolate and gold bulb ornaments.  I tuck all of these elements into the depths of the bows and then we layer our personal ornaments on top. 

Click here to see how faux garland fills out an artificial tree.
Click here for my lighting tips and tricks.
Click here to create your own golden snowflakes or ornament clusters.


Ornaments

The kids and I unpacked and organized our personal ornaments into mixing bowls and baking trays.  This way each person can grab his or her collection and take them right over to the tree.

Click here to read all about those ornaments.

That's all for now, I hope everyone is having a great weekend and thanks for stopping by!
-Jennifer


© Studio 27 - By Jennifer Adams 2018


Saturday, November 17, 2018

Mermaid Party Decor - Tabletops & Seaweed


I'm back today with the final installment from my Daughter's mermaid birthday party.  In case you have missed anything so far...

Click here to read about the seashell cookies.
Click here to see the jellyfish lanterns and balloons.
Click here to get all the details on the layer cake.

Otherwise, continue on to see how we created our table top centerpieces and seaweed decor:

**********

Disclosure- This post contains affiliate links.  If a purchase is made through an affiliate link then (at no additional cost to you) I will receive a commision.  Affiliate links are noted below.

**********


Party Theme Through Color

One of the easiest ways to structure the theme of a party by creating a solid color foundation, and a lot of that is going to take place on your table tops.  Because of this, I like to start by choosing my table coverings, plates and napkins to set the party's tone.  

For this party I used shades of blue to represent water and added a bit of pink and purple for contrast.  Everything shown here can be found at Wal-Mart and with the exception of the clear confetti balloons, costs about $1 per item.  The confetti balloons are reasonable as well at about $2 and were chosen because they looked like bubbles  

Note:  While I nearly always use Pinterest for party inspiration, this time I had extra special help.  With my niece in town at the time, both she and my daughter worked together to scan pinterest, make mermaid tails and come up with a plan for the cake.  It was they who insisted on the clear, bubble like balloon and I must say, they have good instincts 😍


Centerpiece Supplies

In order to create centerpieces for three table tops, I purchased three vases and craft sand from Dollar Tree.  The box of Party Light candles was found for $1 while treasure hunting while the seashells and votive holders I already had on hand.

Not pictured here are the fishing nets and seashells that I used in combination with the finished centerpieces.  The nets were found in Dollar Tree's summer party section and the seashells I'll describe in a bit 😉


Centerpiece Construction

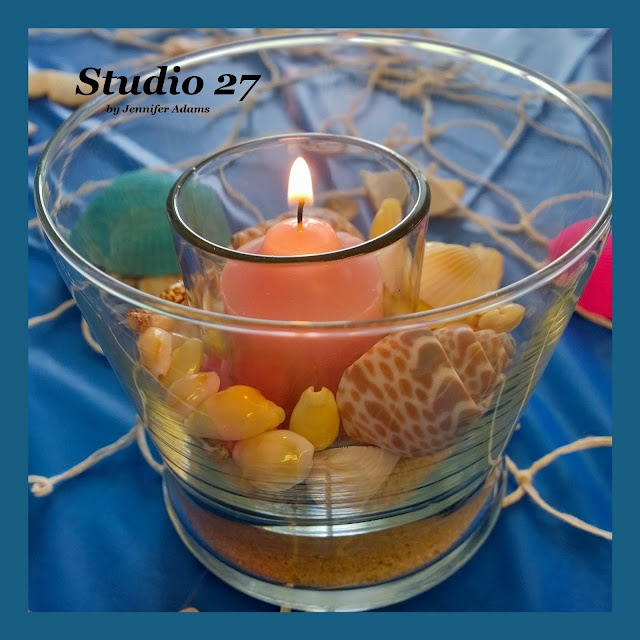
In the top photo you can see that adding a bit of sand to the bottom of the vase creates a nice bed for the decorative items.  Next, add in a votive candle holder (middle photo) and gently push it a bit down into the sand to give it stability.  Finally, add a few seashells around the candle holder to complete the look (bottom photo).

And there you have it, simple and elegant ocean inspired table decor 😎


Completed Centerpieces

Here you can see the centerpieces once completed.  The top photo gives you a better idea of how they looked on their own, but the bottom photo shows how they looked paired with our choice of table coverings and painted seashells.


Painted Seashells

This was a fun project that my daughter and I completed together.  The seashells are from Dollar Tree at $1 a bag and the acrylic paints I already had on hand. (if you need to pick some up, Wal-Mart carries them for about $1 each).  Simply bush on a coat or two of paint and let dry, it's that easy!

You can click this Dollar Tree (affiliate) link and browse their craft supplies,
glassware and party supply selections to find many of the items featured in this post. 😊


Sticker Embellishments

Remember the stickers I used to create these invitations?  Since I had a few left over, I went ahead and added a bit of pretty to the cups that were used to hold utensils.

The rest we cut out and used to add detail to the seaweed...


Seaweed Decor

This 'seaweed' was really easy to create.  I started with light green crepe paper (top photo) and taped four lengths to the bottom of the wall.  Taking one piece at a time, I gave a few twists before taping the length down a bit higher up the wall.  After I was done with the light green, I repeated the process with the darker green (middle photo).  Once all of the seaweed was in place, my daughter came behind to add in seashell stickers and mermaid tails that were still left over from creating those invitations I mentioned a bit ago.

Tip:  Make sure your strips of crepe paper vary in length to give a more natural look.

**********

And that is officially it for our mermaid party!  I won't be posting next week during the holiday weekend, but I hope everyone has a wonderful time celebrating with friends and family. 
I also hope that you enjoyed this how-to post, thanks for stopping by!
-Jennifer


© Studio 27 - By Jennifer Adams 2018

Saturday, November 10, 2018

Deluxe Printable Pack - Thanksgiving Edition + GIVEAWAY!


It's time to reveal my first Deluxe Printable Pack - Thanksgiving Edition!

You can click here to purchase this set from my Etsy Shop
(and print right away)

-or-

Keep reading for a chance to get the entire printable set for free 😉


Thanksgiving Collection

My deluxe printable packages are  digital download collections that contain the files to print an assortment of decorative tags and labels in five separate styles.  Once downloaded, you keep the files forever and may print as many times as you like!

The Thanksgiving Collection contains everything you see here.
Use the printed images to decorate cupcakes, create treat bags, put together seasonal art and much more, take a look:


Cupcake Labels

I created these tiny printables with cupcakes in mind (just attach to toothpicks and insert into a finished dessert), but they work well for decorating in other ways as well.  

Here you can see that I used one label to dress up a jar for a seasonal candy gift.  Another label, attached to the front of a glass votive, added a touch of fall to an otherwise plain candle.

(You can click here for a full cupcake printable tutorial)


Fold-Over Treat Bags


These printables, when cut from the printer sheet, are the perfect size to act as festive toppers for treat bags.  Just fill a few sandwich bags with the treat of your choice and attach a folded label to the top.  And just like that, you are ready for classroom parties or other events where you would like to send your guests home with a little something extra.


Framed Seasonal Art or Scrapbooking Material

Those 'treat bag' labels are great for more than just treats, though.  Pop them into a frame to create seasonal art or use them as background for scrapbooked photos.


Printable Labels

I loved the treat bag labels so much that I went ahead and created a smaller set of labels as well.  These are perfect for smaller framed art, treat jars and gift tags.

**********

If you liked this Thanksgiving set, stay tuned as I'm working on a few sets for Christmas and winter as well 😊

But in the meantime, how about that GIVEAWAY?

I'll send the files for the Thanksgiving Edition Deluxe Printable Pack to the first FIVE readers who contact me via email!

Just drop me a line at Studio27byJenniferAdams@gmail.com and put
'Thanksgiving Deluxe Printable Pack' in the subject line.

Hurry, this offer expires 11-17-18!

**********

I hope you enjoyed this giveaway post, thanks for stopping by!
-Jennifer


© Studio 27 - By Jennifer Adams 2018

Saturday, November 3, 2018

Mermaid Party Baking - Seashell Cookies


Halloween has come and gone, November is here and I'm finally getting to this seashell cookie post from our mermaid birthday party last August!

After seeing several photos like the one above on Pinterest, I decided it couldn't be that hard to replicate.  Read on to see how my daughter and I did it:


Supplies

Vanilla wafer cookies, graham crackers, pink cupcake icing and white chocolate Sixlets  were what we used to create these adorable desserts.


Cookie Construction

Using two of the wafers, I added a bit of icing to one and my daughter then gently placed the second cookier on top, being careful not to smash it down.  She then followed up by adding one Sixlet 'pearls' to the front of the open seashell.  Repeat the process a couple dozen times and that is all it takes to prep an army of clamshells.

Once complete, I gently stacked the cookies into a sealed plastic container and stored them in the fridge.  This was the evening before the party, so I wasn't worried about the cookies getting too soft inside of the fridge, but I probably wouldn't attempt to put them in cold storage any longer than this.  Especially not covered in icing, any way 😉


Graham Cracker Sand

Remember that box of graham crackers?  I can't remember where I read it, but it turns out that crushed graham crackers makes a perfect sandy bedding 😊  I prepped this early by smashing half a box of crackers and stored the crumbs in a plastic bag.  

Once it was time to ready the dessert station, I spread the crushed crackers out over a cupcake stand before putting the seashell cookies on top.


Sandcastles

I also added these sandcastles to give a bit of whimsy to the display.  Found at a thrift store they were about $5 for the set.  

This was a great deal as the original tag was still in place on the bottom of the large one, indicating a price of $15!  It also said that the castles were made of real sand, which is pretty cool 😎


Completed Seashell Display


Dessert Station

Here you can see the seashell cookies on display with the cakes at the party.  Notice that crepe paper seaweed in the background?  I've got one more mermaid party post where I'll get to that and the table tops.  Until then, enjoy this first weekend of November!

Want more details from this party?

Click here to read about the invitations.
Click here for a party decor preview.
Click here to read more about that pretty layer cake.

**********

I hope you liked this bakery post, thanks for stopping by!
-Jennifer


© Studio 27 - By Jennifer Adams 2018