Wednesday, June 29, 2016

Beads, Beads & More Beads!

After finding a very large bag of beads while treasure hunting,
Baby Girl and I decided it was time to finally organize our bead collection.


So Many Beads!

This photo is from the aforementioned bag of beads, all for $1!

It was a great deal, but they were all mixed up.  We decided to ditch our sloppy, sandwich baggie storage and  buy a few plastic bead organizers instead.

Check out the new look:


Sorting the Rainbow

It took us a couple of rainy afternoons, but soon our beads were nice, neat and ready for crafting!

*The Little Man helped out twice by throwing beads all over the dining room ;)


Stackable

Not only are the beads now prettily organized, but the containers stack up for easy storage.  I also love that they are translucent so that I can see what's inside at a glance

We found these containers in the craft section of Dollar Tree, but there were only 2 in stock.  I checked online and discovered that they were available, but could only be ordered in bulk quantities of 24.

I figured, no problem whatever was left over could be used for something in the garage, right?
Nope, it took all 24.  Every.  Single.  One.

I don't know if I should be proud of my collection or ashamed...we'll go with proud!

:D :D :D :D

What do we use our beads for?  Baby Girl likes to make jewelry for herself and friends as well as various craft projects.  I like to use them for hair accessories, Easter eggs and beaded pumpkins.

So that's our nicely organized bead collection.  I hope you enjoyed the post, thanks for stopping by!

-Jennifer

© Jennifer Adams Flowers 2016

Thursday, June 23, 2016

Summer Decor 2016

Since I am spending the day tucked away in the air conditioning,
I'll share some of my newest summer decor items!

 Take a look:


Lemons

These are the new lemons that I picked up treasure hunting this spring.  I couldn't remember if I already had lemons or not, but (of course) decided to take these home anyway.

(You can read more about that day by clicking here)


Double Lemons

Well, it turns out that I did already have lemons stashed away in the garage (surprise, surprise)!

Can you believe the difference in color though?  The new lemons on the left are bright and pretty while the set I already had (right) look dull and unappealing compared to the new set.

I had contemplated painting the old set lime green (since I still haven't come across any faux limes)....but the lemons are quite a bit bigger than a lime should be and I like for things to be realistic.

For now I put the old set of lemons in a bowl on top of my microwave and I'll keep looking ;)


Succulents

I've had my eye on these faux succulents for a couple of years now but never purchased any.  Since I had to order a case for a succulent themed wedding package (post coming soon!) I decided to keep a few for myself.

The pots that the succulents came in were small, terracotta colored and plastic.  I liked the color but not the 'plasticy' look - I'm all about my fakes, but they can't look fake, know what I'm saying??? :D

So I ended up re-potting them into these little white wooden containers.  (These are the same containers that I used for the desktop floral pen arrangements for teacher appreciation week).  I like that they are white, but I think they are a bit to modern looking for my taste.  I know I'm going to end up changing them again but I'm not sure yet exactly how ;)

(You can click here to read more about the desktop floral pens)


Oranges & Sunglasses

Baby Girl can no longer fit into these adorable pink sunglasses, but I can't bear to let them go.  My solution?  Tuck them into a bowl of faux oranges - you can't get more summery than that!


You can click here or here to see more of my summer decor.


**********

That's all for now, enjoy the sunshine and thanks for stopping by!

-Jennifer

© Jennifer Adams Flowers 2016

Tuesday, June 14, 2016

How To: A #1 Teacher Wreath


A couple of posts ago I shared with you the desktop floral pens that we made during teacher appreciation week.  I'm finally back today with the wreath that I mentioned in that post, read on to see how easy it was to put together!

(You can click here to read about the pens)

(The photos in this post were enhanced using Photoshop's Spring filter and white Vignette  border)

(This post is for you, Ms. Campbell, thanks for being the BEST 1st Grade teacher EVER!!!)

Ok now, on with the wreath......


Materials

For this wreath I used a straw base, bright red fabric tulips and a #1 Teacher chalkboard pick.

Baby Girl found the chalkboard pick back in September and had to have it for this year's appreciation gift.  I said ok and then (eventually) chose the tulips because they were spring flowers whose color matched the red apple on the pick perfectly.  Sometimes you start planning months in advance...ok, ok, if you are me you do that all the time :D


Step 1

After gluing one of the green leaves in place, I began layering the tulips on top.


Step 2

Keep layering!  I chose to create an asymmetrical wreath where only some of the wreath base was covered by flowers.  You could cover the entire wreath form if you wanted, or come up with another design entirely.


Step 3

After the flowers were in place I softened the look by layering in a few more greens.


Step 4

After using a pair of wire cutters to remove the chalkboard sign from it's stick, I glued it in place at the center of the tulips.  And that was it, all done!

I thought the wreath looked ok at this angle but then I hung it up for a photo and.....


.....realized that it looked much better hanging at a slight angle.

That happens sometimes in design.  Sometimes you change things up a bit along the way, sometimes you adjust the finished product or sometimes you go in a completely different direction altogether.  It's all ok, just enjoy the creative process!

**********

I hope you enjoyed this how-to post, thanks for stopping by!

-Jennifer

© Jennifer Adams Flowers 2016

Thursday, June 9, 2016

Treasure Hunting Finds (Early Summer 2016)

Take a look at a few of the little treasures I've stumbled upon recently:


Strawberry Ornament

I've been into strawberries lately and found this little beaded ornament for .50
I haven't decided if it will be a Christmas tree ornament or a kitchen ornament, but for now it's resting on a plate on my baker's rack.

(You can click here to see the baker's rack)


Milk Glass & Strawberries

The bowl I found for $3 and the pitcher was $1.
I love the summery feeling I get from the strawberries!


I tucked the new pitcher along side a strawberry printed colander that I already own.  The colander used to be my Granny's and sits nestled into some ivy leaves at the top of a kitchen cupboard.  

(You can click here to see the rest of my kitchen decor)


Silicone Baking!

I found the pumpkin mold for .50 while the packages and gingies were .25 each.  

I manage to squeeze them into my baking cabinet storage.....


.....It's getting a little full in there :D :D :D

(You can click here to read more about my collection of baking supplies)


Tart Ornament

This little fruit-filled tart was priced at 50 cents.  For now I hung it from the top of a cake dome, but I think I'm going to add it to my kitchen Christmas tree ornament collection.

(You can click here or here to see my holiday kitchen)


Misc Holiday Supplies

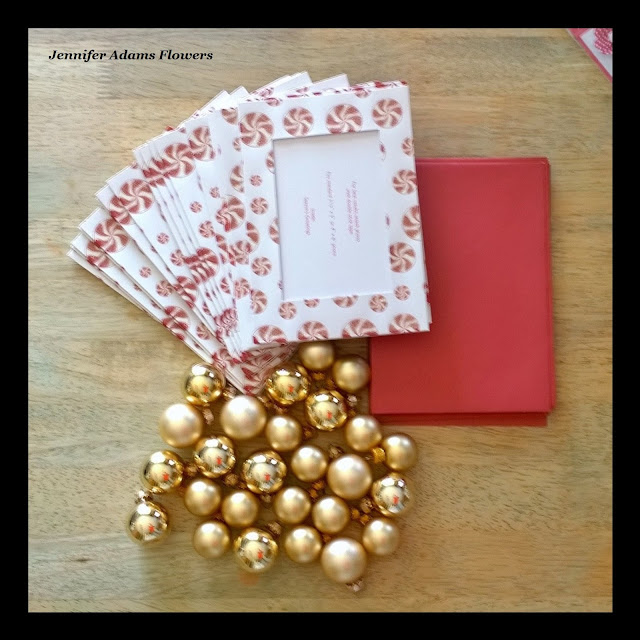
I found the gold bulb ornaments and peppermint stationary all for .50
  
The ornaments will be tucked away for holiday decorating and the stationary I will split apart.  In other words, I have no idea how I'll be using the ornaments ;)

The peppermint printed cards will be great for holiday scrapbooking while the red envelopes will probably be used for the Little Man's next set of birthday invitations.


Rainbow Ornaments

Remember when the kids got their own Christmas tree?  Baby Girl wanted to decorate it in a rainbow theme.  For .50 these will start that project off nicely ;)

(You can click here to see the kid's holiday tree)


Resin Urn

This urn was another $1 find.  I loved the size and shape, hated the color.....


.....so I painted it out white.  I'm not sure if I like the white or not.
But since I am currently out of gold paint, this will have to do for now :D


Miniature Dome

Intended to be the cover for a small cheese plate, I found this glass dome for $1.   I bought it thinking that I would stash it away until I found a coordinating stand, and then remembered that I already have a small raised pedestal plate (right photo).  

I think the plate was meant to be a candle holder, but I've never used it that way.  It was one of those finds (treasure hunting for $1) that I bought and then never really knew what to do with it.  I liked it, but kept it up on a top shelf and never used it.  In fact, I almost got rid of it, twice! 

I'm so glad I kept it because I realized that the little dome would look great on top of it.


In place

Here you can see the newly topped plate pedestal on my shelf.  I love how it turned out and I'm so glad that I kept the pedestal plate!

**********

Those are my goodies for now- stay tuned for more and thanks for stopping by!

-Jennifer

© Jennifer Adams Flowers 2016


Thursday, June 2, 2016

Make Your Own: Desktop Floral Pens


A few weeks ago Baby Girl's school celebrated Teacher Appreciation Week.  
We love, love, love Baby Girl's teacher and decided to make her a wreath (post coming soon).  We also wanted to show appreciation for Baby Girl's awesome principal and the office ladies, so we made up a few floral pen arrangements.

Check out how easy these are to pull together:


Flowers

I looked through my summer supply bins and chose three different colorful daisies for these arrangements.  I wanted each 'bouquet' to pop with bold color.  I also pulled a few small leaves out to create some foliage.

Note:  You can see that I have removed the floral blooms from their stems, I'll be replacing those with toothpicks in a bit.


Pots & Pens

Left:  After searching through my collection of containers, I decided on these pre-filled (with Styrofoam) wooden pots.  I liked these better than plastic because their weight will keep them from tipping over.

 The pots came already painted white, but with sort of an antique-y well worn look.  I wanted them to be bright and clean looking so I freshened them up with a coat of white paint.  I also darkened the Styrofoam to look like potting soil. 

Right:  Pens!  A package of pens was the only thing I had to actually leave the house for - there are perks to running your own business, supplies abound!  Maybe one day I'll take you on a tour of my supply stash......


Prep the Pens

I used a pair of wire cutters to remove the paper clip extension from the pen caps, prepping three pens for each arrangement.


Glue in Place

After running a bead of hot glue along each pen cap, I gently pushed them into the Styrofoam.  The glue will keep the caps from falling back out of the 'soil'.

I recommend inserting the caps at a slight angle so that when the pens are in place, they sort of radiate out from the center.  This will give your flowers more room once the arrangements are complete.


Making Flowers

After applying a small dot of hot glue, I attached a toothpick into the underside of each flower head.  This creates a nice, small but firm, 'stem' to tape to the pen.

Once the toothpicks had cooled into place, I taped them to the pens with green floral tape.  Make sure to keep wrapping the tape all the way down, covering most of the pen.  This gives the arrangement a more natural look.

Tip:  Remember that when working with floral tape, you must gently stretch as you go.  Stretching the tape activates the adhesive properties and keeps the tape in place.  However, I always add a tiny bit of hot glue where I leave off.  I don't want my tape to end up unraveling ;)


Pens in Place

Things are starting to come together here, and look pretty great!  But, there needs to be just a little bit of foliage to fill things out.


Greens

Remember those tiny little leave from the earlier photo?  Once I got the flowers in place, the tiny leaves seemed...too tiny!  

Back into the supply bins I went until I found these similarly colored linear leaves.  
A combination of the two types will be perfect!


Greens

I glued two long leaves at the back of each arrangement and tucked one of the smaller leaves down in front.  Each of the leaves came already wired, so they were easy to gently bend into a realistic looking position.

The arrangements look so much better now, foliage helps everything ;)


Ready to Write

The pens can stay positioned in the container as a cute, desktop arrangement, or be easily pulled out to use.


Gift Wrap

Once the arrangements were complete, we slipped them into gift bags that Baby Girl decorated.

And it's that easy to create your own floral pens.  I think I might need a few for my own desk ;)

**********

I hope you enjoyed this how-to post, thanks for stopping by!

-Jennifer

© Jennifer Adams Flowers 2016