Friday, May 30, 2025

Fake Bake Cheese From Baby Toy

 Toy Upcycle

I'm always on the lookout for pieces to add to my fake bake collection - whether it's ready made faux foods or molds to make my own, I can't pass them up!  Sometimes I even end up bringing home kids toys to work in with my decor, check it out:


**********


Disclosure - This post may contain affiliate links.  If a purchase is made through an affiliate link then (at no additional cost to you) I will receive a commission.  You can read more about affiliate links here


**********

Toy Upcycle

I was at my favorite thrift store when I found this little cheese with mouse toy for $3.  It's was so cute and I knew that If I re-worked it a bit I could tuck it into my faux pantry storage.


Toy Upcycle
Toy Upcycle

After donating the little mice toys back to the store, I used metallic gold paint to cover up the original border.  And that was literally all that I did!


Toy Upcycle
Toy Upcycle

Here you can see it intermingled in my fake bake pantry shelf.  Not only is it cute on it's own, but it gives me another stable surface to stack tinier items on top of.....and I have plenty to stack 😄

**********

I hope you enjoyed this toy upcycle, thanks for stopping by!
-Jennifer

© Studio 27 by Jennifer Adams 2025


**********

This post was added to the following link parties:


**********

Do you like the convenience of crafting or organizing with instantly available digital downloads?
Check out this week's features from my Etsy shop:

**********

Summer Campfire Fake Bake Tiered Tray Decor
S'more Printable

**********

Summer Cricut Crafting
Camping SVG Bundle

**********

Are you thinking of starting a blog or a seasoned author who wants to get organized?  This 115 page printable bundle is for you!  I created these pages for my own use and found them so helpful I thought I should make them available for other bloggers as well.  Click the link below the image to read the full item description.


Planner Download

Tuesday, May 27, 2025

Wednesdays in the Studio - Link Party 19

 Weekly Link Party

Welcome to Wednesdays in the Studio, a weekly link party focusing on designing everyday life.
Thank you to everyone who joined last week!  This week's features include:

Weekly Link Party

A popsicle coloring page from Creatively Beth
A pullover crochet pattern from Stitch Whisper Designs
A shortbread cookie recipe from Trial and Error Home Ec
A plastic bowl turned hanging planter from Steph Creates Things


**********


Weekly Link Party

Were you featured?  Grab this photo and add it to your blog!

**********

Want to join this week?  Here are the rules for participation:

*Add up to 3 posts related to designing everyday life.  Examples include crafting, sewing, cooking, baking, home decor, holidays, party planning, blogging, thrifting, gardening, DIY projects, organization and so on.

*Please link to a specific post and not your homepage.
*Link only your own posts, not someone else's.
*Etsy shops, giveaways and other link parties are ok as long as they are design related.
*Party runs from Wednesday until Monday each week, Central Standard Time.
*A link back to this party isn't required but is appreciated!
*Linking up gives you the opportunity to be featured in next week's party.

*By Linking up you give Studio 27 by Jennifer Adams permission to use your posts and photos in social media and as features.  If used, a link back to your material will be given.

**********

If you don't already, please consider following me on:

*  Facebook  *  Pinterest  *  Instagram  *  Etsy  *

**********

Now let's party:

You are invited to the Inlinkz link party!

Click here to enter
-Jennifer

© Studio 27 by Jennifer Adams 2025


**********

Do you like the convenience of crafting or organizing with instantly available digital downloads?
Check out this week's features from my Etsy shop:

**********

Fake Bake Tiered Tray Decor

**********

Cricut Organization

**********

Are you thinking of starting a blog or a seasoned author who wants to get organized?  This 115 page printable bundle is for you!  I created these pages for my own use and found them so helpful I thought I should make them available for other bloggers as well.  Click the link below the image to read the full item description.


Saturday, May 24, 2025

Resurfacing Your Countertops

 Kitchen Decor

Have you ever wanted to change your countertops without having to actually install new ones?  Read on to see how you can easily resurface them using ready made products:


**********


Disclosure - This post may contain affiliate links.  If a purchase is made through an affiliate link then (at no additional cost to you) I will receive a commission.  You can read more about affiliate links here


**********


Kitchen Decor

This photo (from our home's sales listing) shows you the walls, floors, cabinets and countertops as they were at move in.  I repainted the walls beige, the cabinets white and my husband replaced the linoleum with stone gray ceramic tiles - you can see those changes in this post.


Kitchen Decor

Here is how the countertops looked up close - a beigy marbled laminate.  I didn't think they were all that bad by themselves, but with the new tile floor it was just too much contrasting pattern.

We wanted to calm them down with something neutral and decided to use Rust-oleum's Countertop Coating.  The product is available to be tinted in several different colors, and must be done so by a sales associate at the time of purchase.


Kitchen Decor

The cans are a bit small so we got two just in case.  If you do get multiple cans, make sure to open them up, combine them into a larger container and mix well.  Because the coating is tinted at the time of purchase, it's possible to have variance between cans.  Mixing them together prior to use will prevent you from painting half of your surface in one color, then opening a second can and painting the remaining in a slightly different shade.


Kitchen Decor

Prep your surface by cleaning well, lightly sanding, cleaning again and then taping off the areas where the counters touch the walls.  We used a small brush to cut in around the sink and then rolled on the rest.  The most important tip is to make sure that your space is well ventilated!  This stuff is noxious and you will definitely get light headed and headachy if you don't have enough fresh air.


Kitchen Decor

The instructions on the can say that the product should cure for 72 hours before use.  We managed this by painting the perimeter counters first, using the island for 3 days and then swapping.  That caused the project to take almost a full week to complete, but it was better than not being able to use the kitchen at all for three days.  Luckily our island has a power outlet so we plugged the microwave in there, but you could always move your small appliances to another room if you needed to.


Kitchen Decor

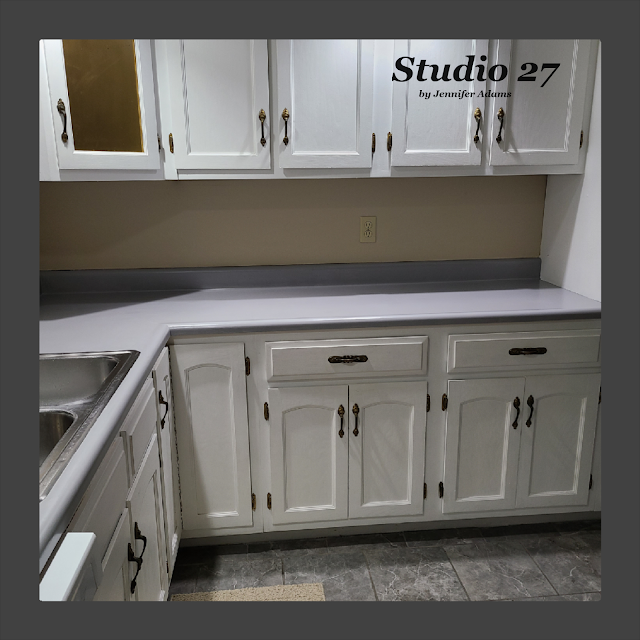
The flat gray color really toned things down and made a calmer environment.


Kitchen Decor

And that's how we resurfaced our kitchen countertops!


**********

Do you like the convenience of crafting or organizing with instantly available digital downloads?
Check out this week's features from my Etsy shop:

**********


Kitchen Baking Decor
Life Is What You Bake It Printable


**********


Kitchen Organization and Decor
Spice Rack Labels SVG Bundle


**********

Are you thinking of starting a blog or a seasoned author who wants to get organized?  This 115 page printable bundle is for you!  I created these pages for my own use and found them so helpful I thought I should make them available for other bloggers as well.  Click the link below the image to read the full item description.


Planner Download

**********

This post was featured at:

Tuesday, May 20, 2025

Wednesdays in the Studio - Link Party 19

 Weekly Link Party

Welcome to Wednesdays in the Studio, a weekly link party focusing on designing everyday life.
Thank you to everyone who joined last week!  This week's features include:


Weekly Link Party


An easy to sew baby rattle from Fresh Vintage by Lisa S
Gluten free strawberry blondies from Me and My Inklings
A pretty summer wreath from Blue Sky at Home
Growing herbs for your garden and kitchen from Thrifting Wonderland


**********


Weekly Link Party

Were you featured?  Grab this photo and add it to your blog!

**********

Want to join this week?  Here are the rules for participation:

*Add up to 3 posts related to designing everyday life.  Examples include crafting, sewing, cooking, baking, home decor, holidays, party planning, blogging, thrifting, gardening, DIY projects, organization and so on.

*Please link to a specific post and not your homepage.
*Link only your own posts, not someone else's.
*Etsy shops, giveaways and other link parties are ok as long as they are design related.
*Party runs from Wednesday until Monday each week, Central Standard Time.
*A link back to this party isn't required but is appreciated!
*Linking up gives you the opportunity to be featured in next week's party.

*By Linking up you give Studio 27 by Jennifer Adams permission to use your posts and photos in social media and as features.  If used, a link back to your material will be given.

**********

If you don't already, please consider following me on:

*  Facebook  *  Pinterest  *  Instagram  *  Etsy  *

**********

Now let's party:

You are invited to the Inlinkz link party!

Click here to enter
-Jennifer

© Studio 27 by Jennifer Adams 2025


**********

Do you like the convenience of crafting or organizing with instantly available digital downloads?
Check out this week's features from my Etsy shop:

**********

Honey Bee Decor

**********


Summer Cricut Crafting

**********

Are you thinking of starting a blog or a seasoned author who wants to get organized?  This 115 page printable bundle is for you!  I created these pages for my own use and found them so helpful I thought I should make them available for other bloggers as well.  Click the link below the image to read the full item description.


Monday, May 19, 2025

Paper Mache Beehive

Summer Decor

I found a beehive cake pan at the thrift store and knew I wanted to use it to construct a paper mache hive, read on to see how:


**********


Disclosure - This post may contain affiliate links.  If a purchase is made through an affiliate link then (at no additional cost to you) I will receive a commission.  You can read more about affiliate links here


**********

Summer Decor

Here is the pan that I found for $5, I knew right away that I wanted it for a decor piece!  I've done a lot of cake pan makeovers using paint, but because half of this cake pan is always upside down that wasn't going to work.  I decided to pull out my elementary school memories of paper mache and see what I could manage...


Summer Decor

I did this exactly as I recalled from grade school; cut strips of paper dipped in a sticky mixture of flour and water.  I hear that some people use glue instead of the flour/ water mixture, but this ended up working out ok.


Summer Decor

Strip by strip I layered on top of the cake pan, making sure to capture as much detail as possible by pressing the strips as closely to the various shapes as possible.  I didn't worry too much about it because I knew I could fix up any blemishes with paint later.  I also left a bit of overlap around the edges, I figured it would be easier to pull the dried paper mache off if it had more of and edge.


Summer Decor

Here is how the hive looked when dried as I pulled it off.  I used scissors to trim the edges.


Summer Decor
Summer Decor

I wanted my beehive to sit on a shelf in my garden shed and not be too big, so I only made the front half of the hive.  This meant that there was no back to the hive, but I fixed that by tracing and cutting out some foam board.


Summer Decor
Summer Decor
Summer Decor

To give the hollow hive more strength, I stuffed it with plastic bags before attaching the foam backing with glue.


Summer Decor

I painted the entire hive first in Apple Barrel Khakki.


Summer Decor

Then used Golden Sunset to add dimension and Milk Chocolate to highlight the details (both also Apple Barrel brand).


Summer Decor
Summer Decor

The bees were a bit messy through the paper strips, but I was able to better define them using puffy paint.


Summer Decor

And that's how I made my paper mache beehive, it now happily lives outside in my garden shed.

**********

I hope you enjoyed this how-to post, thanks for stopping by!
-Jennifer

© Studio 27 by Jennifer Adams 2025


**********

This post was added to the following link parties:


**********

Do you like the convenience of crafting or organizing with instantly available digital downloads?
Check out this week's features from my Etsy shop:

**********

Bumble Bee Honey Jar Home Decor
Honey Printable

**********

Summer Honey Bumble Bee Crafting
Honey SVG Bundle

**********

Are you thinking of starting a blog or a seasoned author who wants to get organized?  This 115 page printable bundle is for you!  I created these pages for my own use and found them so helpful I thought I should make them available for other bloggers as well.  Click the link below the image to read the full item description.


Planner Download

**********

This post was featured at:


**********