Putz houses, or tiny decorative houses, are extremely popular these days!
Just take a look at these examples:
I have always loved little villages at Christmas time and have been wanting to expand my collection to include tiny houses for other holidays as well. I've been on the lookout for awhile, wanting to find some tiny houses that would either be ready to decorate myself or easy to redecorate. Finally I wondered how difficult would it be to make some up myself?
Well yesterday was the day that I finally took the plunge and designed a collection of my own, ready to decorate, little houses. Read on and I'll show you how I did it:
********
Disclosure - This post may contain affiliate links. If a purchase is made through an affiliate link then (at no additional cost to you) I will receive a commission. You can read more about affiliate links here.
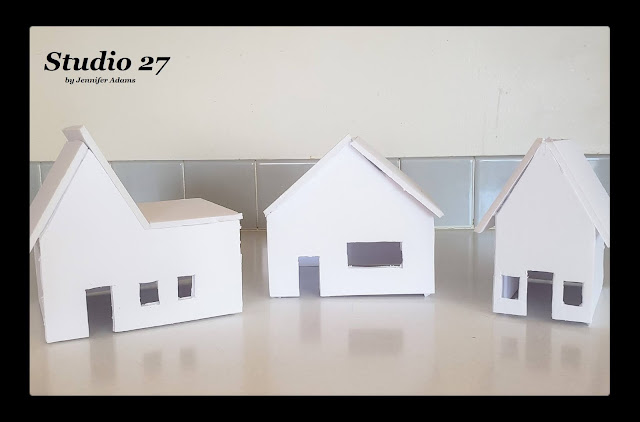
This first picture I'm showing you is of the three different styles of houses that I made. The top and the bottom left are the simplest, with the bottom right being only slightly more difficult. I'll walk you through how I did both!
Let's start with the most simple of houses, this narrow building. All you really need for this house is a series of 6 rectangles, 4 of equal size for the walls and 2 slightly larger for the roof. You take two rectangles and trim the ends to create an angled roof, then add the details of doors and windows. I only placed openings at the front of my houses, but you could certainly get as complex as you would like. The rest of the rectangles, the two of similar size that will be the side walls and the two slightly larger that will be the roof, you can leave alone.
*Note - The two rectangles for the roof don't absolutely have to be slightly larger, I only did this to give a bit of overhang to the look of my roof. If you really want to keep things simple, the roof pieces can be the exact same size as the rest.
For reference, the pieces that are pictured here are about 3" X 5", or roughly the size of an index card.
You can cut your rectangles out of many different materials; cardstock, balsa wood and cardboard being just a few. I decided to go with foam board for mine which you can pick up at Dollar Tree for just $1 a sheet. I was able to make all three of my houses with one sheet and still had foam left over.
So how did I cut out my pieces? Let me tell you, I had these grand ideas of popping my foam board onto a Cricut mat and letting my cutting machine do the work for me. In fact, I even went into Design Space (Cricut's design program) and made all my shapes there. It wasn't until I went to cut that I realized that my foam board is too thick to fit into the machine...oops!
At that point I switched things up and changed my 'cut' files into 'draw' files (only the Cricut Maker can do this) and had the machine draw the shapes out onto paper instead. I then used those papers as stencils and cut the foam board by hand using a craft knife instead.
So how can you cut out your shapes?
-If you have a cutting machine and are using the correctly sized material, you can have your machine cut the pieces for you. Your pieces can be those you have designed yourself, or you can purchase SVG files to use.
-If you have a Cricut Maker and are using foam board, you can use your machine to draw your pattern onto paper, then use that pattern to cut your board.
-If you don't have a cutting machine, you can simply create your own pattern onto paper and then cut your materials yourself.
Now that we have discussed the cutting, let me show you the assembly!
Still working with the simple house here, I took the front and back sections and glued them in a box shape with the side walls using hot glue.
Next I used my slightly larger roof rectangles and glued them on top.
The wider house will be assembled in the same way, but what about this one with the funny roof line?
Start your house in the exact same way as the narrow one, creating a box with the front, back and side walls.
Using your roof pieces, glue them onto the peak leaving an open section.
Then take another section the same size as the side walls (you'll have to cut one extra) and glue it down as a flat roof.
And there you have it, ready to decorate miniature houses.
💗I'm thinking these will be turned into candy themed Valentine's Day houses 💗
**********
I hope you enjoyed this how-to post, thanks for stopping by!
-Jennifer
© Studio 27 by Jennifer Adams 2021
**********
This post was added to the following link parties:
This Post was featured at:


Jennifer, I love tiny houses. Yours is super adorable ! Thank you for sharing with us at Meraki Link Party at Doodle Buddies. Drop by this evening to join the next Meraki Party..
ReplyDeleteMuch love
Naush
I'll be there, thank you!
Delete