Friday, July 26, 2024

House Gnomes: A Miniature Laundry Room

 Dollhouse Miniatures

If you've visited my blog before you might remember that scattered throughout my home I have several of what I call "house gnome doors".  Made with my Cricut, these black vinyl stickers look like cartoon mouse holes and are tucked away here and there at baseboard level.  I thought it would be fun to be able to somehow peek inside the tiny houses and came up with the idea of using shadow boxes to create interior rooms.  I started with the laundry room, check it out:


**********


Disclosure - This post may contain affiliate links.  If a purchase is made through an affiliate link then (at no additional cost to you) I will receive a commission.  You can read more about affiliate links here


**********

(In case you missed it, here is that post where I took you on a tour of all my house gnome doors)


Dollhouse Miniatures

Wanting to look 'inside' the house gnome rooms without cutting holes in my walls is why I thought shadow boxes would work the best.  I was browsing the thrift store and found a stack of these hot pink and turquoise wooden art pieces for $1.99 each.  By flipping them around they created the perfect miniature shadowbox, all I had to do was paint them to blend in with my walls.


Dollhouse Miniatures

After the beige paint was dry I first sketched out in pencil how I wanted the room to look.  This box was going to by a tiny laundry room with an upstairs and I painted those background details in acrylic. 

 Notice the difference between the middle shot and the one on the right - by cutting and adding a painted popsicle stick the stairs now have dimension.


Dollhouse Miniatures

Using more popsicle sticks I glued three together, painted them and positioned them to serve as the upstairs floor.


Dollhouse Miniatures

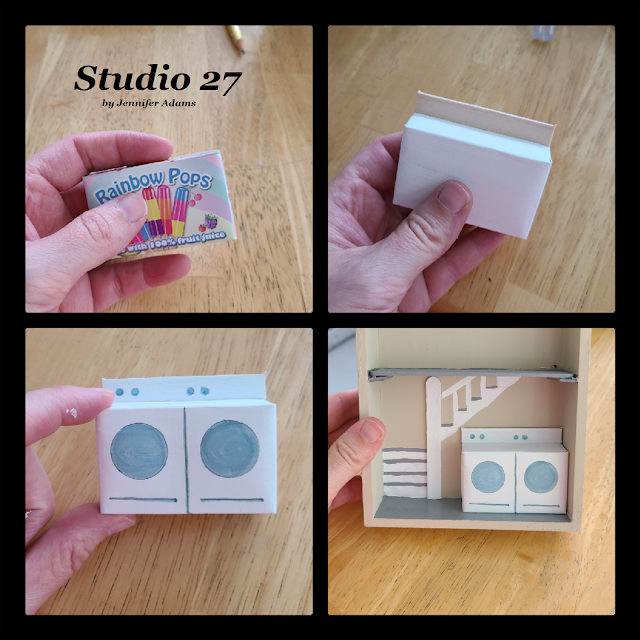
I recycled a small cardboard box to create the washer and dryer by first painting it in white, gluing a cut popsicle stick to the top and then adding in the details with markers.


Dollhouse Miniatures

More popsicle sticks served to create wall shelving as well.


Dollhouse Miniatures

Next was the really fun part - coming up with accessories and decorations!  Combing through a huge bin of Barbie toys was really helpful here.  I simply chose what I wanted based on size and shape, then repainted it to go with my laundry room.

If you need to, you can always find cheap tiny accessories at Dollar Tree, as well as the popsicle sticks and the hook and loop tape that I mention in a minute.


Dollhouse Miniatures

The two baskets is a Barbie basket that I cut in half lengthwise and glued into place, the containers and planters are all Barbie kitchen containers that I painted and the overhead light is a button.  The towels are just pieces of felt that I folded over and glued in place and the greens are tiny bits that I cut off of larger faux bushes in my craft supply.  I added in a couple of extra gold buttons as decoration.


Dollhouse Miniatures

With the room done I needed a way to close it up.  Each room will hang on the wall in my home near the corresponding gnome door, but I don't want them open all of the time.  For one reason having them open would look kind of cluttery, but also I hate dust!

Using a piece of heavy cardstock I cut it into the size of the shadow box and glued popsicle sticks to the interior side to add strength.  It doesn't show in this photo, but I  painted the doors in the same shade of beige as the boxes.


Dollhouse Miniatures

In order to attach the doors to the boxes, but still make them easy to open, I used tiny bits of hook and loop tape.  The tape is adhesive backed so once it was cut I just pressed it into place.


Dollhouse Miniatures

Here is how the box looked with the cover on.  Nice and tidy, but a little bland.


Dollhouse Miniatures

Back to the Cricut I went to create a pretty decorative sticker in gold.  It's simple but nicely dresses up the box.


Dollhouse Miniatures

And there you have it, a little laundry room!  I have more posts coming up where I'll show you in similar detail each one of the tiny rooms I have made, as well as a post showing how they look installed on the walls.


Do you like the convenience of crafting or organizing with instantly available digital downloads?
Check out this week's features from my Etsy shop:


**********


Laundry Room Organization & Decor
Laundry Room Labels SVG Bundle

**********

Fake Bake Tiered Tray Decor


**********

This post was featured at:


**********


**********


**********


Friday, July 19, 2024

Reupholstered Patio Chairs With Vintage Curtains

Furniture Restyle


I have a patio set in the back yard where the fabric on the chairs was ripped and coming apart.  Not only was this unsightly, but it was allowing water to reach the wooden seats as well.  I decided to reupholster them as soon as possible and was delighted when I found a set of vintage curtains whose fabric I could reuse, check it out:


**********


Disclosure - This post may contain affiliate links.  If a purchase is made through an affiliate link then (at no additional cost to you) I will receive a commission.  You can read more about affiliate links here


**********

This post shows what the tiled top of the patio set looks like.  I don't think the fabric of the chairs is visible in any of the photos, but at least you can better see the set!


Furniture Restyle

Here is the set of large, vintage JC Penny curtains that I found while thrifting for only $7.99.  I don't know what it's called exactly, but they are made from that fabric that was soft but also waterproof.  That kind that back in the day would always turn ugly yellow when used in public because of everybody smoking, know what I'm talking about?  Well thankfully these came from a non-smoking home and were soft, clean and still bright white!

Also in the picture is a pile of quilt batting that I already had on hand.  Doubled up this makes a nice, soft cushion for the chairs in between the wooden seats and the waterproof fabric.  Because my outer fabric is waterproof, I can get away with this.  If your fabric isn't waterproof and you use batting, your chairs are going to end up as a soggy mess.

If you peek closely at the bottom, right hand corner, you can see a bit of gray wood sticking out from beneath the curtain fabric.  I didn't get a picture of the process but before starting on the fabric I removed the old seats from the chairs, took off the ruined fabric and gave them a coat of paint to seal them from any stray moisture.


Furniture Restyle
Furniture Restyle

I cut the curtain fabric into four large squares and placed it on the floor with the good side of the fabric touching the floor and the bad side of the fabric facing upward.  I then layered quilt batting on top of the fabric's bad side.

Because the curtains were so big, I only needed one for all four of my chairs and was able to be very liberal in my cutting.  If you are short on fabric though, you will want to cut as close as possible to avoid waste.


Furniture Restyle
Furniture Restyle

I then positioned the wooden seats from the chairs on top of the quilt batting and trimmed the batting close to the wood.  I wanted enough batting left that it would cover the edges of the chairs, but not so much that it would be in the way of trying to staple the fabric in place.


Furniture Restyle

Using a staple gun I pulled the fabric tightly and stapled in place, working around until everything was secure and continuing to trim as needed.  Keep in mind here the thickness of your wood and the length of you staples.  If you use staples that are too long they could end up poking through the other side and making a very uncomfortable seat!


Furniture Restyle

After that it was a simple as screwing the newly covered seats back in place and I was all done.

Back to School Teacher Cricut Crafting


**********


This post was featured at:


**********


**********


Friday, July 12, 2024

Fake Bake Decor: Summer Citrus

Fake Bake Tiered Tray Decor

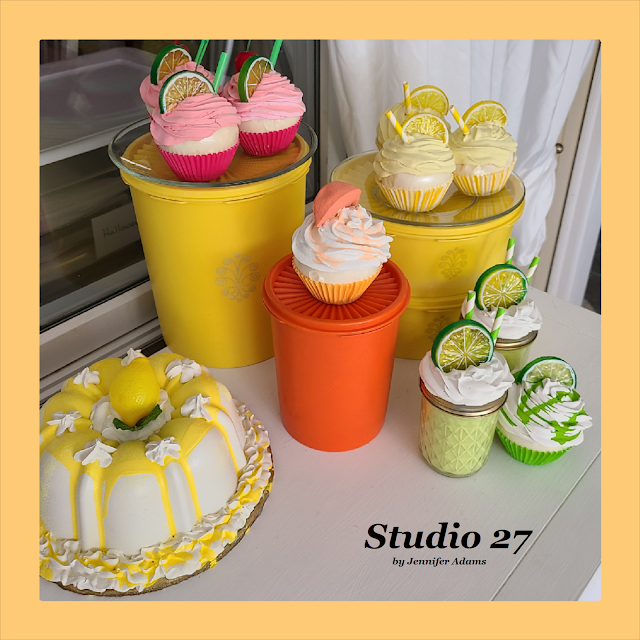
Summer is my busiest fake bake season and I have so many different themes that it seems like I'm changing them out every couple of weeks.  Right now I'm enjoying my citrus collection, check it out:


**********


Disclosure - This post may contain affiliate links.  If a purchase is made through an affiliate link then (at no additional cost to you) I will receive a commission.  You can read more about affiliate links here


**********


Fake Bake Tiered Tray Decor

Starting with the China cabinet, I'll move from left to right for each grouping in the room.  All of the vintage Tupperware pieces have been found while thrifting.


Fake Bake Tiered Tray Decor

The small layer cakes are foam rounds hot glued together and covered in lightweight spackle that I tinted with acrylic paint.  The cupcakes I made like this and the fruit slices can be found here.  You can find the faux raspberries and mandarin oranges here.  The larger orange wedge is a leftover lemon one that I painted in acrylic and the half slices were full slices that I cut apart myself.

The key lime pie printable is no longer available, but you can find the orange cake printable here and the fresh limes printable here.


Fake Bake Tiered Tray Decor

The left side of my buffet contains a tiered tray with sponge cakes, sandwich cookies, a couple of drinks and some more cupcakes.  All of the cupcakes were made as mentioned in the above section with the faux fruits available in the same links.

The sponge cakes are real sponges, cut into smaller sizes, and then sandwiched together with spackle.  The sandwich cookies are clay using this mold, painted with acrylic and combined with lightweight spackle.  The drinks I made like this and the orange grove printable can be found here.


Fake Bake Tiered Tray Decor

The right side of the buffet holds more cupcakes, a couple of more drinks and a Bundt cake that I made like this.

**********

And that's my summer citrus collection of fake bakes!


I hope you enjoyed this fake bake post, thanks for stopping by!
-Jennifer

© Studio 27 by Jennifer Adams 2024


**********
Do you like the convenience of crafting with instantly available digital downloads?
Check out this week's features from my Etsy shop:


**********

Classroom Activity Printable

**********

Back To School Cricut Crafting

**********

This post was featured at: