Friday, September 13, 2024

House Gnomes: Front Room

Miniature Decor

Welcome back to the tour of my miniature rooms, today I'm sharing the front room shadow box:


**********


Disclosure - This post may contain affiliate links.  If a purchase is made through an affiliate link then (at no additional cost to you) I will receive a commission.  You can read more about affiliate links here


**********


Miniature Decor

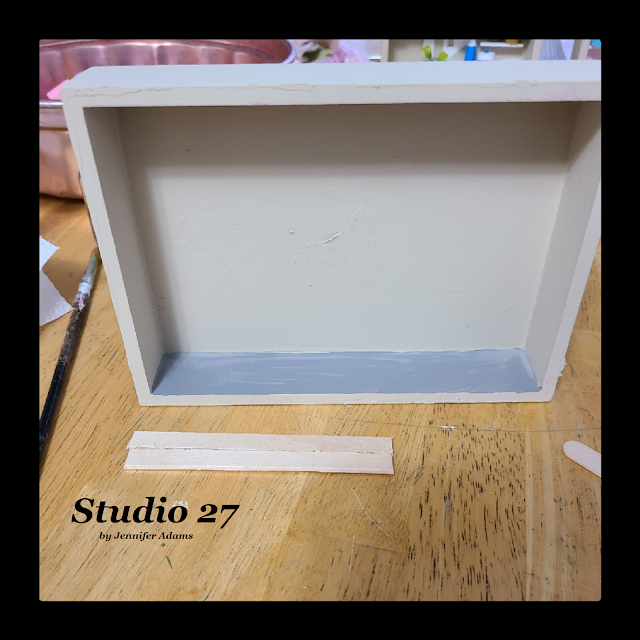
Starting with a thrifted shadow box I repainted it with beige walls and a gray floor.  This miniature laundry room post will take you through those steps in more detail.


Miniature Decor

I've been making each miniature room reflect the furniture and decor of the rooms that they are being placed in, so my front room box features my desk area.  I used craft sticks and hot glue to create a small table...


Miniature Decor

...then painted it white and glued it into the box.


Miniature Decor
Miniature Decor

I needed a box of some sort to serve as my computer screen and painted this Barbie pet food box in solid black.  After gluing it to the table I painted the keyboard on the table top.


Miniature Decor

With the basics in place I then accessorized with buttons, empty thread spools and plants.  The basket is a Barbie accessory and the pots all Barbie containers that I painted in gold before gluing in bits of faux greens.  The mirror is a frame sticker where I kept the sticker backing paper in place inside of the frame and colored it gray to represent the mirror surface.  I always have a jar of dark chocolates on my desk in real life so a tiny Barbie container worked here as well 😊

And that's my miniature front room.

**********

Want to see more?

**********

I hope you enjoyed this how-to miniature post, thanks for stopping by!
-Jennifer

© Studio 27 by Jennifer Adams 2024


**********

Do you like the convenience of crafting or organizing with instantly available digital downloads?
Check out this week's features from my Etsy shop:


Fake Bake Tiered Tray Fall Decor


**********
Fall Cricut Crafting

**********

Are you thinking of starting a blog or a seasoned author who wants to get organized?  This 115 page printable bundle is for you!  I created these pages for my own use and found them so helpful I thought I should make them available for other bloggers as well.  Click the link below the image to read the full item description.

Blog Planning and Organization

Friday, September 6, 2024

DIY Faux Pumpkin Plant With Dollar Tree Foam Pumpkins

Dollar Tree Pumpkin

With September here it's time to start crafting our fall decor.  Take a look at how easily you can put together your own faux potted pumpkin plant:


**********


Disclosure - This post may contain affiliate links.  If a purchase is made through an affiliate link then (at no additional cost to you) I will receive a commission.  You can read more about affiliate links here


**********


Dollar Tree Pumpkin
Dollar Tree Pumpkin

Starting with this thrifted bucket that I found for $1.99, I stuffed the bottom with newspaper to make it less deep.


Dollar Tree Pumpkin

On top of the newspaper I settled a round bit of foam with glue on the bottom.  Since it was a recycled bit of foam it already had a few tiny holes, but that's no problem as they won't be seen.  I used a screwdriver to add in a couple of larger holes to create a holder for my greens.

If your plant is going to be top heavy, you can always put something weighty like rocks underneath your foam to keep the plant from tipping over.


Dollar Tree Pumpkin

First coating the handle of the faux bushes with glue, I then pushed them into the foam holes.


Dollar Tree Pumpkin

I used two bunches of greens for this planter.  They also were thrifted and had a few sticks with missing leaves here and there - no problem, just snip those off.


Dollar Tree Pumpkin

The artificial greens covered up most of the foam, but I added in a bit of moss to fill out the container.  Just tuck the handfuls in here and there around the base of your greens until you feel the foam is covered enough.  I like to put a bit of glue on the foam first to keep the moss from shifting around as much.


Dollar Tree Pumpkin
Dollar Tree Pumpkin

Next using wooden dowels and foam pumpkins (both Dollar Tree), I glued a wooden dowel into the base of each pumpkin.


Dollar Tree Pumpkin

Then adding a bit more glue to the remaining end of the dowel, I inserted the dowels into the foam of the planter.

I want to point out here that the stems of my pumpkins are visible as I intentionally placed the dowels on the bottoms of the gourds.  In nature each pumpkin is going to be attached to it's plant by it's stem, not it's bottom.  But since I liked how the pumpkins looked better with their stems up, I went ahead a broke the rules 😋


Dollar Tree Pumpkin

And there you have it, a faux potted pumpkin!  This plant is great for fall decor, but I actually keep mine in my 'garden shed' with the rest of my fake fruit and vegetable plants.  You can see that shed in this post.


Do you like the convenience of crafting or organizing with instantly available digital downloads?
Check out this week's features from my Etsy shop:

Fake Bake Tiered Tray Decor

**********

Fall Cricut Crafting

**********

Are you thinking of starting a blog or a seasoned author who wants to get organized?  This 115 page printable bundle is for you!  I created these pages for my own use and found them so helpful I thought I should make them available for other bloggers as well.  Click the link below the image to read the full item description.

Blogger Printables

**********

This post was featured at: