Showing posts sorted by relevance for query snack cabinet. Sort by date Show all posts

Friday, May 1, 2026

Upgrading the Faux Snack Cabinet

Fake Bakes

In our family room is a "snack cabinet" where I keep my collection of lunch/dinner and snack type fake bakes.  I had been wanting to upgrade the cabinet for awhile when I finally found the piece that would work perfectly, check it out:


**********


Disclosure - This post may contain affiliate links.  If a purchase is made through an affiliate link then (at no additional cost to you) I will receive a commission.  You can read more about affiliate links here


**********


Fake Bakes

Here is the cabinet before, a bookshelf with picture frames attached to make it enclosed.  The frames didn't quite cover the opening so a length of ribbon kept out the dust.  The shelf worked to keep everything in place and clean while I kept my eye out for another option.


Fake Bakes

I took a photo after removing the frames so you could see inside better, 
this post will give you more of a tour.


Fake Bakes

At one of my trips to the local thrift store I found this cabinet for $40.  The height, width and depth of the top part were perfect and I liked that it had actual glass doors.


Fake Bakes

Another bonus?  The top glass cabinet could easily be separated from the bottom drawer set.  Though it was lovely together, it was too tall for what I wanted.


Fake Bakes

It took a little doing, but I was able to remove the top from the drawers.  The wide, flat base makes it perfect to sit on the floor without having to vacuum underneath every week 😉

I didn't need the drawers for anything, so I put those out next to our curb as a freebie for whoever wanted them.


Fake Bakes

After cleaning, sanding and painting, I moved the new piece into place. It already looks better!


Fake Bakes

Here it is with the door reattached and everything in place.  I like that it is both wider and taller, as well as sturdier looking.  And that's how I upgraded my faux snack cabinet!


Friday, February 20, 2026

Fake Bake Modelite McMuffins and Sandwich

Faux Food Decor

I went through the drive through at breakfast and decided that I ought to make up some fake bake McMuffins and a small sandwich.  Here's how I did it:


**********


Disclosure - This post may contain affiliate links.  If a purchase is made through an affiliate link then (at no additional cost to you) I will receive a commission.  You can read more about affiliate links here


**********

Faux Food Decor
Faux Food Decor

For this project I used Modelite foam clay and the Wilton Winter cookie cutter set.  I liked the small size of the circle and really wanted to see how the hat shape would look as a slice of bread 😄


Faux Food Decor

Sometimes the Modelite can get stuck in the cookie cutters.  When this happens I take another small bit and stick it to the back of my shape.  Gently pull and the whole thing will come out.  You might have to clean up your shape a little, but it will be free of the cutter!  Another option, if you have the time, is to put the cutter into the freezer.  Once frozen your shape will be easy to remove.


Faux Food Decor
Faux Food Decor

Using a clay tool I added markings to look like a meat patty.


Faux Food Decor
Faux Food Decor
Faux Food Decor

All of the McMuffin parts were from the round cutter, but for the sandwich I used both the round and the snowman's hat.  The round worked for the lunchmeat and the lettuce (I squished it out a little) while the hat made a cute slice of bread.


Faux Food Decor

Once dry I painted the pieces with acrylic paint; Real Brown, Crisp Green, Golden Yellow, Lite Mocha and Cameo Pink.


Faux Food Decor

The McMuffin pieces.


Faux Food Decor

The sandwich pieces.


Faux Food Decor

The McMuffin I added to my breakfast cabinet, which you can see here


Faux Food Decor
Faux Food Decor

And the sandwich I tucked in with my snack cabinet.  You can see the snack cabinet here or read about the stacked burger (also in picture) here.

And that's how I made my fake bake McMuffins and sandwich!

**********

Interested in more fake bake crafts?
I've gathered all of my tutorials and collections into this resource page.

**********

I hope you enjoyed this how-to post, thanks for stopping by!
-Jennifer

© Studio 27 by Jennifer Adams 2026


**********

This post was added to the following link parties:


**********

Do you like the convenience of crafting or organizing with instantly available digital downloads?
Check out this week's features from my Etsy shop:


**********


Are you thinking of starting a blog or a seasoned author who wants to get organized?  This 115 page printable bundle is for you!  I created these pages for my own use and found them so helpful I thought I should make them available for other bloggers as well.  Click the link below the image to read the full item description.


Blog Organization

**********

This post was featured at:


**********

Friday, December 5, 2025

Fake Bake Stacked Burger

Fake Food Decor

I had an idea for a faux stacked burger and wanted to give it a try.  Here is how it turned out:


**********


Disclosure - This post may contain affiliate links.  If a purchase is made through an affiliate link then (at no additional cost to you) I will receive a commission.  You can read more about affiliate links here


**********


Fake Food Decor
Fake Food Decor

I kept things really simple and only used two cookie cutters to create all of my shapes with Crayola Model Magic.


Fake Food Decor
Fake Food Decor

For the burger patties I poked little holes all over the place using a Dollar Tree clay tool.


Fake Food Decor
Fake Food Decor

For the lettuce I cut the sides in jagged lines and then ran over the whole piece with a Wilton fondant tool.


Fake Food Decor

Here is how the lettuce looked afterward.  I focused on the edges because that's what will be visible when constructed.


Fake Food Decor

Here are the shapes that I ended up with; square cheese, round smooth for the buns, round distressed for the patties, and round cut/ distressed for the lettuce.


Fake Food Decor

Using acrylic paint I colored my pieces like this:

Classic Caramel - Buns
Apricot - Cheese
Chocolate Bar - Burger Patties
Kelly Green - Lettuce


Fake Food Decor

When everything was dry (I used two coats) I hot glued the stack together like this.  Now the faux burger is part of my snack cabinet, which you can see in this post.

And that's how I made my faux burger!


**********

Interested in more fake bake crafts?
I've gathered all of my tutorials and collections into this resource page.

**********

I hope you enjoyed this how-to post, thanks for stopping by!
-Jennifer

© Studio 27 by Jennifer Adams 2025


**********

This post was added to the following link parties:


**********

Do you like the convenience of crafting or organizing with instantly available digital downloads?
Check out this week's features from my Etsy shop:


**********


Are you thinking of starting a blog or a seasoned author who wants to get organized?  This 115 page printable bundle is for you!  I created these pages for my own use and found them so helpful I thought I should make them available for other bloggers as well.  Click the link below the image to read the full item description.


Blog Organization

Friday, February 10, 2023

New House Makeover: Family Room

 Home Decor

It's now February 2023 and I'm still working my way through the new house makeover series!

Read on to see the family room before and after:


**********


Disclosure - This post may contain affiliate links.  If a purchase is made through an affiliate link then (at no additional cost to you) I will receive a commission.  You can read more about affiliate links here

**********

If you have missed any of the other new house room tours, you can check out these links:


**********

Now on to the family room:


Home Decor
Home Decor

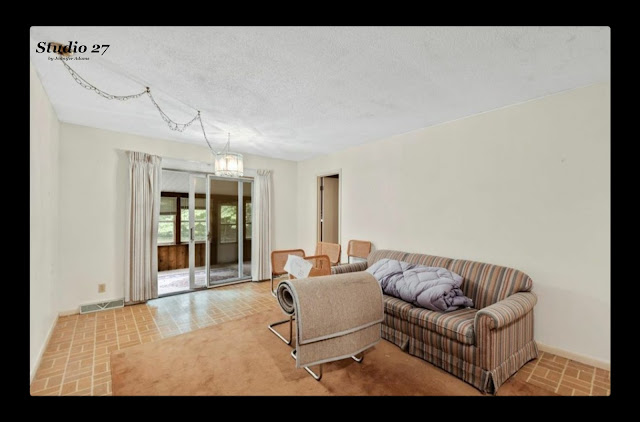
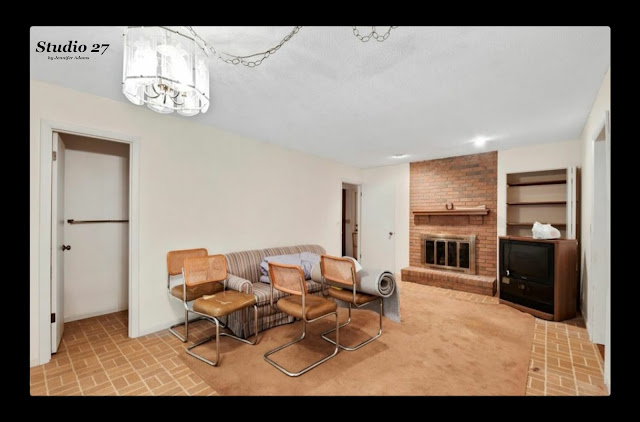
These listing photos show the family room as it was when we purchased the house and contain some of the previous owner's furniture.  We ended up repainting the walls beige, the brick fireplace surround white, having carpet put in and swapped out the hanging light for a ceiling fan.


Home Decor

This photo is from right after we moved in.  Tons of things had been completed but we still had to have plastic down to protect the carpeting.  I like things neat and tidy, so for me it was a nightmare!  Husband and kids were just happy to have a fireplace though 😁

**********

And here are the after photos:

Home Decor

Because the family room opens into the craft studio, lots of light comes in throughout the day.  Having the glass doors means I keep the studio picked up as well, since any mess can be seen.  The curio cabinet we've had forever and I repainted it a few of years ago.  Behind the couch you can kind of see a decorative piece of wood.  That's the headboard from the crib that both of my children used.  I repainted it white, added a Cricut decal in gold vinyl and positioned it behind the couch.  The very first photo at the top of this post gives you a better look at the headboard.


Home Decor

The TV stand is a thrifted buffet that I refinished. The coffee table used to be darker oak and black wrought iron until I refinished that as well.


Home Decor

 I opted to remove the doors from the small closet and put up a curtain instead.  I like the softness of it and it makes it easier to grab extra blankets/ pillows and still have the chair there.  The chair has a really dark fabric but the slipcover lightens it up nicely.  I love furniture slipcovers because I can pull them off and run them through the laundry as needed.  Since this photo was take I put a matching cover on the couch as well.


Home Decor

Here is a nice shot at night, just because I though it was cozy!  The deer skull that you see in this room is named Herschel and below that is a cabinet where I display my faux snack foods.  You can see inside the cabinet in this post.